MetaWear Guide Series Part 3
Connecting to your Board
This is part 3 of a multipart series showing you how to get started with the MetaWear platform. View the contents of the series to easily skip forwards or backwards
Binding the Service
For us to interact with the MetaWear board, we need to bind the Bluetooth service in our application and keep a reference to it. This is one of the more confusing parts of working with the MetaWear platform, and we’ll continue to explore it as the series unfolds. For now, in your MyActivity.java file replace the code with the following:
package com.christophergs.metawearguide; //update to your package details

import android.app.Activity;
import android.support.v7.app.AppCompatActivity;
import android.os.Bundle;
import android.view.Menu;
import android.view.MenuItem;
import android.content.*;
import android.os.IBinder;

import com.mbientlab.metawear.MetaWearBleService;

public class MyActivity extends AppCompatActivity implements ServiceConnection {

    private MetaWearBleService.LocalBinder serviceBinder;

    @Override
    protected void onCreate(Bundle savedInstanceState) {
        super.onCreate(savedInstanceState);
        setContentView(R.layout.activity_my);

        ///< Bind the service when the activity is created
        getApplicationContext().bindService(new Intent(this, MetaWearBleService.class),
                this, Context.BIND_AUTO_CREATE);
    }

    @Override
    public void onDestroy() {
        super.onDestroy();

        ///< Unbind the service when the activity is destroyed
        getApplicationContext().unbindService(this);
    }

    @Override
    public void onServiceConnected(ComponentName name, IBinder service) {
        ///< Typecast the binder to the service's LocalBinder class
        serviceBinder = (MetaWearBleService.LocalBinder) service;
    }

    @Override
    public void onServiceDisconnected(ComponentName componentName) { }

}
The ServiceConnection we are implementing in this code is defined as:
[An] Interface for monitoring the state of an application service
This means that any Android activity or fragment where you want to access your MetaWear board will need access to the service connection created in the code above.
Logging
Before we go any further, let’s make sure we have a way to log what we are doing. We will need this a lot.
import android.util.Log;, then declare a constant to identify our logs:
private static final String TAG = "MetaWear";
Let’s run a quick test in the onCreate method:
@Override
    protected void onCreate(Bundle savedInstanceState) {
        super.onCreate(savedInstanceState);
        setContentView(R.layout.activity_my);

        ///< Bind the service when the activity is created
        getApplicationContext().bindService(new Intent(this, MetaWearBleService.class),
                this, Context.BIND_AUTO_CREATE);

        Log.i(TAG, "log test"); //ADD THIS
    }

//code continues...
For those new to Android, here we are logging at the “info” level, hence Log.i and we add a description tag to our log so that we can easily filter the logs and find them. To check this is working, run the app and then filter your logcat by the “METAWEAR” term:
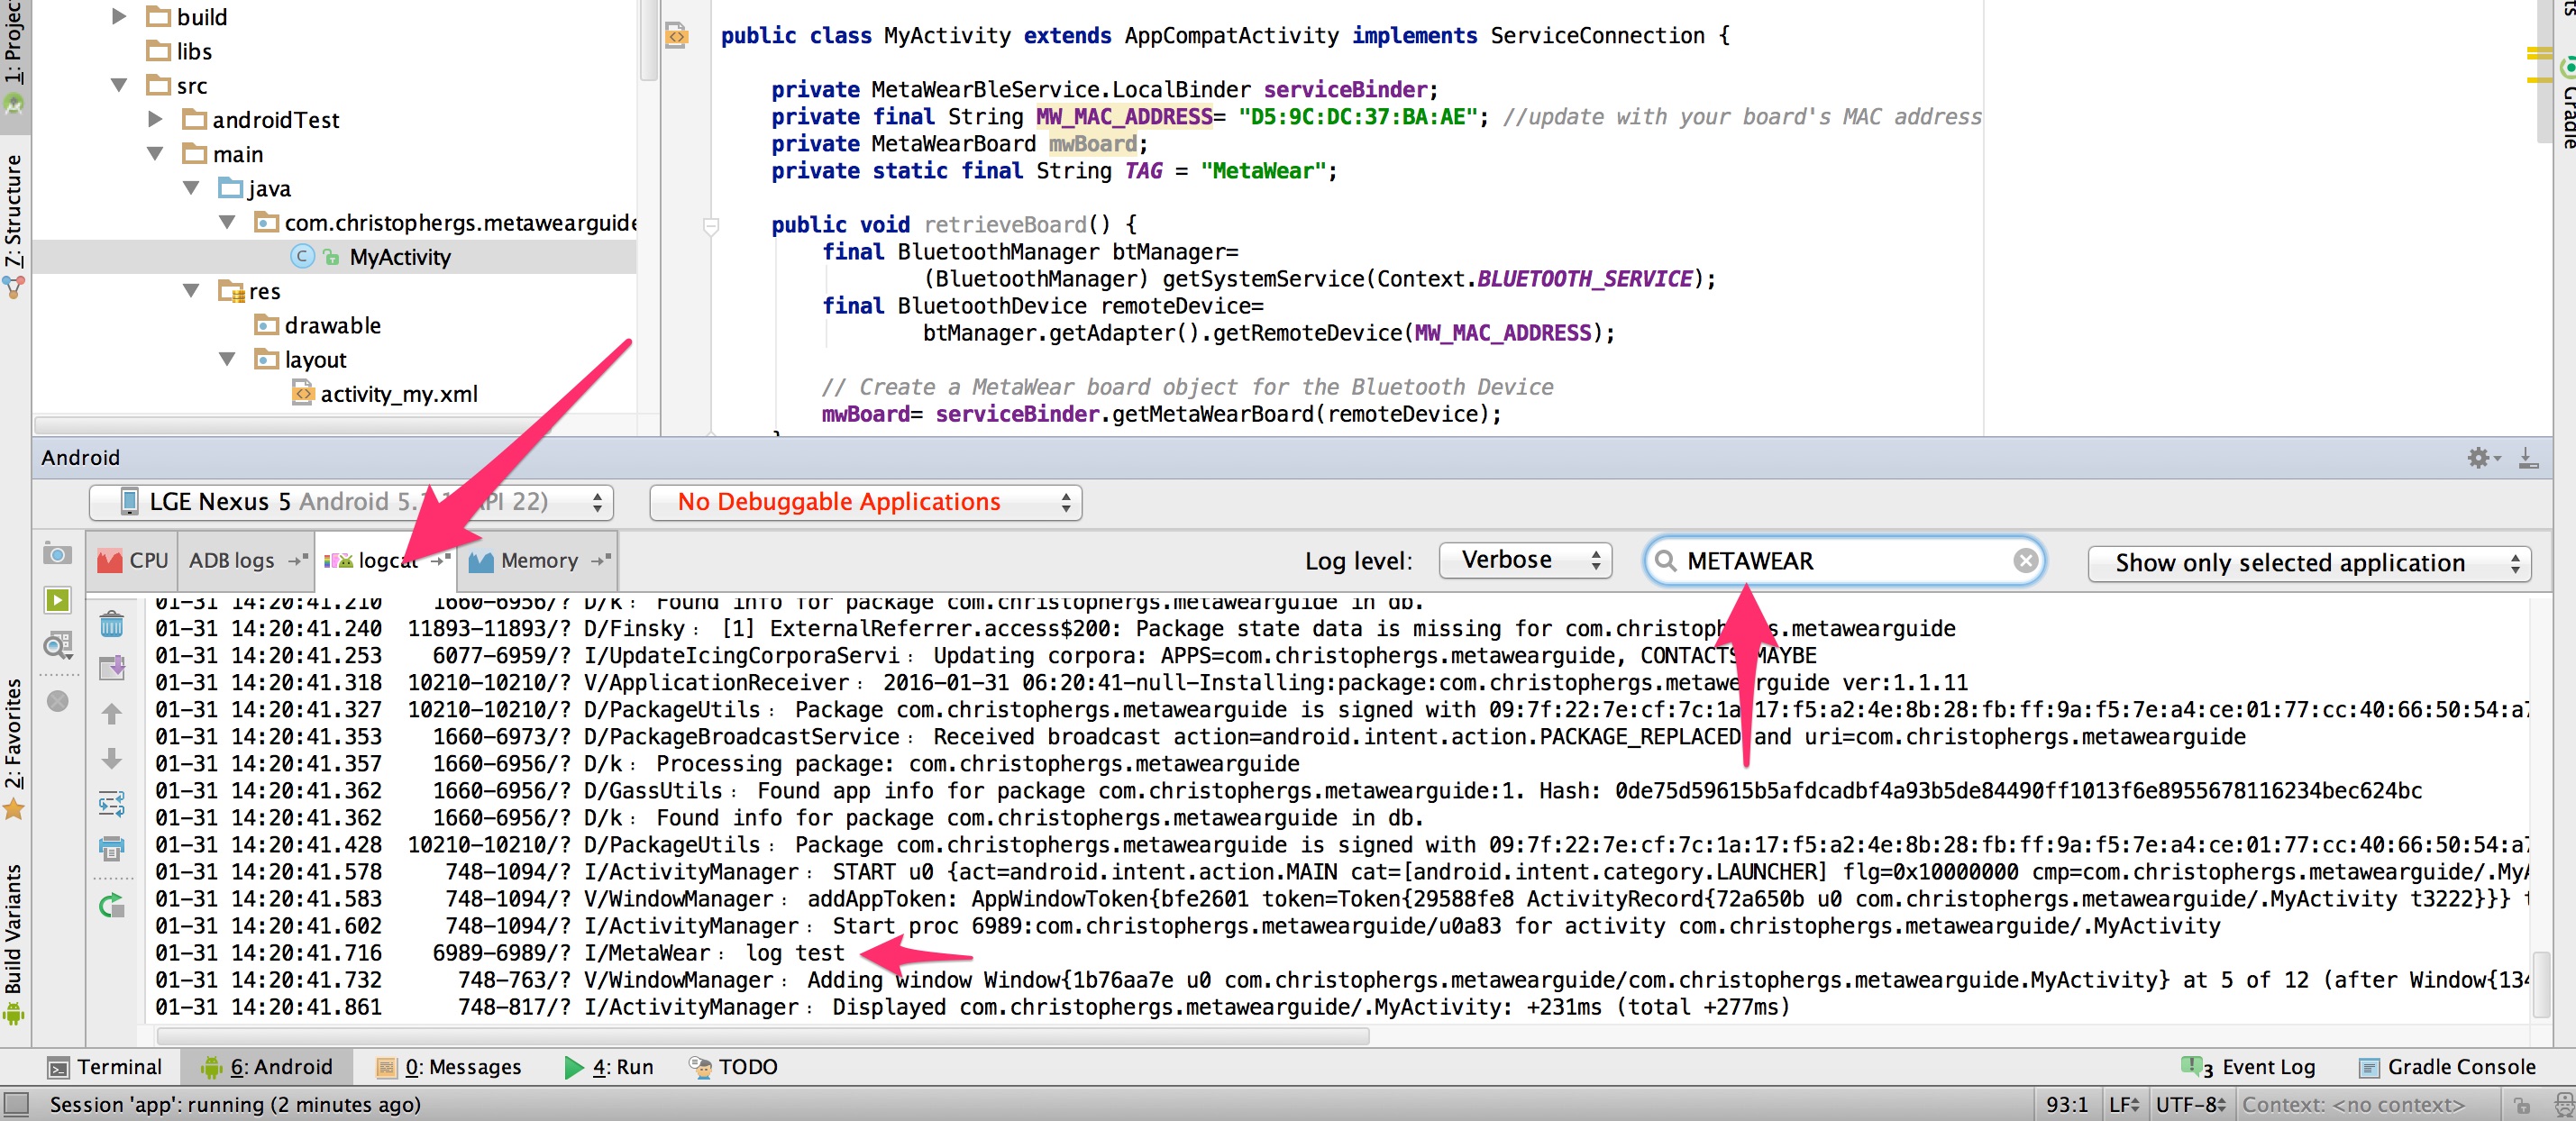
Without this filter, the logs will be too noisy to be much use.
Connecting to the Board
The MetaWearBoard class is the central class for communicating with your MetaWear board. To start with, we will connect to our board using the MAC address. For simplicity, use the MetaWear official app to lookup your board’s MAC address (it should in a format like “D5:9C:DC:37:BA:AE”)
We add our Bluetooth imports:
import android.bluetooth.BluetoothDevice;
import android.bluetooth.BluetoothManager;
Then declare our variables in our MyActivity class
private final String MW_MAC_ADDRESS= "D5:9C:DC:37:BA:AE"; //update with your board's MAC address
private MetaWearBoard mwBoard;
However, we can’t connect to the board without setting up a mechanism for managing the connection state. Notifications about the connection state are handled by the ConnectionStateHandler class. You register a handler by calling setConnectionStateHandler.
We’ll need a few more imports to make this work:
import static com.mbientlab.metawear.MetaWearBoard.ConnectionStateHandler;
import static com.mbientlab.metawear.AsyncOperation.CompletionHandler;
So we add the following to our MyActivity class:
private final ConnectionStateHandler stateHandler= new ConnectionStateHandler() {
        @Override
        public void connected() {
            Log.i(TAG, "Connected");
        }

        @Override
        public void disconnected() {
            Log.i(TAG, "Connected Lost");
        }

        @Override
        public void failure(int status, Throwable error) {
            Log.e(TAG, "Error connecting", error);
        }
    };
Now that we have created the handler, we need to pass the handler to our board object. To do this, we create a retrieveBoard method (note that this is still within the activity):
public void retrieveBoard() {
    final BluetoothManager btManager=
            (BluetoothManager) getSystemService(Context.BLUETOOTH_SERVICE);
    final BluetoothDevice remoteDevice=
            btManager.getAdapter().getRemoteDevice(MW_MAC_ADDRESS);

    // Create a MetaWear board object for the Bluetooth Device
    mwBoard= serviceBinder.getMetaWearBoard(remoteDevice);
    mwBoard.setConnectionStateHandler(stateHandler);
}
Notice how this function is seeking out the board with the MAC address and then passing that same board the state handler. We should now call the retrieveBoard function inside the onServiceConnected method.
@Override
    public void onServiceConnected(ComponentName name, IBinder service) {
        ///< Typecast the binder to the service's LocalBinder class
        serviceBinder = (MetaWearBleService.LocalBinder) service;
        retrieveBoard();
    }
Now we have setup our connection state handler, we’ve retrieved the board based on its MAC address, the last thing we need to do is actually connect to it. For this, we’ll add a simple button to our app, and then add an onClick listener to this button to trigger the connection. If you’ve ever worked with Javascript, the onClick principle is very similar.
Open up the activity_my.xml file and inside the RelativeLayout tag add the button with xml:
<Button
        android:layout_width="wrap_content"
        android:layout_height="wrap_content"
        android:text="Connect"
        android:id="@+id/connect"
        android:layout_centerVertical="true"
        android:layout_centerHorizontal="true" />
You’ll also notice the Hello World TextView above the button. We may as well remove that. If you’re new to Android, play around with the text displayed by adjusting the values found in the values/strings.xml file.
<TextView android:text="@string/hello_world" android:layout_width="wrap_content"
        android:layout_height="wrap_content"
        android:id="@+id/textView" />
Now when we run the app, we should see the button. But it won’t do anything yet. Let’s declare our button with our other variable declarations: private Button connect;
Then add an onClick listener inside our onCreate method. This is what it looks like:
@Override
protected void onCreate(Bundle savedInstanceState) {
super.onCreate(savedInstanceState);
setContentView(R.layout.activity_my);
///< Bind the service when the activity is created
getApplicationContext().bindService(new Intent(this, MetaWearBleService.class),
this, Context.BIND_AUTO_CREATE);
Log.i(TAG, "log test");
connect=(Button)findViewById(R.id.connect);
connect.setOnClickListener(new View.OnClickListener() {
@Override
public void onClick(View v) {
Log.i(TAG, "Clicked connect");
mwBoard.connect(); //.connect() and .disconnect() are how we control connection state
}
});
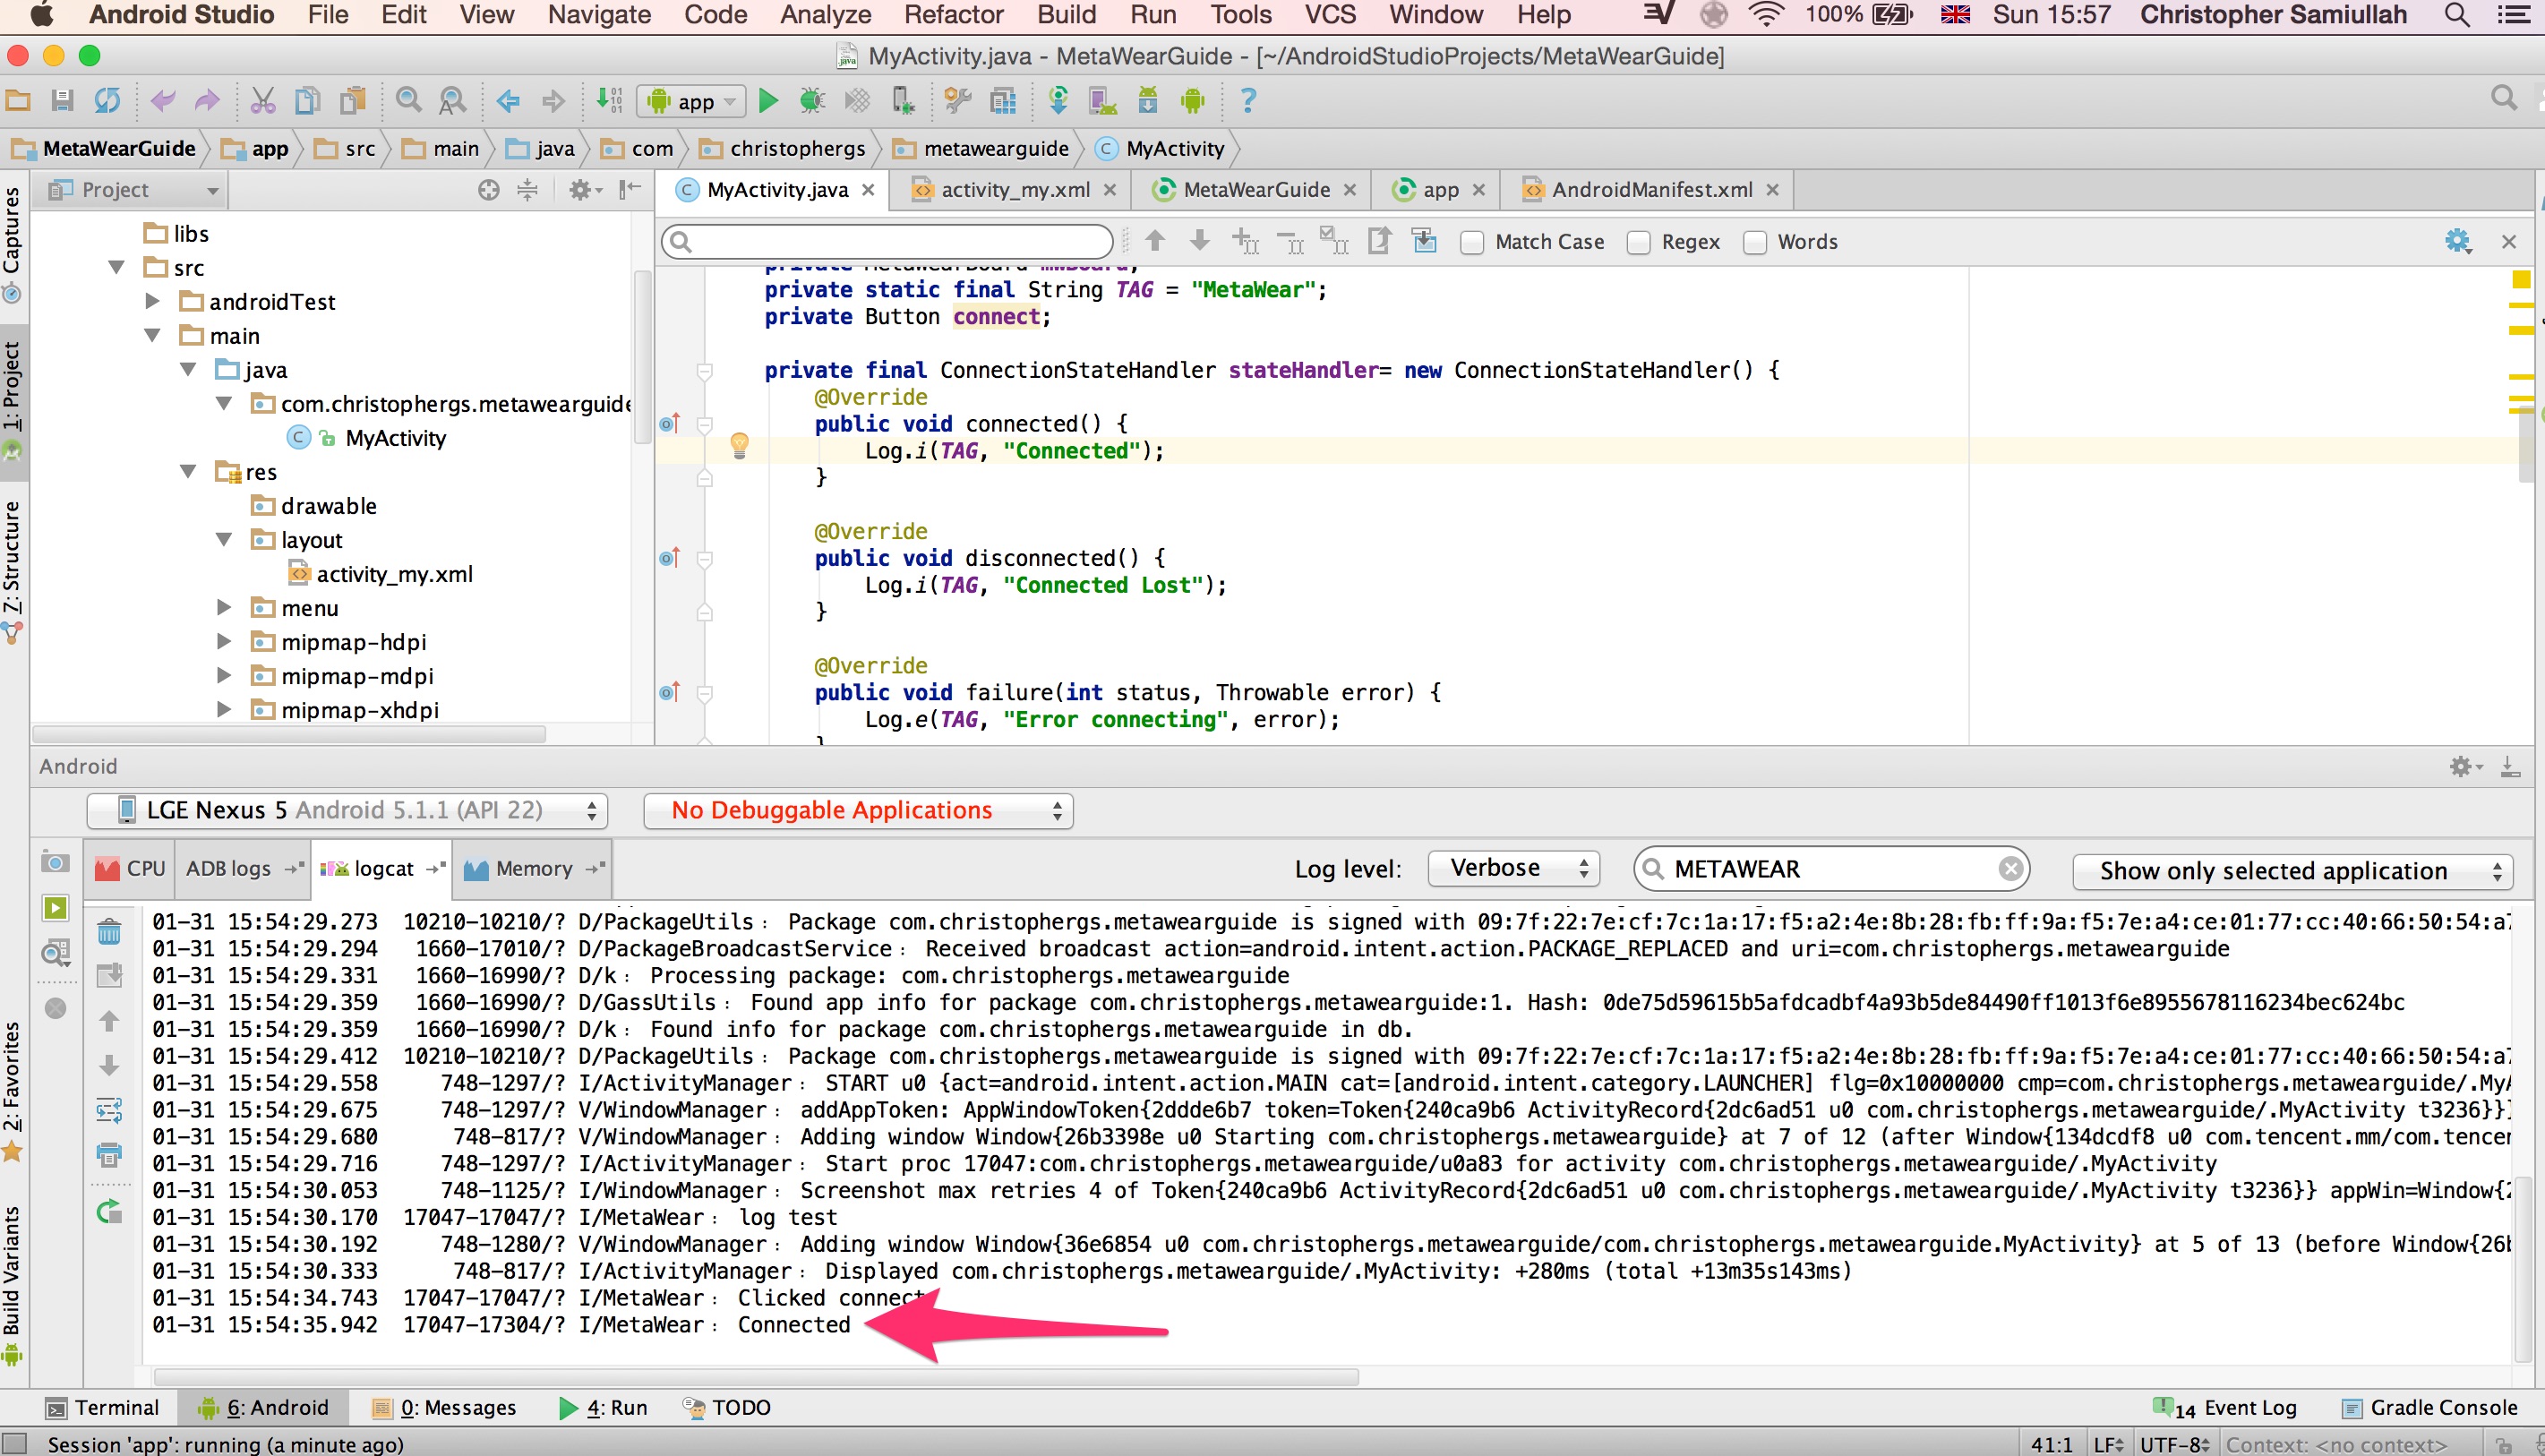
}Go ahead and run the app. When you press the connect button, your logs should first tell you that you have clicked the button, and then show “connected”. If you have a problem connecting, be sure to try the following:
- If you had previously paired with the device close any apps and programs that were paired to it and toggle the bluetooth radio on these devices on and off.
- If this is your first time pairing this device make sure that your device is charged
- Make sure that you have a device that supports bluetooth 4.0.
Good stuff! Now that we’ve connected to our board, we are ready to start playing with its different sensors. Check out part four to see this.
Note You can view all these changes in the github repository on the branch version-0.2