The Ultimate FastAPI Tutorial Part 12 - Setting Up a React Frontend
In part 12 of the FastAPI tutorial, we'll look at setting up a React frontend
Introduction
Welcome to the Ultimate FastAPI tutorial series. This post is part 12. The series is a project-based tutorial where we will build a cooking recipe API. Each post gradually adds more complex functionality, showcasing the capabilities of FastAPI, ending with a realistic, production-ready API. The series is designed to be followed in order, but if you already know FastAPI you can jump to the relevant part.
Code
Project github repo directory for this part of the tutorial
Tutorial Series Contents
Optional Preamble: FastAPI vs. Flask
Beginner Level Difficulty
Part 1: Hello World
Part 2: URL Path Parameters & Type Hints
Part 3: Query Parameters
Part 4: Pydantic Schemas & Data Validation
Part 5: Basic Error Handling
Part 6: Jinja Templates
Part 6b: Basic FastAPI App Deployment on Linode
Intermediate Level Difficulty
Part 7: Setting up a Database with SQLAlchemy and its ORM
Part 8: Production app structure and API versioning
Part 9: Creating High Performance Asynchronous Logic via async def and await
Part 10: Authentication via JWT
Part 11: Dependency Injection and FastAPI Depends
Part 12: Setting Up A React Frontend
Part 13: Using Docker, Uvicorn and Gunicorn to Deploy Our App to Heroku
Part 14: Using Docker and Uvicorn to Deploy Our App to IaaS (Coming soon)
Part 15: Exploring the Open Source Starlette Toolbox - GraphQL (Coming soon)
Part 16: Alternative Backend/Python Framework Comparisons (i.e. Django) (Coming soon)
Post Contents
Theory Section - How Frontends Interact with FastAPI
Practical Section 1 - Setting Up React Create App
Practical Section 2 - Calling FastAPI from the Frontend
Practical Section 3 - React Auth with FastAPI and JWTs
Practical Section 4 - FastAPI Updates
![]()
Theory Section - How Frontends Interact with FastAPI
So far in this tutorial series we’ve only interacted with our API via the Open API (swagger) UI, and by serving a fairly limited Jinja2 template. If your system is all backend microservices, then this is fine. However, if you’re looking to serve a more complex frontend then you’ll probably want to leverage a modern JavaScript framework like:
Whilst each of these frameworks has their pros and cons, their typical interaction with FastAPI is quite similar.
Here is a rough architecture diagram:
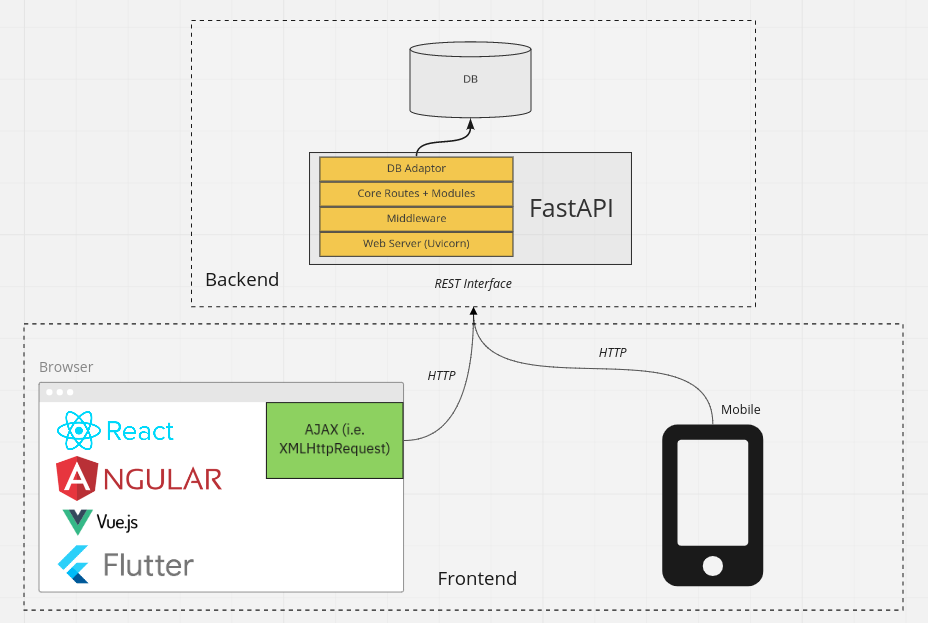
As shown in the diagram, the fundamental way the frontend frameworks interact with the backend is by making HTTP calls via AJAX. The typical interface to the backend is a REST API
A variation on this architecture would be a GraphQL approach, but that is not what we will focus on in this post.
You could implement the backend in any language (node, PHP, Java…any language that can create a web server), but since this is a FastAPI tutorial, the Python choice is made for us :)
Since React is the most popular of the modern frontend frameworks, this is the one I have chosen to use for the tutorial series. Whilst this isn’t a series on React, I will cover it in enough detail to give a meaningful example of how it would work with FastAPI - so I’m including common requirements like auth, and including multiple pages and components. My idea here is that if you combine this tutorial with other dedicated React tutorials (I recommend the getting started docs), you’ll be able to put together all the pieces you need for interaction across the full stack.
Note, we’ll look at deployment of both the front and backends later in the tutorial series.
Practical Section 1 - Setting Up React Create App
If you’re not familiar with React then I suggest checking out the very approachable docs. The key thing to note here is that the create-react-app package we’re making use of is an officially supported tool that simplifies React apps:
Create React App is an officially supported way to create single-page React applications. It offers a modern build setup with no configuration.
Under the hood, React relies on:
- webpack: a static module builder
- babel: a JavaScript compiler mainly used to convert ECMAScript 2015+ code into a backwards compatible version of JavaScript)
- ESLint: A powerful code linter
Each of these usually requires configuring, and it can be a painful hurdle for those unfamiliar with the ecosystem. Create React App basically
sets sensible defaults for you so you can skip all that setup. At any point you can call the eject command (which is irreversible) and then all
the underlying config files are revealed so you can customize them. Given this simplification, it’s a great tool for when you are starting out, and
it offers flexibility as your app grows in complexity.
Setting Up the Project Structure
You’ll notice that in part 12 of our project repo we have a
new frontend directory where all React code will be. To get started, cd into this directory then install the dependencies:
- Note that
create-react-apprequires NodeJS 14+ - Run
npm installin the directory where yourpackage.jsonfile is located (this lists our dependencies) - To start the React app run
npm start
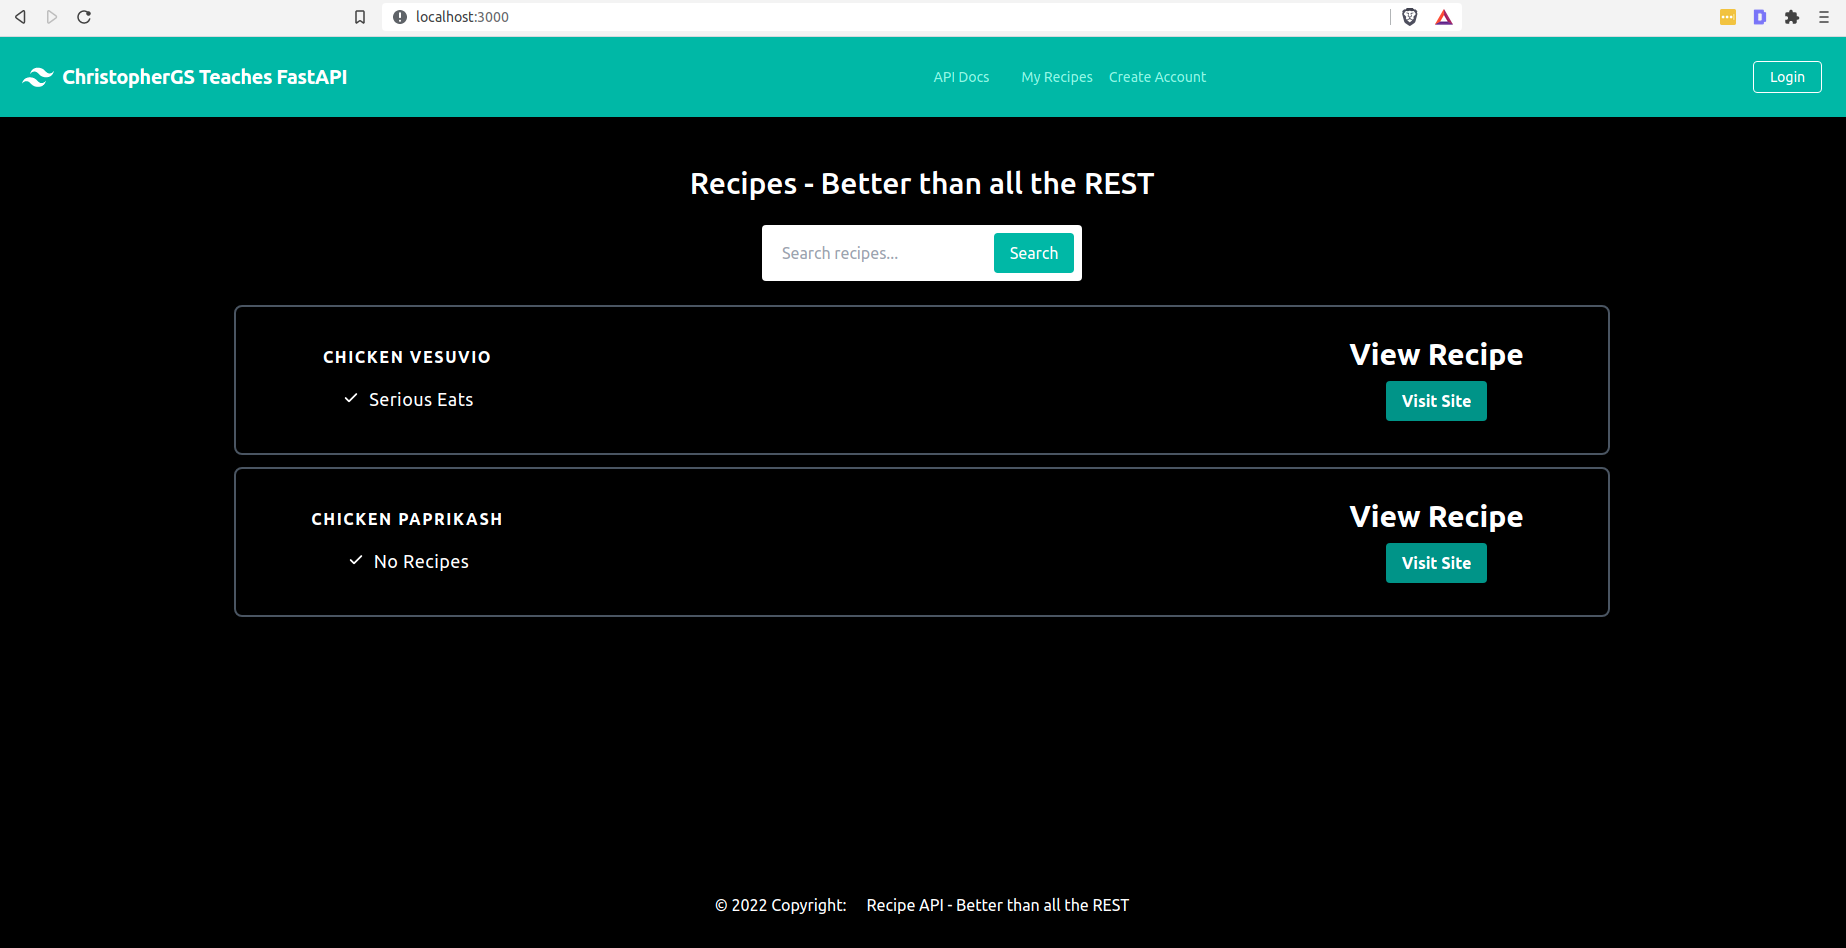
Your app will start, and if you then navigate over to http://localhost:3000/ you should see this:
Terminal/CMD Prompt:

localhost:3000
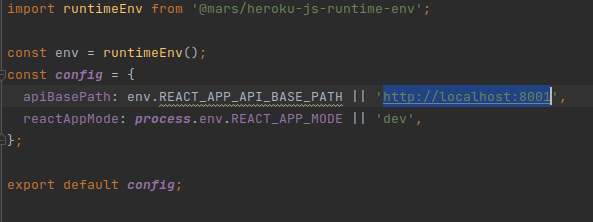
At the moment the recipes are being fetched from an externally running version of our FastAPI app (which is deployed
using the method we’ll explore in the next part of this tutorial series). This API is specified in our frontend/config.js file
under the REACT_APP_API_BASE_PATH setting. However, to test everything locally we’ll want to update this value to be our
running backend application: http://localhost:8001. Obviously we’ll first have to start up our backend app, as we have
done in the previous entries in the tutorial series.
Before we hook up the local backend, let’s inspect our frontend structure:
part-12-react-frontend/frontend/src
.
├── App.css
├── App.js
├── client.js
├── components
│         ├── Button
│         │         └── Button.jsx
│         ├── DashboardHeader
│         │         ├── index.jsx
│         ├── Footer
│         │         ├── index.jsx
│         ├── FormInput
│         │         └── FormInput.jsx
│         ├── Idea
│         │         └── index.jsx
│         ├── IdeaTable
│         │         └── index.jsx
│         ├── Loader.jsx
│         ├── Modal
│         │         └── PopupModal.jsx
│         ├── Recipe
│         │         └── index.jsx
│         └── RecipeTable
│             └── index.jsx
├── config.js
├── index.css
├── index.js
├── pages
│         ├── error-page
│         │         └── index.jsx
│         ├── home
│         │         └── index.jsx
│         ├── ideas
│         │         ├── index.jsx
│         ├── login
│         │         └── index.jsx
│         ├── my-recipes
│         │         ├── index.jsx
│         │         └── NotLoggedIn.jsx
│         └── sign-up
│             ├── index.jsx
This is a pretty standard structure:
pagesare our main “containers” of HTML, representing different pages on the site as the name impliescomponentsare the building blocks which make up these pages, such as forms, buttons, tables and modals.App.jsis where we set up the routing logic which assigns page React functions to a particular url of the site.
We’ll get to the more advanced parts (like client.js a little further on in this post).
Sidebar: What is JSX?
You’ll notice that all of our page and component files have a .jsx extension. This is called JSX, and it is a syntax
extension to JavaScript. The React docs recommend using it to describe what the
UI should look like. JSX may remind you of a template language, but it comes with the full power of JavaScript.
Sidebar: What’s With All the ClassNames - Tailwind CSS
Within the .jsx files we’re styling the HTML with Tailwind CSS (this is what
all the className="flex items-center justify-center type of lines are about) which
has gained popularity over the past few years due to its ease of use, especially for responsive design.
Sidebar: React Hooks
Hooks were added in React 16.8. If you wrote React before this update and
you’re now looking at this tutorial, you might be wondering where all the React classes are. The answer is: They’re not
needed if we use hooks.
From the docs:
Hooks let you use more of React’s features without classes. Conceptually, React components have always been closer to functions. Hooks embrace functions, but without sacrificing the practical spirit of React
Practical Section 2 - Calling FastAPI from the Frontend
Now that we understand how our React frontend application works, let’s have it fetch data from our FastAPI backend.
In frontend/src/pages/home/index.jsx We have the following component:
// code omitted...

const client = new FastAPIClient(config);

const MainView = () => {  // 1

  const [recipes, setRecipes] = useState([])  // 2

  useEffect(() => {
    fetchExampleRecipes()
  }, [])  // 3

  const fetchExampleRecipes = () => {
    client.getSampleRecipes('chicken').then((data) => {  // 4
      setRecipes(data?.results)  // 5
    })
  }

  return (
      <RecipeTable
          recipes={recipes}
      />
  )
}

// code continues...
Let’s break this down
- We define our React
MainViewreusable component as a function (note this is the functional component style, see this guide for an overview of the differences vs. class based components) - Because we’re using functional components, we use React hooks such as useState
- We make use of the powerful
useEffecthook (docs)), which allows us to perform side effects in function components. Note that the empty array passed in as the second argument indicates this effect will only be called once (this empty array is the default so could be omitted, but I’m including it for clarity) - We use our instantiated
FastAPIClient(more on this soon) to call the backend API. The response data is gathered via.thensyntax promise chaining. In Javascript there are two main ways to handle asynchronous code:then/catch(ES6) andasync/await(ES7). Although not as modern as theasync/awaitsyntax, I think it’s more useful for backend devs who might not be as up-to-date with modern JS to easily follow along (see here for a comparison of the two approaches) - We set the recipe data fetched from the API using the state hook.
OK, let’s go deeper now and look at what the client FastAPIClient getSampleRecipes method is doing:
client.js
// code omitted...
import config from "./config"
const axios = require("axios")  // 1


class FastAPIClient {
	constructor(overrides) {
		this.config = {
			...config,
			...overrides,
		}

		this.apiClient = this.getApiClient(this.config)  // 2
	}

	/* Create Axios client instance pointing at the REST api backend */
	getApiClient(config) {
		let initialConfig = {
			baseURL: `${config.apiBasePath}/api/v1`,  // 3
		}
		let client = axios.create(initialConfig)
		client.interceptors.request.use(localStorageTokenInterceptor)  // 4
		return client
	}

	getSampleRecipes(keyword) {
		return this.apiClient.get(`/recipes/search/?keyword=${keyword}&max_results=10`).then(({data}) => {  // 5
			return data
		})
	}
// code continues...- We use the JavaScript Axios promise-based HTTP client, which includes session support we will make use of.
- We instantiate the
apiClient, which is an Axios session - The
apiBasePathURL comes from theconfig.jsfile - for local development this ishttp://localhost:8001, but you’d update it via environment variable for deployment (we’ll cover this in the next post in the series). Note that we append the/api/v1to match our recipe API structure. All subsequent requests with this client will automatically have this base URL prepended. - We make use of Axios request interceptors which allow us to update the request headers for auth purposes (more on auth shortly).
- Using the Axios session we call our
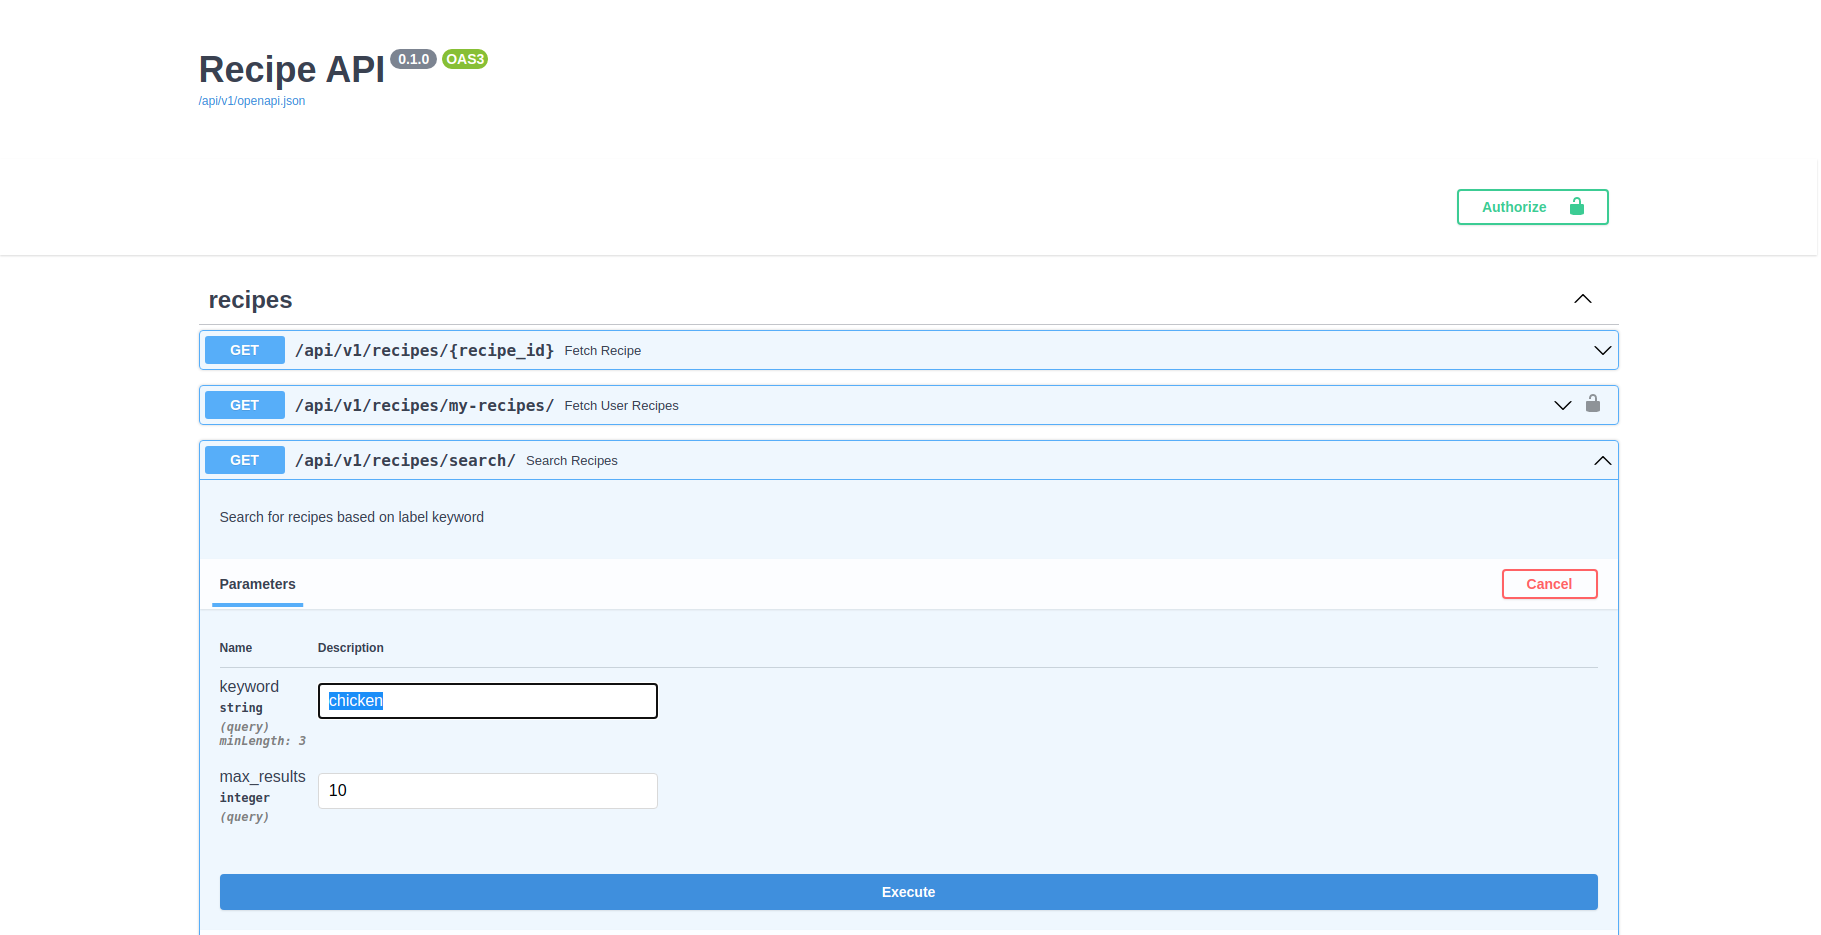
recipes/search?keywordendpoint and return the response data.
The recipes/search endpoint should be familiar from previous parts of the tutorial
In order to see this client working, let’s start the backend:
- Follow the setup in the README.md
- Create the DB tables with:
poetry run ./prestart.sh - Start the FastAPI server with
poetry run ./run.sh - Update your frontend/config.js to set REACT_APP_API_BASE_PATH to
http://localhost:8001(note do not use https with localhost)
- In a separate terminal/command prompt, start your React app (or if it is already running, refresh the page at
localhost:3000)
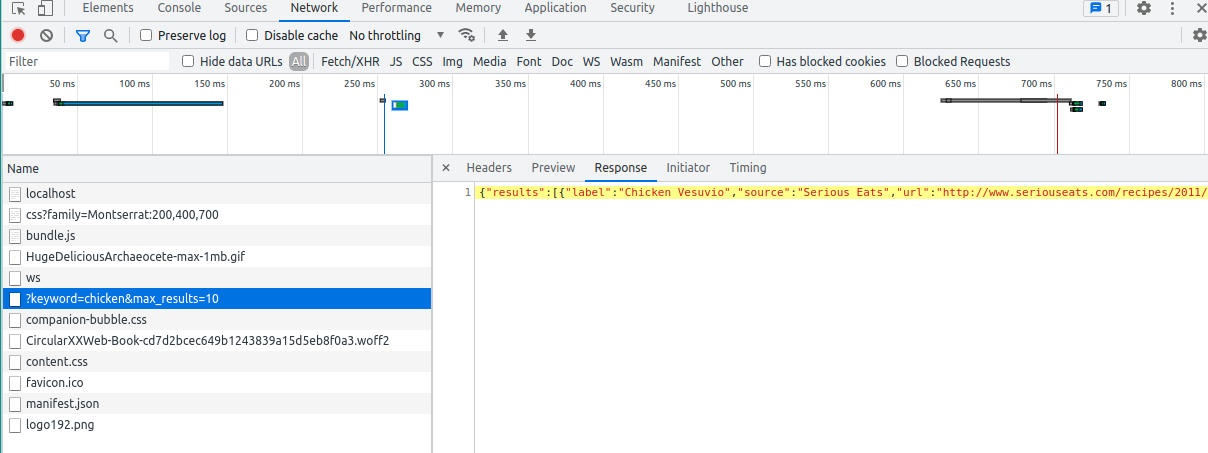
You should now see recipe data:
And if you open up the browser dev tools and look at the network tab, you’ll see the app making requests to the backend running at http://localhost:8001:
Great! Now let’s look at user auth.
Practical Section 3 - React Auth with FastAPI and JWTs
As promised, we’re going beyond just a toy example. We’ll hook up an auth mechanism between our React frontend and our JWT-based backend auth system which we covered in part 10
We’ll start with the /frontend/src/pages/sign-up/index.jsx
We have a pretty standard React registration form, which makes use of our FormInput and Button components located:
frontend/src/components/FormInput/index.jsxfrontend/src/components/Button/index.jsx
sign-up/index.jsx
// skipping imports for brevity

const client = new FastAPIClient(config);

const SignUp = () => {
  const [error, setError] = useState({ email: '', password: '', fullName: '' });
  const [registerForm, setRegisterForm] = useState({ email: '', password: '', fullName: '' });  // 1
  const [loading, setLoading] = useState(false)
  const navigate = useNavigate()  // 2

  const onRegister = (e) => {
    e.preventDefault();
    setLoading(true)
    setError(false);

    // skipping form checking for brevity

    client.register(registerForm.email, registerForm.password, registerForm.fullName)  // 3
      .then( () => {
        navigate('/my-recipes')  // 4
      })
      .catch( (err) => {
        setLoading(false)
        setError(true);
        alert(err)
      });
  }

  // skipping header for brevity
  return (
      <>
      <form onSubmit={(e) => onRegister(e)}>  // 5
          <FormInput
            type={"text"}
            name={"fullName"}
            label={"Full Name"}
            error={error.fullName}
            value={registerForm.fullName}
            onChange={(e) => setRegisterForm({...registerForm, fullName: e.target.value })}
          />
          <FormInput
            type={"email"}
            name={"email"}
            label={"Email"}
            error={error.email}
            value={registerForm.email}
            onChange={(e) => setRegisterForm({...registerForm, email: e.target.value })}
          />
          <FormInput
            type={"password"}
            name={"password"}
            label={"Password"}
            error={error.password}
            value={registerForm.password}
            onChange={(e) => setRegisterForm({...registerForm, password: e.target.value })}
          />
        <Button title={"Create Account"} error={error.password} loading={loading} />
      </form>

      {/*skipping additional code for brevity*/}
This is pretty standard React code, but for those backend devs who might be a bit rusty (I sympathise!), here’s a quick breakdown:
- We update the form input fields with the React
useStatehook - The
useNavigatehook is from the react-dom-router library, which is used for routing. - We’re using our FastAPI client
registermethod to call the backend (we’ll look at this next) - Upon successful registration we navigate to the
/my-recipespage - Standard React form submission code, indicating that we’ll call the
onRegisterfunction when the form is submitted.
OK great, next up we’ll dig down into the client:
client.js
// within the FastAPIClient class
register(email, password, fullName) {
    const loginData = {
        email,
        password,
        full_name: fullName,
        is_active: true,
    }

    return this.apiClient.post("/auth/signup", loginData).then(
        (resp) => {
            return resp.data
    })
}

// code continues...
Here we prepare all the registration form data gathered in our React component. This loginData is then set as the body
of a POST request to our API /auth/signup endpoint. We return the response (which will be the JWT token). Feel
free to play around with this endpoint yourself by starting up the backend, navigating to the /docs interactive UI and
trying it out:

So now we have registered a user. We still need to login.
The login React page follows almost exactly the same format and logic as the registration page (obviously calling the login
method on the client instead of the register method) so I won’t go over that. Where
things differ is in the client:
client.js
// within the FastAPIClient class
login(username, password) {
    delete this.apiClient.defaults.headers["Authorization"]  // 1

    // Generate form data for submission
    var form_data = new FormData()
    const grant_type = "password"
    const item = {grant_type, username, password}
    for (var key in item) {
        form_data.append(key, item[key])
    }

    return this.apiClient
        .post("/auth/login", form_data)  // 2
        .then((resp) => {
            localStorage.setItem("token", JSON.stringify(resp.data))  // 3
            return this.fetchUser()  // 4
        })
}

fetchUser() {
    return this.apiClient.get("/auth/me").then(({data}) => {  // 5
        localStorage.setItem("user", JSON.stringify(data))  // 6
        return data
    })
}

// code continues...
Lots happening in this code block, let’s break it down:
- The Authorization request header is the key header that must be set correctly for a valid login. We start by deleting it to ensure a stale default value is not used by the session.
- We POST the login data to the backend
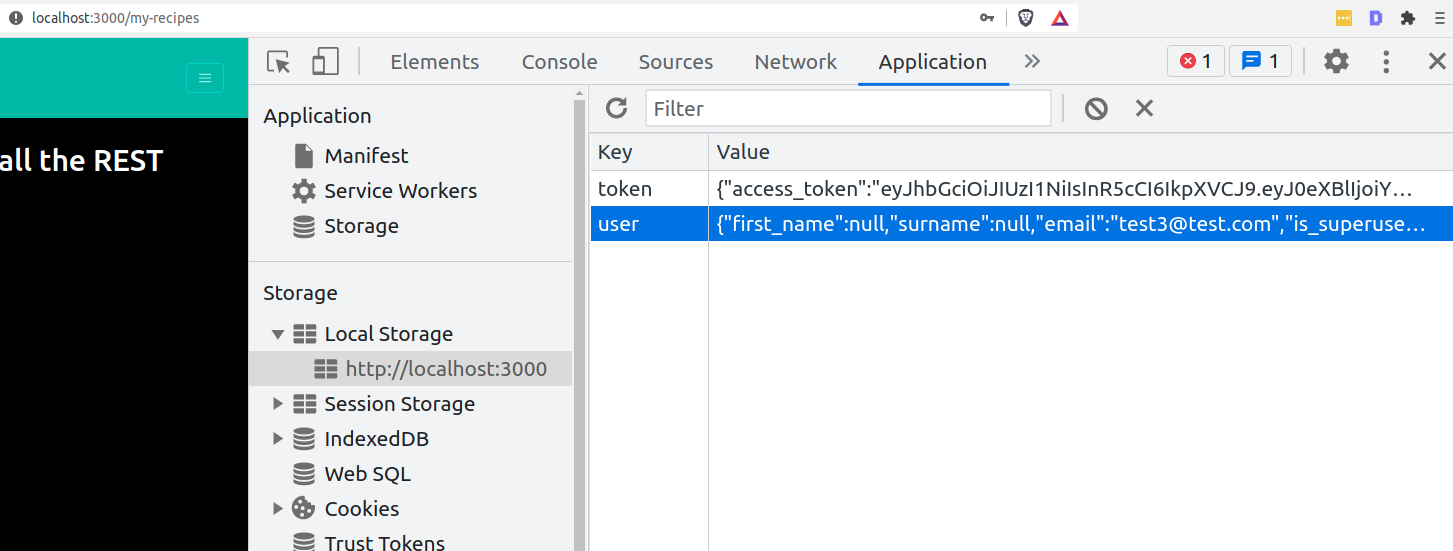
/auth/loginendpoint - We store the response (which will be a JWT) in the browser local storage
- We’re now in possession of a JWT, and we use that to fetch the user data via the
fetchUsermethod - This involves making a GET request to the backend
/auth/meendpoint - And then we store the response user data in local storage (as well as the token)
Inspecting LocalStorage:
Every request the React app makes to the backend API has an Authorization header inserted via the localStorageTokenInterceptor
we specified earlier in the getApiClient method. Let’s look at the interceptor function, which is the final piece in our
client-side auth story:
import jwtDecode from "jwt-decode"
import * as moment from "moment"

// every request is intercepted and has auth header injected.
function localStorageTokenInterceptor(config) {
	let headers = {}
	const tokenString = localStorage.getItem("token")

	if (tokenString) {
		const token = JSON.parse(tokenString)
		const decodedAccessToken = jwtDecode(token.access_token)  // 1
		const isAccessTokenValid =
			moment.unix(decodedAccessToken.exp).toDate() > new Date()  // 2
		if (isAccessTokenValid) {
			headers["Authorization"] = `Bearer ${token.access_token}`  // 3
		} else {
			alert('Your login session has expired')
		}
	}
	config["headers"] = headers
	return config
}
Key lines to note:
- We use the jwt-decode library to decode the token - note that decoding is not the same as validating which can only be done on the server where the JWT secret resides (part 10 goes over JWT theory if you need a refresher)
- We then check the expiry data of the JWT using the Moment.js library (you can use a more modern alternative if you prefer)
- Finally, we set the
Authorizationheader for the request
And voila, now requests to our FastAPI endpoints which require user auth are possible. In our React app, this allows us to have
the concept of login-required pages. The pages/my-recipes page is an example of this. We can set component state based on the
presence of a token:
my-recipes/index.jsx
useEffect(() => {
    const tokenString = localStorage.getItem("token")
    if (tokenString) {
          const token = JSON.parse(tokenString)
          const decodedAccessToken = jwtDecode(token.access_token)
          if(moment.unix(decodedAccessToken.exp).toDate() > new Date()){
              setIsLoggedIn(true)
          }
      }
  }, [])
And then display different HTML and/or redirect based on this state. In our example React app the “my-recipes” page is only displayed to logged in users, and attempts to create new recipes for non-logged in users will fail.
We’re also able to chain calls to get user information and then create recipes for a specific user
based on the ID (recall, this is how the POST /recipes/ endpoint is structured, expecting a submitter_id as one of the
POST body fields):
my-recipes/index.jsx
    client.fetchUser().then((user) => {
      client.createRecipe(recipeForm.label, recipeForm.url, recipeForm.source, user?.id).then(
          (data) => {
            fetchUserRecipes()
            setLoading(false)
            setShowForm(false)
          })
    })
We’ve mostly considered the frontend additions so far, but we also need to take a moment to look at a few key updates to the API. —
Practical Section 4 - FastAPI Updates
FastAPI CORS With Frontends (like React)
CORS or “Cross-Origin Resource Sharing” refers to the situations when a frontend running in a browser has JavaScript code that communicates with a backend, and the backend is in a different “origin” than the frontend.
Quoting from the docs:
So, let’s say you have a frontend running in your browser at http://localhost:8080, and its JavaScript is trying to communicate with a backend running at http://localhost (because we don’t specify a port, the browser will assume the default port 80). Then, the browser will send an HTTP OPTIONS request to the backend, and if the backend sends the appropriate headers authorizing the communication from this different origin (http://localhost:8080) then the browser will let the JavaScript in the frontend send its request to the backend. To achieve this, the backend must have a list of “allowed origins”.
In short, this gives you control over which frontends can call your API, which is often useful. In the case of our Recipe API and React frontend, we do need to allow some origins to call our API, such as localhost (for local development) and our deployed frontend application.
We do this in two places. The first is by using the FastAPI CORS Middleware.
We add this to main.py like so:
backend/app/app/main.py
# skipping a few imports for brevity
from fastapi import FastAPI, APIRouter, Request, Depends
from fastapi.middleware.cors import CORSMiddleware

from app.api.api_v1.api import api_router
from app.core.config import settings

root_router = APIRouter()
app = FastAPI(title="Recipe API", openapi_url=f"{settings.API_V1_STR}/openapi.json")

# Set all CORS enabled origins
if settings.BACKEND_CORS_ORIGINS:
    app.add_middleware(
        CORSMiddleware,
        allow_origins=[str(origin) for origin in settings.BACKEND_CORS_ORIGINS],
        allow_origin_regex=settings.BACKEND_CORS_ORIGIN_REGEX,
        allow_credentials=True,
        allow_methods=["*"],
        allow_headers=["*"],
    )

# Code continues
Above, when BACKEND_CORS_ORIGINS is set in our settings, then the CORS Middleware is applied, and the allowed_origins
are set via a list comprehension on the BACKEND_CORS_ORIGINS value. This brings us to the second update, which is
introducing this setting:
backend/app/app/core/config.py
# Skipping imports for brevity

class Settings(BaseSettings):
    API_V1_STR: str = "/api/v1"
    JWT_SECRET: str = "TEST_SECRET_DO_NOT_USE_IN_PROD"
    ALGORITHM: str = "HS256"

    # 60 minutes * 24 hours * 8 days = 8 days
    ACCESS_TOKEN_EXPIRE_MINUTES: int = 60 * 24 * 8

    # BACKEND_CORS_ORIGINS is a JSON-formatted list of origins
    # e.g: '["http://localhost", "http://localhost:4200", "http://localhost:3000", \
    # "http://localhost:8080", "http://local.dockertoolbox.tiangolo.com"]'
    BACKEND_CORS_ORIGINS: List[AnyHttpUrl] = [
        "http://localhost:3000",
        "http://localhost:8001",  # type: ignore
        "https://fastapi-recipe-app.herokuapp.com"
    ]

# Code continues...
Notice how BACKEND_CORS_ORIGINS includes both localhost and our deployed frontend application (on Heroku). We’ll
be looking at the Heroku deployment in the next part of the tutorial. Wherever you deploy your frontend, you’ll need
to update this value to reflect it. Once the value is set correctly, you’ll be able to call your API without any
CORS errors.
Phew! That was a lot of information. But now we have a truly modern frontend to interact with our FastAPI backend. Now we need to deploy everything…that’s coming up next.
Continue Learning FastAPI
Next we’ll deploy everything!
Part 13: Using Docker and Uvicorn to Deploy Our App to Heroku
Finding this useful? Please subscribe to my email list for updates.