The Ultimate FastAPI Tutorial Part 7 - Database Setup with SQLAlchemy and Alembic
In part 7 of the FastAPI tutorial, we'll look at setting up a database
Introduction
Welcome to the Ultimate FastAPI tutorial series. This post is part 7. The series is a project-based tutorial where we will build a cooking recipe API. Each post gradually adds more complex functionality, showcasing the capabilities of FastAPI, ending with a realistic, production-ready API. The series is designed to be followed in order, but if you already know FastAPI you can jump to the relevant part.
Code
Project github repo directory for this part of the tutorial
Tutorial Series Contents
Optional Preamble: FastAPI vs. Flask
Beginner Level Difficulty
Part 1: Hello World
Part 2: URL Path Parameters & Type Hints
Part 3: Query Parameters
Part 4: Pydantic Schemas & Data Validation
Part 5: Basic Error Handling
Part 6: Jinja Templates
Part 6b: Basic FastAPI App Deployment on Linode
Intermediate Level Difficulty
Part 7: Setting up a Database with SQLAlchemy and its ORM
Part 8: Production app structure and API versioning
Part 9: Creating High Performance Asynchronous Logic via async def and await
Part 10: Authentication via JWT
Part 11: Dependency Injection and FastAPI Depends
Part 12: Setting Up A React Frontend
Part 13: Using Docker, Uvicorn and Gunicorn to Deploy Our App to Heroku
Part 14: Using Docker and Uvicorn to Deploy Our App to IaaS (Coming soon)
Part 15: Exploring the Open Source Starlette Toolbox - GraphQL (Coming soon)
Part 16: Alternative Backend/Python Framework Comparisons (i.e. Django) (Coming soon)
Post Contents
Theory Section 1 - Quick Introduction to SQLAlchemy
Practical Section 1 - Establishing our Database Tables and Connection
Practical Section 2 - CRUD operations and DB schemas
Practical Section 3 - Enabling Migrations with Alembic
Practical Section 4 - Putting it all Together in Our Endpoints
![]()
This is the first of the intermediate-level posts. We’ll cover quite a lot of ground in this post because there are a lot of parts that all work together and therefore would be more confusing if presented in isolation (because you can’t easily spin it up and run it locally without all the parts).
Theory Section 1 - Quick Introduction to SQLAlchemy
SQLAlchemy is one of the most widely used and highest quality Python third-party libraries. It gives application developers easy ways to work with relational databases in their Python code.
SQLAlchemy considers the database to be a relational algebra engine, not just a collection of tables. Rows can be selected from not only tables but also joins and other select statements; any of these units can be composed into a larger structure. SQLAlchemy’s expression language builds on this concept from its core.
SQLAlchemy is composed of two distinct components:
- Core - a fully featured SQL abstraction toolkit
- ORM (Object Relational Mapper) - which is optional
In this tutorial, we will make use of both components, though you can adapt the approach not to use the ORM.
Practical Section 1 - Setting Up Database Tables with SQLAlchemy
So far in the tutorial, we have not been able to persist data beyond a server restart since all our POST operations just updated data structures in memory. Not we will change that by bringing in a relational database. We’ll use SQLite because it requires minimal setup so it’s useful for learning. With very minor config modifications you can use the same approach for other relational database management systems (RDBMS) such as PostgreSQL or MySQL.
In the tutorial repo open up the part-7 directory. You’ll notice that there are a number of new directories compared to previous parts of the tutorial:
.
├── alembic                    ----> NEW
│  ├── env.py
│  ├── README
│  ├── script.py.mako
│  └── versions
│     └── 238090727082_added_user_and_recipe_tables.py
├── alembic.ini                ----> NEW
├── app
│  ├── __init__.py
│  ├── backend_pre_start.py    ----> NEW
│  ├── crud                    ----> NEW
│  │  ├── __init__.py
│  │  ├── base.py
│  │  ├── crud_recipe.py
│  │  └── crud_user.py
│  ├── db                      ----> NEW
│  │  ├── __init__.py
│  │  ├── base.py
│  │  ├── base_class.py
│  │  ├── init_db.py
│  │  └── session.py
│  ├── deps.py                 ----> NEW
│  ├── initial_data.py
│  ├── main.py
│  ├── models                  ----> NEW
│  │  ├── __init__.py
│  │  ├── recipe.py
│  │  └── user.py
│  ├── recipe_data.py
│  ├── schemas
│  │  ├── __init__.py
│  │  ├── recipe.py
│  │  └── user.py
│  └── templates
│     └── index.html
├── poetry.lock
├── prestart.sh
├── pyproject.toml
├── README.md
└── run.sh
We’ll go through all of these additions in this post, and by the end you’ll understand how all the new modules work together to enable not just a one-time database integration, but also migrations as we update our database schemas. More on that soon.
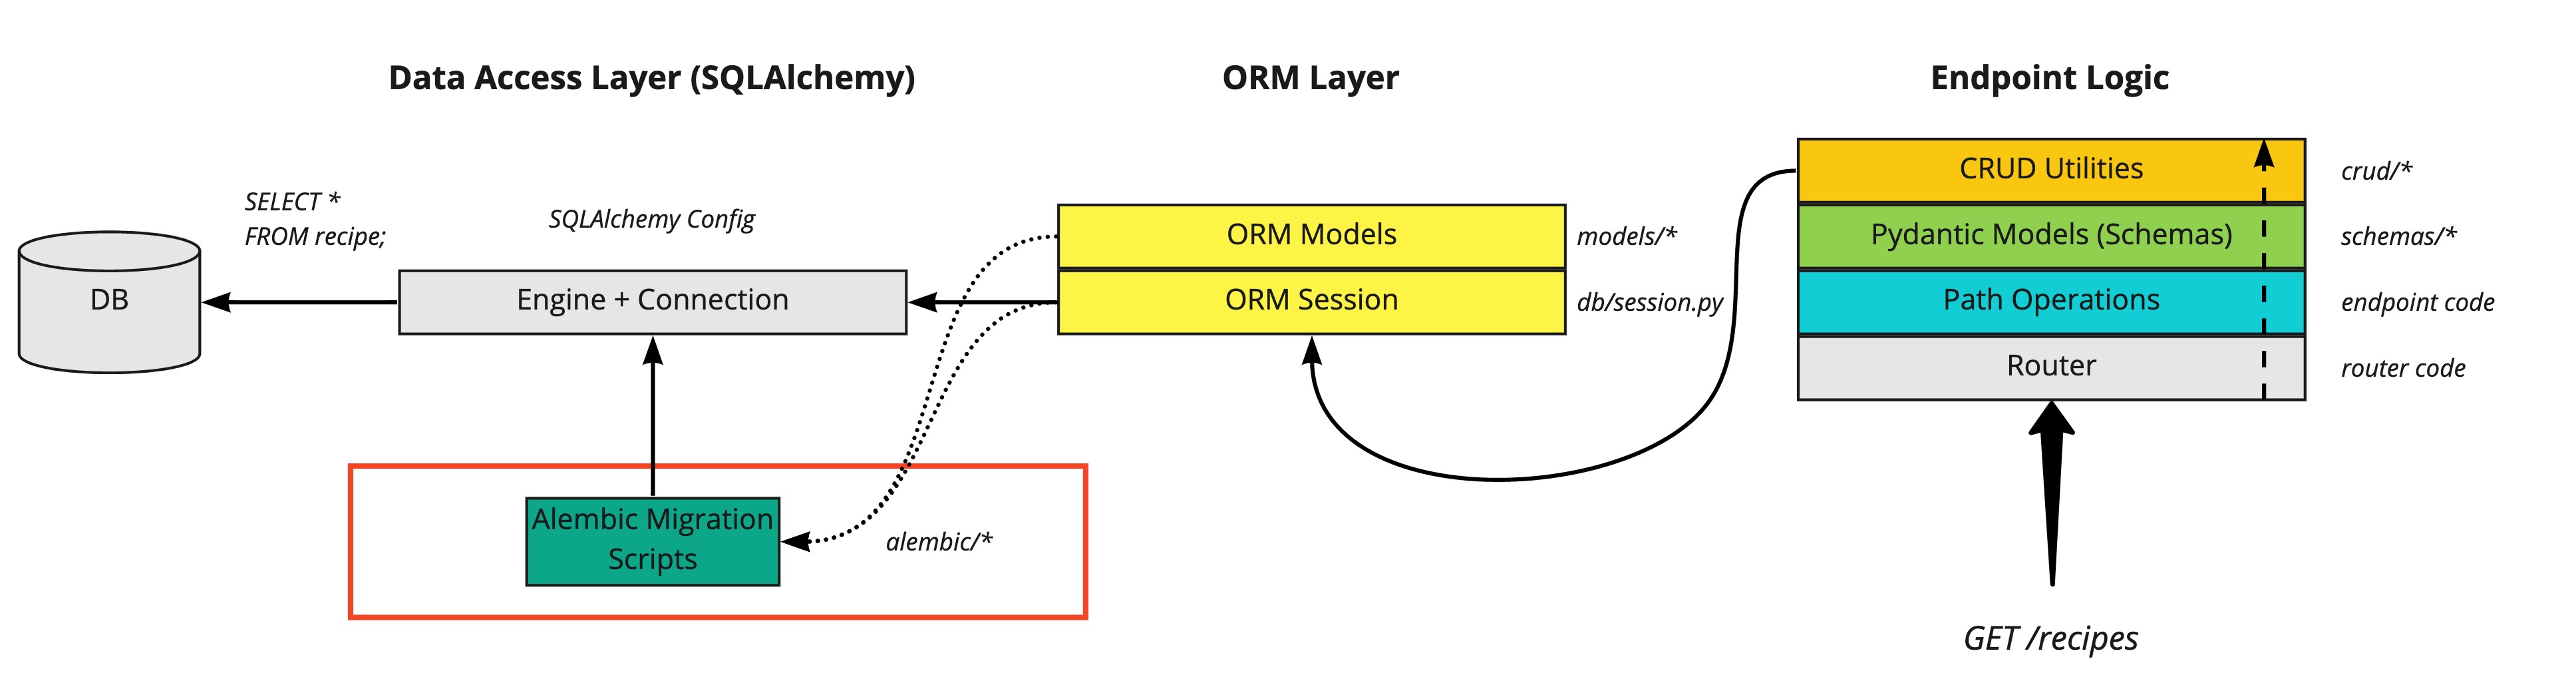
FastAPI SQLAlchemy Diagram
The overall diagram of what we’re working towards looks like this:
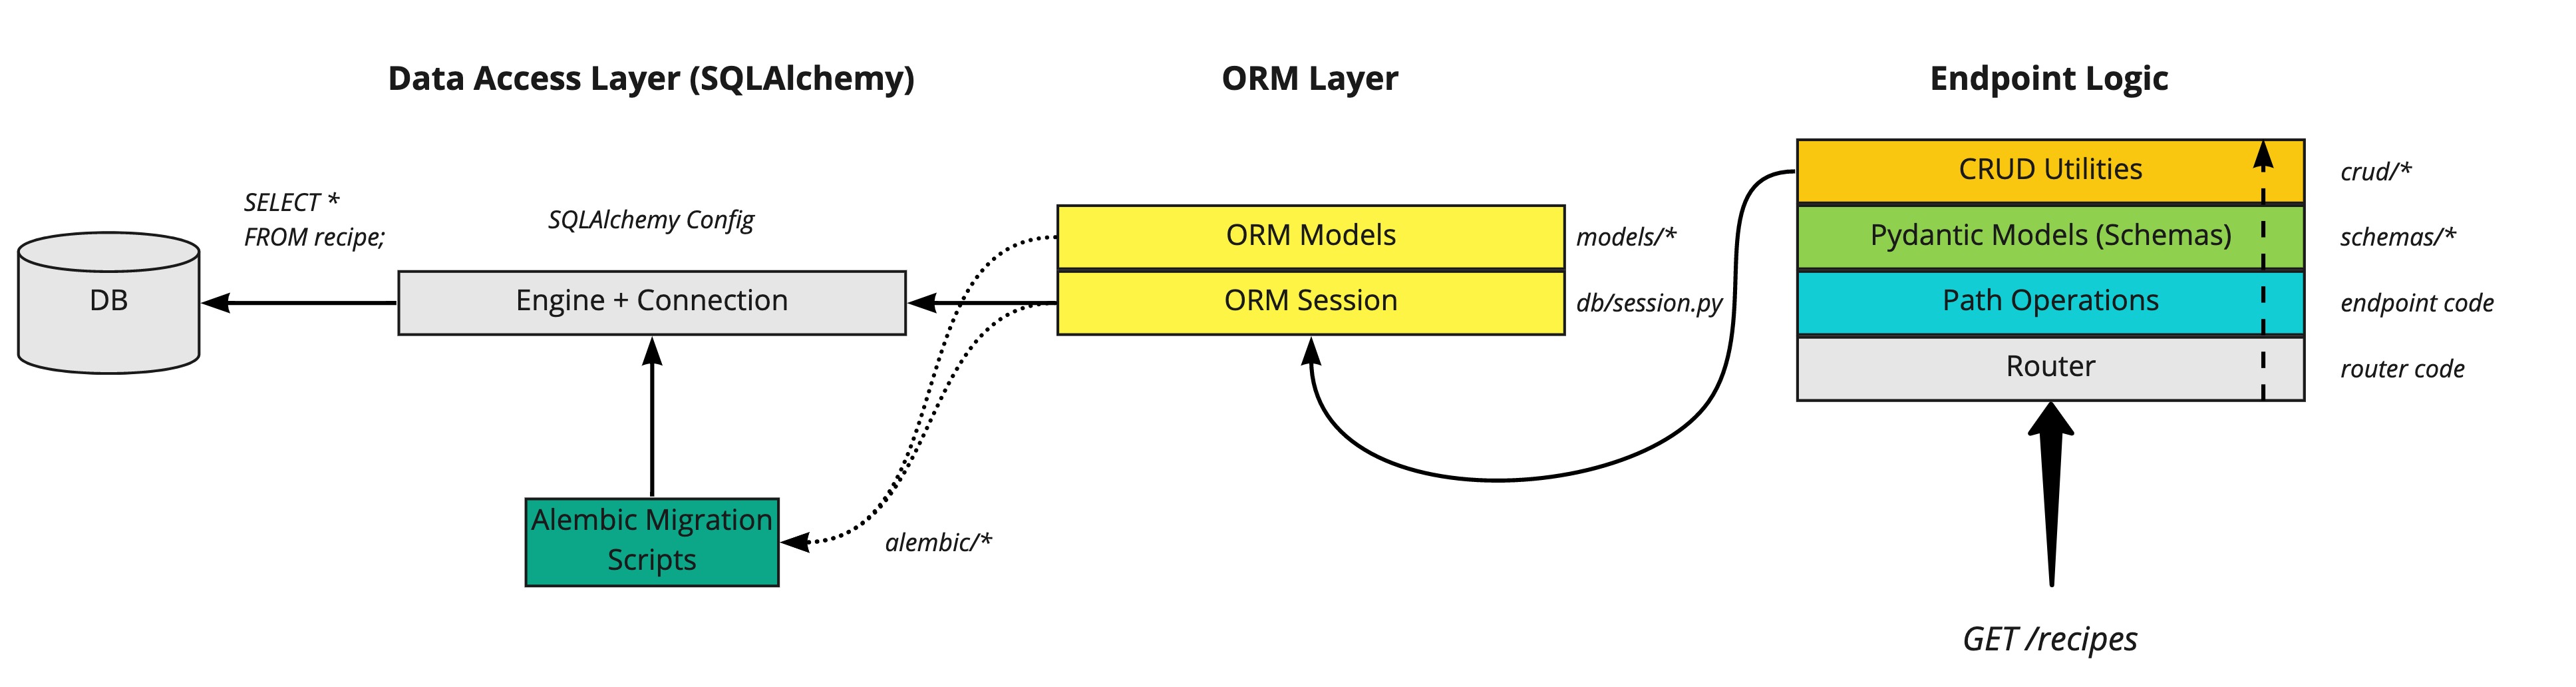
To start off, we will look at the ORM and Data Access Layers:
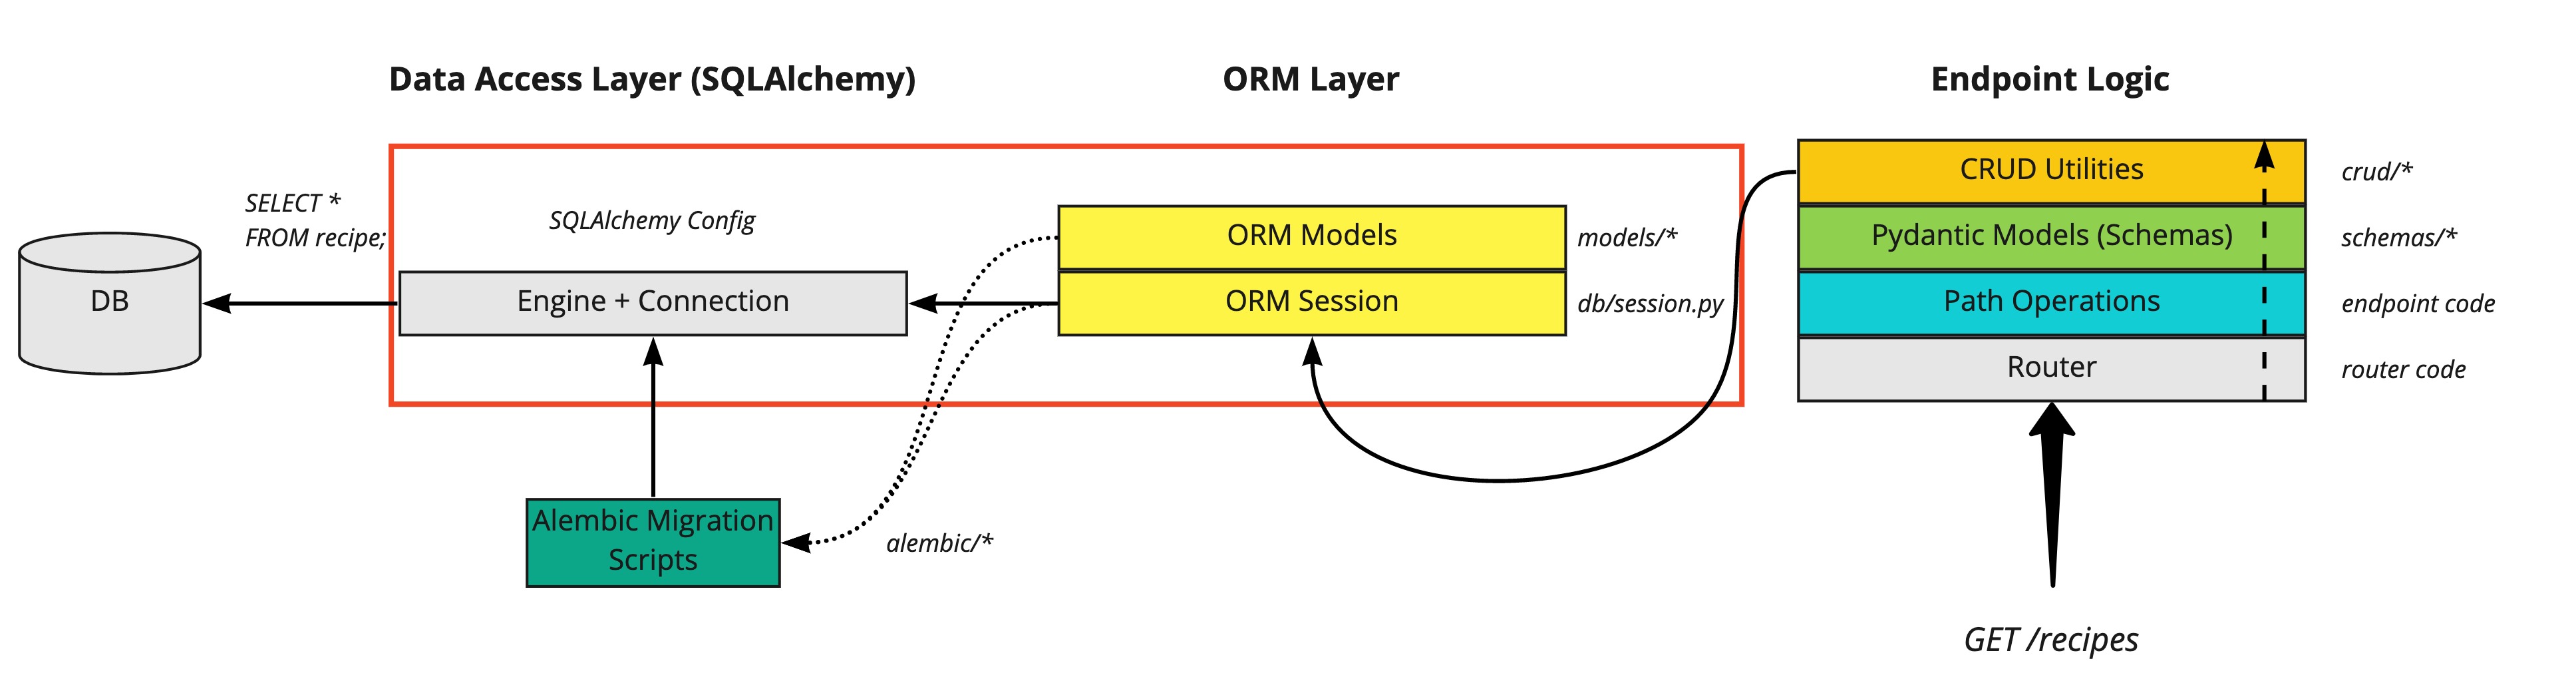
For now, let’s turn our attention to the new db directory.
We want to define tables and columns from our Python classes using the ORM. In SQLAlchemy,
this is enabled through a declarative mapping.
The most common pattern is constructing a base class using the SQLALchemy
declarative_base function, and then having all DB model classes inherit from this base class.
We create this base class in the db/base_class.py module:
import typing as t

from sqlalchemy.ext.declarative import as_declarative, declared_attr


class_registry: t.Dict = {}


@as_declarative(class_registry=class_registry)
class Base:
    id: t.Any
    __name__: str

    # Generate __tablename__ automatically
    @declared_attr
    def __tablename__(cls) -> str:
        return cls.__name__.lower()
In other codebases/examples you may have seen this done like so:
Base = declarative_base()In our case, we’re doing the same thing but with a decorator (provided by SQLAlchemy) so that we can
declare some helper methods on our Base class - like automatically generating a __tablename__.
Having done that, we are now free to define the tables we need for our API. So far we’ve worked with some toy recipe data stored in memory:
RECIPES = [
    {
        "id": 1,
        "label": "Chicken Vesuvio",
        "source": "Serious Eats",
        "url": "http://www.seriouseats.com/recipes/2011/12/chicken-vesuvio-recipe.html",
    },
    {
        "id": 2,
        "label": "Chicken Paprikash",
        "source": "No Recipes",
        "url": "http://norecipes.com/recipe/chicken-paprikash/",
    },
    {
        "id": 3,
        "label": "Cauliflower and Tofu Curry Recipe",
        "source": "Serious Eats",
        "url": "http://www.seriouseats.com/recipes/2011/02/cauliflower-and-tofu-curry-recipe.html",
    },
]
Therefore the first table we want to define is a recipe table that will store the data above.
We define this table via the ORM in models/recipe.py:
from sqlalchemy import Column, Integer, String, ForeignKey
from sqlalchemy.orm import relationship

from app.db.base_class import Base


class Recipe(Base):  # 1
    id = Column(Integer, primary_key=True, index=True)  # 2
    label = Column(String(256), nullable=False)
    url = Column(String(256), index=True, nullable=True)
    source = Column(String(256), nullable=True)
    submitter_id = Column(String(10), ForeignKey("user.id"), nullable=True)  # 3
    submitter = relationship("User", back_populates="recipes")  # 4
Let’s break this down:
- We represent our database
recipetable with a Python class, which inherits from theBaseclass we defined earlier (this allows SQLAlchemy to detect and map the class to a database table). - Every column of the
recipetable (e.g.id,label) is defined in the class, setting the column type with SQLAlchemy types likeIntegerandString. - We define a one-to-many relationship
between a recipe and user (which we refer to as “submitter”), via the SQLAlchemy
ForeignKeyclass. - To establish a bidirectional relationship in one-to-many, where the “reverse” side is a
many to one, we specify an additional
relationship()and connect the two using therelationship.back_populatesparameter
As you can infer from the foreign key, we will also need to define a user table, since we want
to be able to attribute the recipes to users. A user table will set us up for doing auth in later parts
of the tutorial.
Our user table is defined in models/user.py, and follows a similar structure:
class User(Base):
    id = Column(Integer, primary_key=True, index=True)
    first_name = Column(String(256), nullable=True)
    surname = Column(String(256), nullable=True)
    email = Column(String, index=True, nullable=False)
    is_superuser = Column(Boolean, default=False)
    recipes = relationship(
        "Recipe",
        cascade="all,delete-orphan",
        back_populates="submitter",
        uselist=True,
    )
Great, we have defined our tables. Now what? Well, we haven’t yet told SQLAlchemy how to
connect to the DB (e.g. what is the database called, how do we connect to it, what flavor of
SQL is it). All this happens in the SQLALchemy Engine class.
We instantiate an engine in the db/session.py module:
from sqlalchemy import create_engine
from sqlalchemy.orm import sessionmaker, Session

SQLALCHEMY_DATABASE_URI = "sqlite:///example.db"  # 1


engine = create_engine(  # 2
    SQLALCHEMY_DATABASE_URI,
    # required for sqlite
    connect_args={"check_same_thread": False},  # 3
)
SessionLocal = sessionmaker(autocommit=False, autoflush=False, bind=engine)  # 4
Let’s break this code down:
- The
SQLALCHEMY_DATABASE_URIdefines the file where SQLite will persist data. - Via the SQLAlchemy
create_enginefunction we instantiate our engine, passing in the DB connection URI - note that this connection string can be much more complex and include drivers, dialects, database server locations, users, passwords and ports. Here’s a postgres example. - The
check_same_thread: Falseconfig is necessary to work with SQLite - this is a common gotcha because FastAPI can access the database with multiple threads during a single request, so SQLite needs to be configured to allow that. - Finally we also create a DB
Session, which (unlike the engine) is ORM-specific. When working with the ORM, the session object is our main access point to the database.
From the SQLAlchemy Session docs:
In the most general sense, the Session establishes all conversations with the database and represents a “holding zone” for all the objects which you’ve loaded or associated with it during its lifespan.
We are making progress! Next, we will once again turn to Pydantic which we looked at in part 4 to make it very easy to get our Python code into the right shape for database operations.
Practical Section 2 - Pydantic DB Schemas and CRUD Utilities
Now let’s look at the FastAPI app endpoint logic, specifically the Pydnantic DB schemas and CRUD utilities:
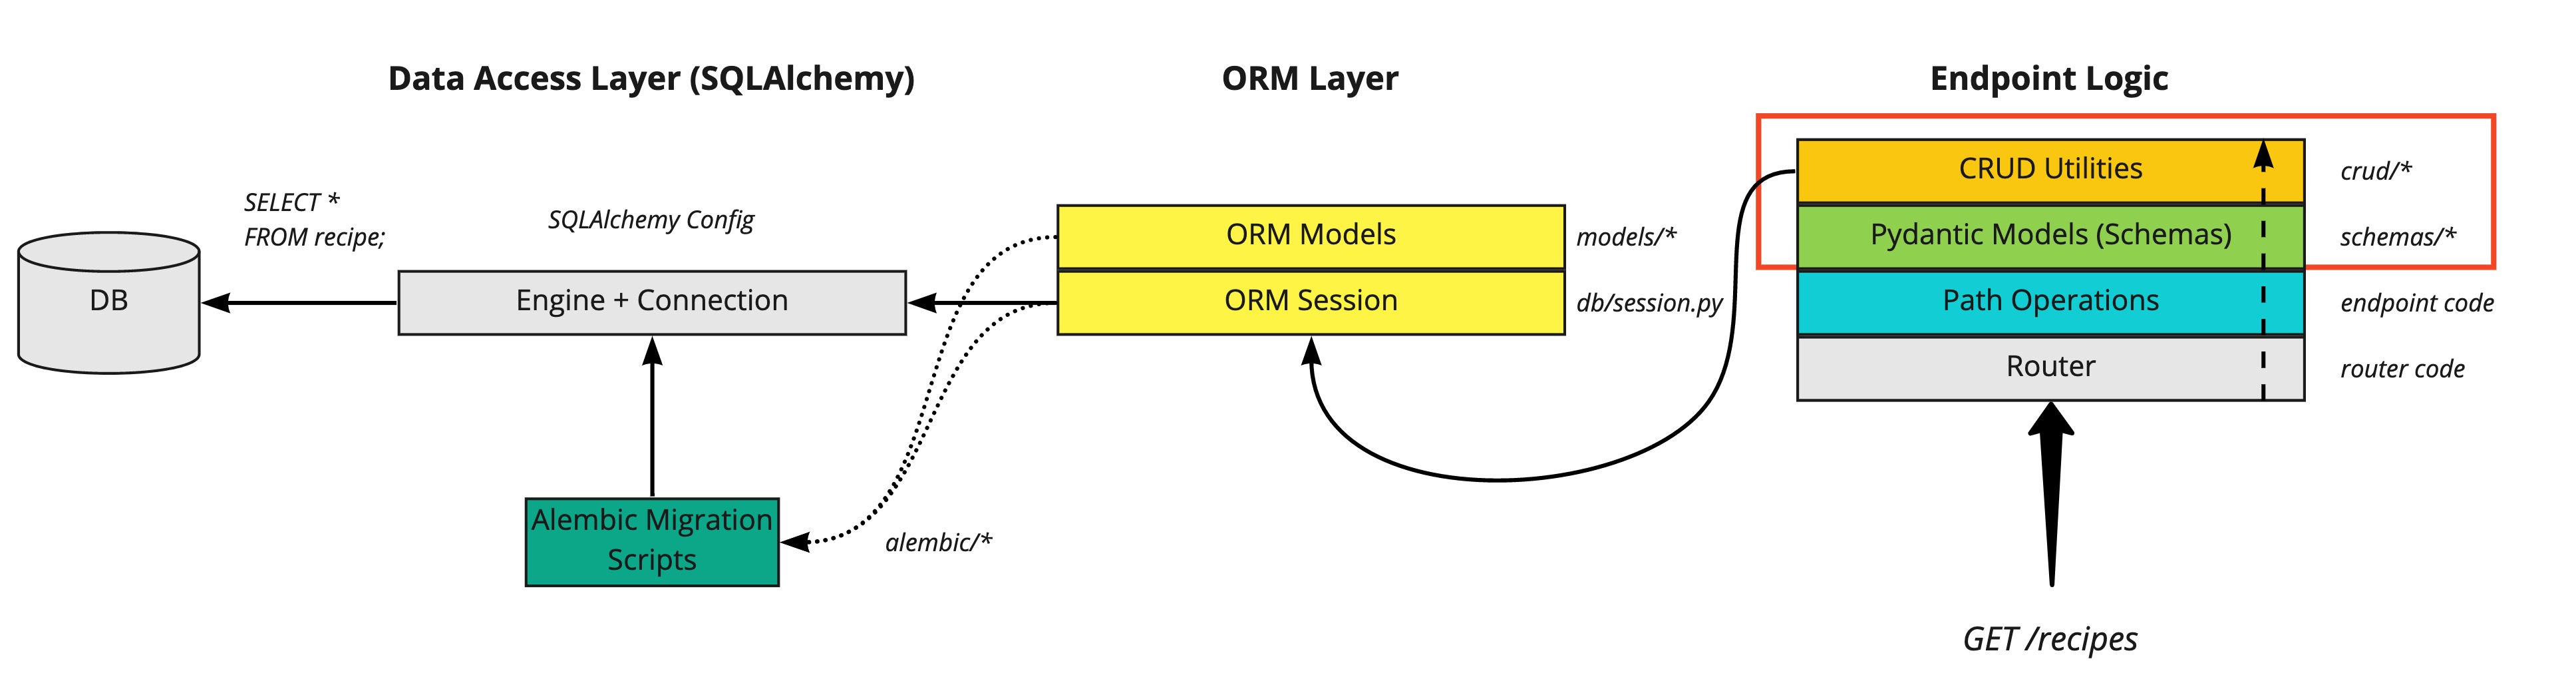
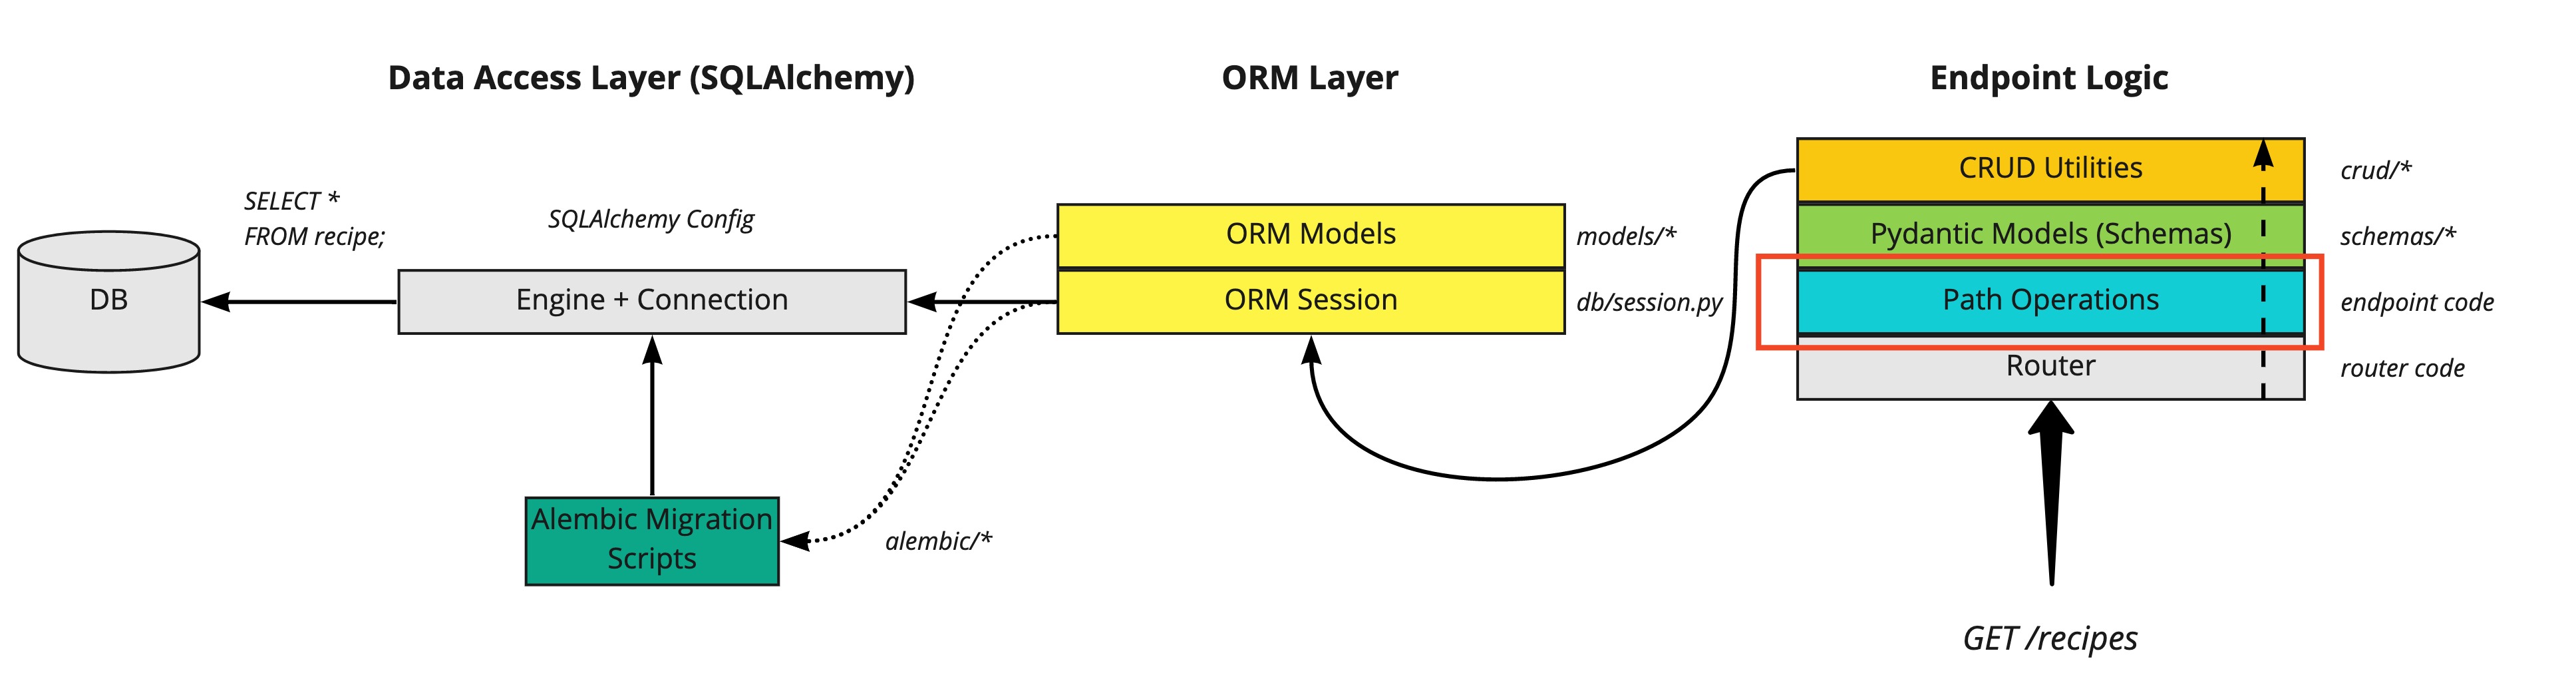
For those already used to SQLAlchemy and other Python web frameworks like Django or Flask, this part will probably contain something a little different to what you might be used to. Let’s zoom in on the diagram:
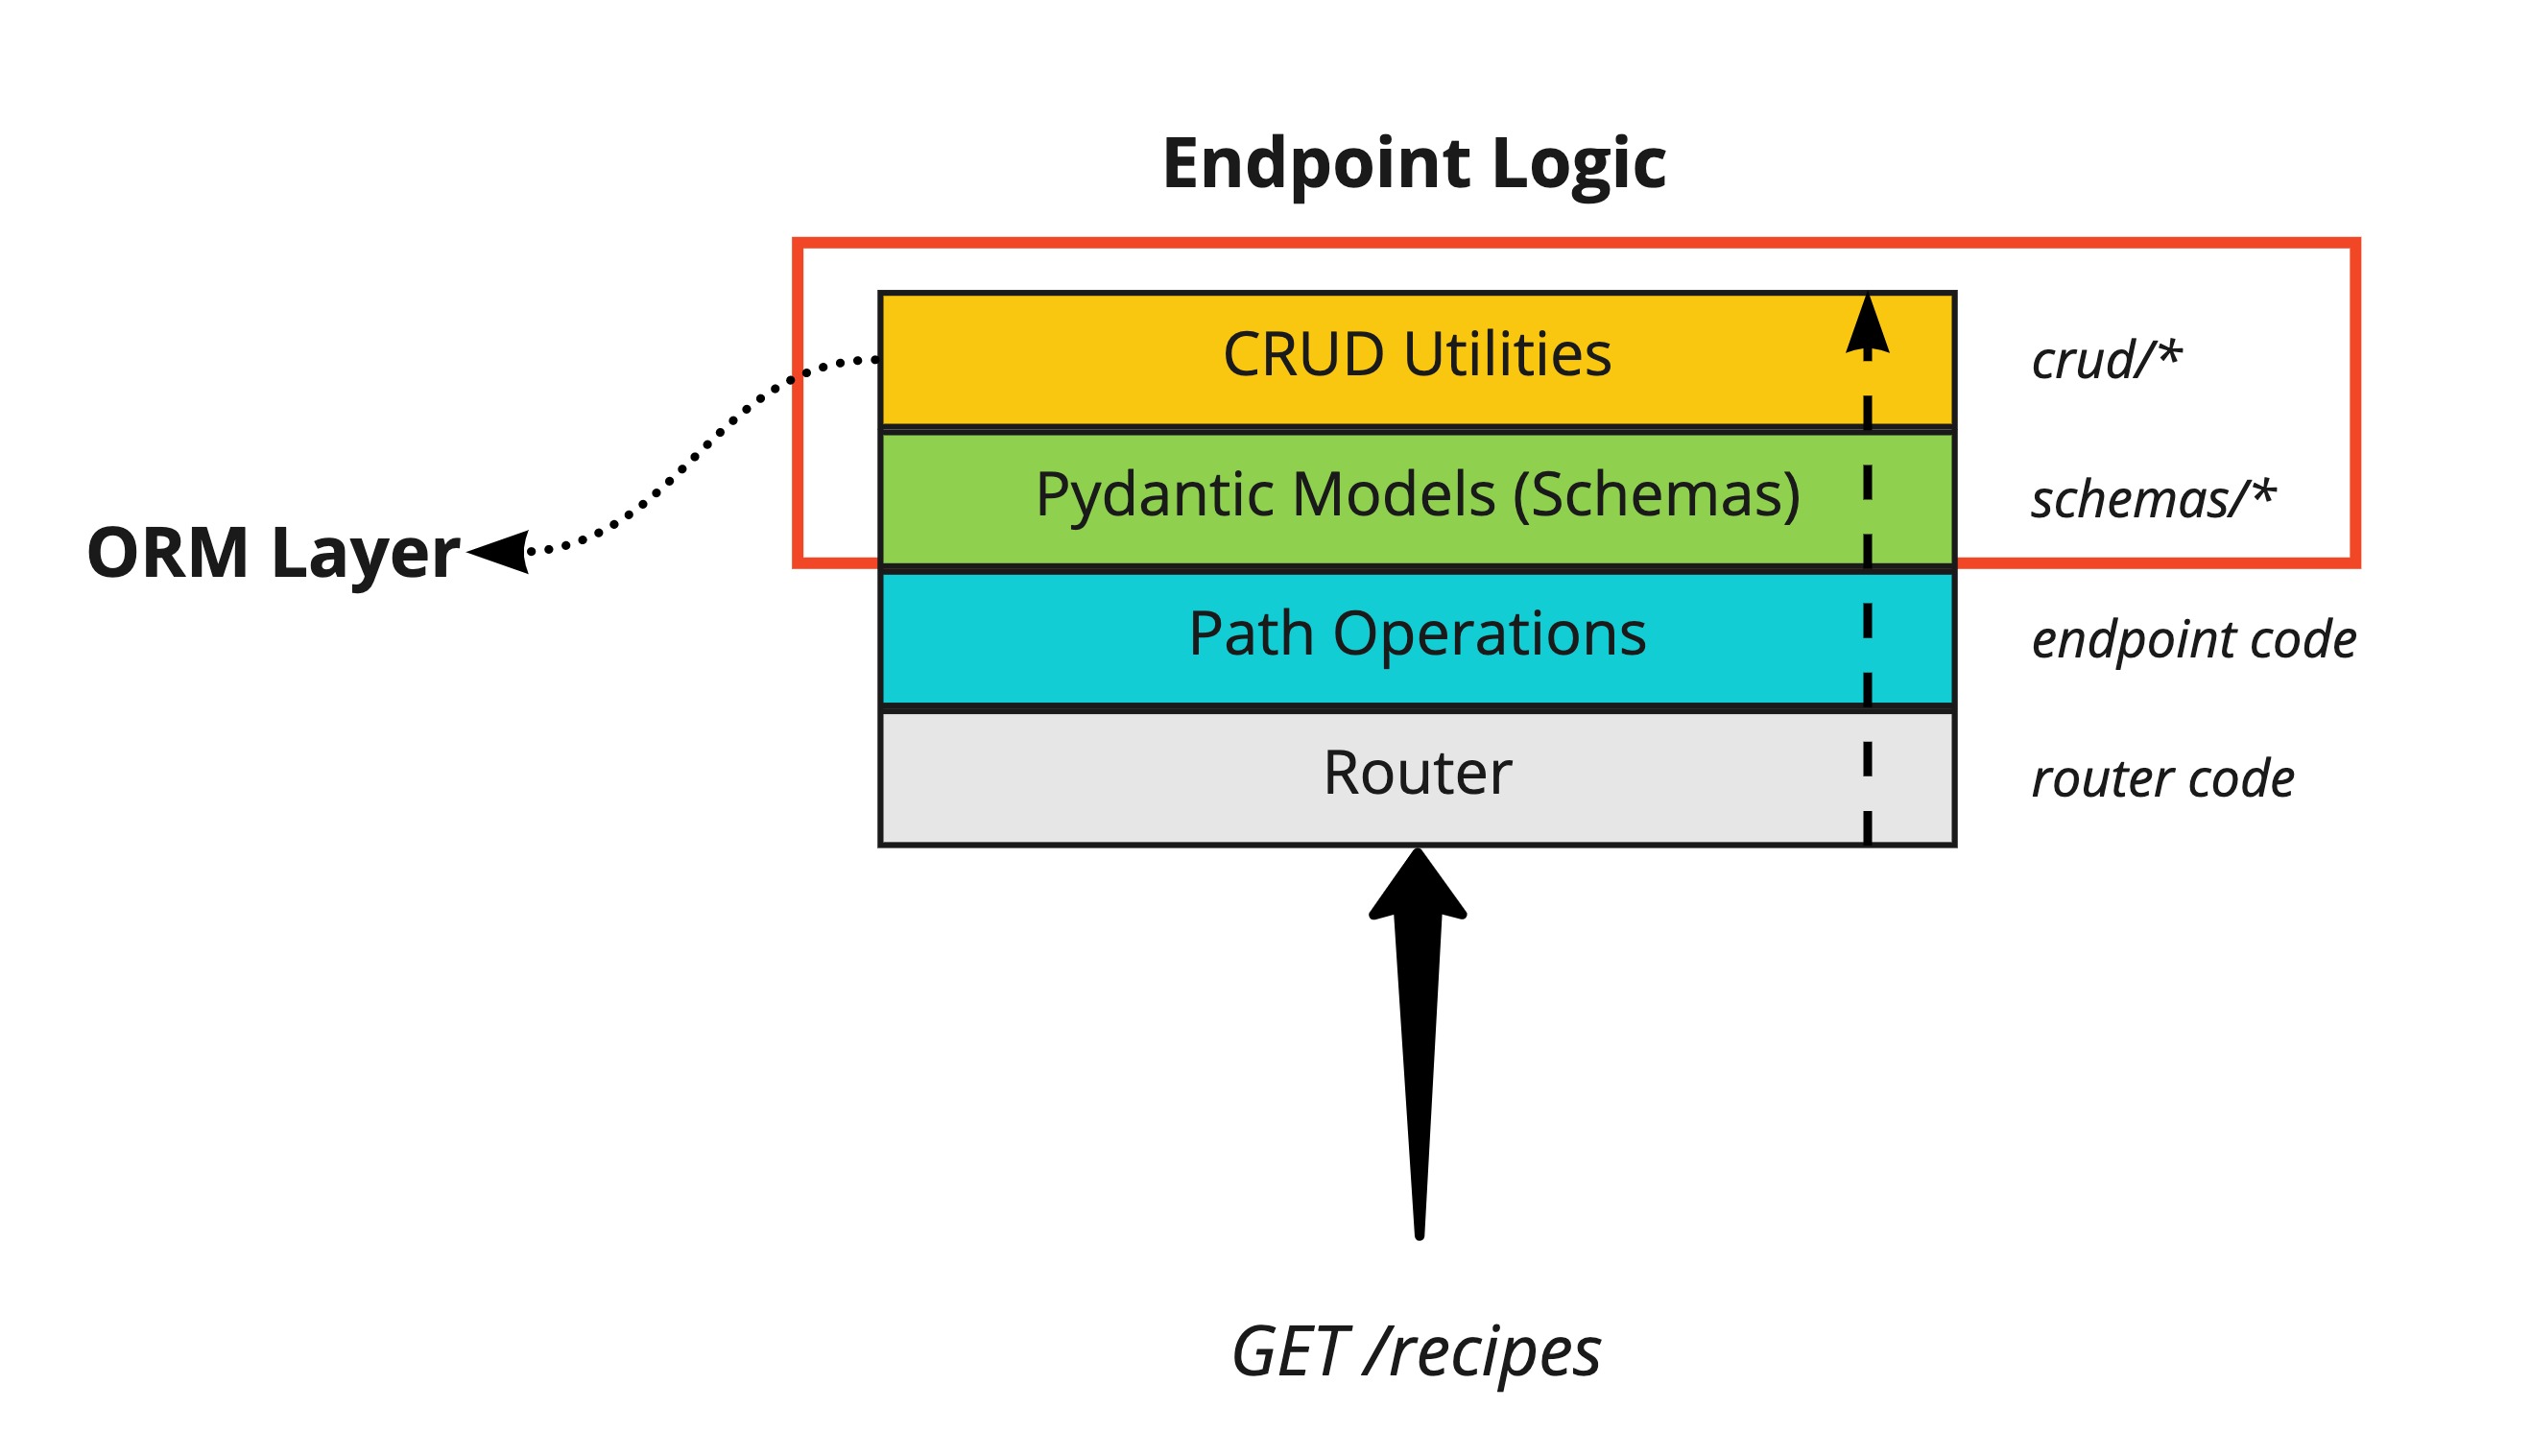
The key sequencing to understand is that as REST API requests which will require interaction with the database come in, the following occurs:
- The request is routed to the correct path operation (i.e. the function for handling it, such as
our
rootfunction inmainpy file) - The relevant Pydantic model is used to validate incoming request data and construct the appropriate data structure to be passed to the CRUD utilities
- Our CRUD utility functions use a combination of the ORM Session and the shaped data structures to prepare DB queries
Don’t worry if this isn’t entirely clear yet, we’ll go through each step and by the end of this blog post have brought everything together.
We will create Pydantic models for reading/writing data from our various API endpoints. The terminology can get confusing because we have SQLAlchemy models which look like this:
name = Column(String)
and Pydantic models which look like this:
name: str
To help distinguish the two, we tend to keep the Pydantic classes in the schemas directory.
Let’s look at the schemas/recipe.py module:
from pydantic import BaseModel, HttpUrl

from typing import Sequence


class RecipeBase(BaseModel):
    label: str
    source: str
    url: HttpUrl


class RecipeCreate(RecipeBase):
    label: str
    source: str
    url: HttpUrl
    submitter_id: int


class RecipeUpdate(RecipeBase):
    label: str


# Properties shared by models stored in DB
class RecipeInDBBase(RecipeBase):
    id: int
    submitter_id: int

    class Config:
        orm_mode = True


# Properties to return to client
class Recipe(RecipeInDBBase):
    pass


# Properties properties stored in DB
class RecipeInDB(RecipeInDBBase):
    pass
Some of these classes, like Recipe and RecipeCreate existed in previous parts of
the tutorial (in the old schema.py module), others such as those classes referencing
the DB, are new.
Pydantic’s orm_mode (which you can see in RecipeInDBBase) will tell the Pydantic model to
read the data even if it is not a dict, but an ORM model (or any other arbitrary object with attributes).
Without orm_mode, if you
returned a SQLAlchemy model from your path operation, it wouldn’t include the relationship
data.
Why make the distinction between a
RecipeandRecipeInDB? This allows us in future to separate fields which are only relevant for the DB, or which we don’t want to return to the client (such as a password field).
As we saw in the diagram, it’s not enough to just have the Pydantic schemas. We also need
some reusable functions to interact with the database. This will be our data access layer,
and by FastAPI convention, these utility classes are defined in the crud directory.
These CRUD utility classes help us to do things like:
- Read from a table by ID
- Read from a table by a particular attribute (e.g. by user email)
- Read multiple entries from a table (defining filters and limits)
- Insert new rows into a table
- Update a row in a table
- Delete a row in a table
Each table gets its own CRUD class, which inherits reusable parts from a base class. Let’s
examine this now in crud/base.py.
from typing import Any, Dict, Generic, List, Optional, Type, TypeVar, Union

from fastapi.encoders import jsonable_encoder
from pydantic import BaseModel
from sqlalchemy.orm import Session

from app.db.base_class import Base


ModelType = TypeVar("ModelType", bound=Base)
CreateSchemaType = TypeVar("CreateSchemaType", bound=BaseModel)
UpdateSchemaType = TypeVar("UpdateSchemaType", bound=BaseModel)


class CRUDBase(Generic[ModelType, CreateSchemaType, UpdateSchemaType]):  # 1
    def __init__(self, model: Type[ModelType]):  # 2
    """
    CRUD object with default methods to Create, Read, Update, Delete (CRUD).
    **Parameters**
    * `model`: A SQLAlchemy model class
    * `schema`: A Pydantic model (schema) class
    """
    self.model = model

    def get(self, db: Session, id: Any) -> Optional[ModelType]:
        return db.query(self.model).filter(self.model.id == id).first()  # 3

    def get_multi(
        self, db: Session, *, skip: int = 0, limit: int = 100
    ) -> List[ModelType]:
        return db.query(self.model).offset(skip).limit(limit).all()  # 4

    def create(self, db: Session, *, obj_in: CreateSchemaType) -> ModelType:
        obj_in_data = jsonable_encoder(obj_in)
        db_obj = self.model(**obj_in_data)  # type: ignore
        db.add(db_obj)
        db.commit()  # 5
        db.refresh(db_obj)
        return db_obj

# skipping rest...
This is one of the trickier bits of code in this part of the tutorial, let’s break it down:
- Models inheriting from
CRUDBasewill be defined with a SQLAlchemy model as the first argument, then the Pydantic model (aka schema) for creating and updating rows as the second and third arguments. - When instantiating the CRUD class, it expects to be passed the relevant SQLAlchemy model (we’ll look at this in a moment).
- Here are the actual DB queries you have probably been expecting - we use the ORM Session (
db) .query method to chain together different DB queries. These can be as simple or complex as we need. Here is a the SQLAlchemy documentation on queries. In this example we filter by ID, allowing us to fetch a single row from the database. - Another DB query, this time we fetch multiple database rows by querying and chaining the
.offsetand.limitmethods, and finishing with.all() - When creating DB objects, it is necessary to run the session
commitmethod (see docs) to complete the row insertion. We’ll be looking at tradeoffs to having the commit call here vs. in the endpoint later in the tutorial series (in the Python 3 asyncio and performance blog post).
Now that we’ve defined the CRUDBase we can use that to define crud utilities for each table.
The code for these subclasses is much simpler, with the majority of the logic inherited from the base class:
from app.crud.base import CRUDBase
from app.models.recipe import Recipe
from app.schemas.recipe import RecipeCreate, RecipeUpdate


class CRUDRecipe(CRUDBase[Recipe, RecipeCreate, RecipeUpdate]):  # 1
    ...

recipe = CRUDRecipe(Recipe) # 2- The class is defined with the relevant SQLAlchemy
Recipemodel, followed by the PydanticRecipeCreateandRecipeUpdateschemas. - We instantiate the
CRUDRecipeclass
Don’t worry if this seems a bit abstract at the moment. In the last part of this post show this being used in the endpoints so can see (and run locally) the API endpoints interacting with the DB, and how the Pydantic schemas and CRUD utilities will work together. However, before we get there, we need to handle the initial creation of the DB, as well as future migrations.
Practical Section 3 - Enabling Migrations with Alembic
The goal of this tutorial is to build a production-ready API, and you simply can’t setup a database without considering how to make changes to your tables over time. A common solution for this challenge is the alembic library, which is designed to work with SQLAlchemy.
Recall our new part-7 file tree:
.
├── alembic                    ----> NEW
│  ├── env.py
│  ├── README
│  ├── script.py.mako
│  └── versions
│     └── 238090727082_added_user_and_recipe_tables.py
├── alembic.ini                ----> NEW
├── app
...etc.
The alembic directory contains a few files we’ll be using:
env.pywhere we pass in configuration (such as our database connection string, config required to create a SQLAlchemy engine, and our SQLAlchemyBasedeclarative mapping class)versions- A directory containing each migration to be run. Every file within this directory represents a DB migration, and contains a reference to previous/next migrations so they are always run in the correct sequence.script.py.mako- boilerplate generated by alembicREADME- boilerplate generated by alembicalembic.ini- Tells alembic where to look for the other files, as well as setting up config for logging
In order to trigger the alembic migrations, you run the alembic upgrade head command.
When you make any change to a database table, you capture that change by running alembic revision --autogenerate -m "Some description" - this
will generate a new file in the versions directory which you should always check.
For our recipe API, we’ve wrapped this migration command in the prestart.sh bash script:
#! /usr/bin/env bash

# Let the DB start
python ./app/backend_pre_start.py

# Run migrations
alembic upgrade head    <---- ALEMBIC MIGRATION COMMAND

# Create initial data in DB
python ./app/initial_data.py
Running the alembic migrations will not only apply changes to the database, but also
create the tables and columns in the first place. This is why you don’t find any table
creation command like Base.metadata.create_all(bind=engine) which you’ll often find
in tutorials that don’t cover migrations.
You’ll notice that we also have a couple of other scripts in our prestart.sh script:
backend_pre_start.pywhich simply executes a SQLSELECT 1query to check our DB is workinginitial_data.py- which uses theinit_dbfunction fromdb/init_db.pywhich we will breakdown further now
db/init_db.py
from app import crud, schemas
from app.db import base  # noqa: F401
from app.recipe_data import RECIPES

logger = logging.getLogger(__name__)

FIRST_SUPERUSER = "[email protected]"


def init_db(db: Session) -> None:  # 1
    if FIRST_SUPERUSER:
        user = crud.user.get_by_email(db, email=FIRST_SUPERUSER)  # 2
        if not user:
            user_in = schemas.UserCreate(
                full_name="Initial Super User",
                email=FIRST_SUPERUSER,
                is_superuser=True,
            )
            user = crud.user.create(db, obj_in=user_in)
        else:
            logger.warning(
                "Skipping creating superuser. User with email "
                f"{FIRST_SUPERUSER} already exists. "
            )
        if not user.recipes:
            for recipe in RECIPES:
                recipe_in = schemas.RecipeCreate(
                    label=recipe["label"],
                    source=recipe["source"],
                    url=recipe["url"],
                    submitter_id=user.id,
                )
crud.recipe.create(db, obj_in=recipe_in) # 3- The
init_dbfunction takes as its only argument a SQLAlchemySessionobject, which we can import from ourdb/session.py. - Then we make use of the
crudutility functions that we created earlier in this part of the tutorial to fetch or create a user. We need a user so that we have can assign asubmitterto the initial recipes (recall the foreign key lookup from the recipe table to the user table). - We iterate over the recipes hardcoded in the
app/recipe_data.pyRECIPElist of dictionaries, use that data to create a series of PydanticRecipeCreateschemas, which we can then pass to thecrud.recipe.createfunction toINSERTrows into the database.
Give this a try in your cloned copy:
- cd into the part-7 directory
pip install poetry- run
poetry installto install the dependencies - run
poetry run ./prestart.sh
In the terminal, you should see migrations being applied. You should also see a new
file created: part-7-database/example.db. This is the SQLite DB, check it by running:
- Install sqlite3
- run the command
sqlite3 example.db - run the command
.tables
You should see 3 tables: alembic_version, recipe, and user. Check the initial
recipe data has been created with a simple SQL query: SELECT * FROM recipe;
You should see 3 recipe rows in the sqlite DB:

You can exit the SQLite3 shell with the command .exit
Great! All that remains now is to bring everything together in our API endpoints.
Practical Section 4 - Putting it all Together in Our API Endpoints
If you look at app/main.py you’ll find all the endpoint functions have been updated
to take an additional db argument:
from fastapi import Request, Depends
# skipping...

@api_router.get("/", status_code=200)
def root(
    request: Request,
    db: Session = Depends(deps.get_db),
) -> dict:
    """
    Root GET
    """
    recipes = crud.recipe.get_multi(db=db, limit=10)
    return TEMPLATES.TemplateResponse(
        "index.html",
        {"request": request, "recipes": recipes},
    )

# skippping...
This is a first look at FastAPI’s powerful dependency injection capabilities, which for my money is one of the frameworks best features. Dependency Injection (DI) is a way for your functions and classes to declare things they need to work (in a FastAPI context, usually our endpoint functions which are called path operation functions).
We’ll be exploring dependency injection in much more detail later in the tutorial. For now, what you
need to appreciate is that the FastAPI Depends class is used in our function parameters like so:
db: Session = Depends(deps.get_db)
And what we pass into Depends is a function specifying the dependency. In this part of the tutorial,
we’ve added these functions in the deps.py module:
from typing import Generator

from app.db.session import SessionLocal  # 1


def get_db() -> Generator:
    db = SessionLocal()  # 2
    try:
        yield db  # 3
    finally:
        db.close()  # 4
Quick breakdown:
- We import the ORM session class
SessionLocalfromapp/db/session.py - We instantiate the session
- We
yieldthe session, which returns a generator. Why do this? Well, theyieldstatement suspends the function’s execution and sends a value back to the caller, but retains enough state to enable the function to resume where it is left off. In short, it’s an efficient way to work with our database connection. Python generators primer for those unfamiliar. - We make sure we close the DB connection by using the
finallyclause of thetryblock - meaning that the DB session is always closed. This releases connection objects associated with the session and leaves the session ready to be used again.
OK, now understand how our DB session is being made available in our various endpoints. Let’s look at a more complex example:
@api_router.get("/recipe/{recipe_id}", status_code=200, response_model=Recipe)  # 1
def fetch_recipe(
    *,
    recipe_id: int,
    db: Session = Depends(deps.get_db),
) -> Any:
    """
    Fetch a single recipe by ID
    """
    result = crud.recipe.get(db=db, id=recipe_id)  # 2
    if not result:
        # the exception is raised, not returned - you will get a validation
        # error otherwise.
        raise HTTPException(
            status_code=404, detail=f"Recipe with ID {recipe_id} not found"
        )

    return result
Notice the following changes:
- The
response_model=Recipenow refers to our updated PydanticRecipemodel, meaning that it will work with our ORM calls. - We use the
crudutility function to get a recipe by id, passing in thedbsession object we specified as a dependency to the endpoint.
The extra crud utilities took a bit more time to understand - but can you see how now we have
an elegant separation of concerns - no need for any DB queries in the endpoint code, it’s all
handled within our CRUD utility functions.
We see a similar pattern in the other endpoints, swapping out crud.recipe.get for
crud.recipe.get_multi when we’re returning multiple recipes and crud.recipe.create when
we create new recipes in the POST endpoint.
Let’s give it a try!
From the top (you can skip the prestart.sh command if you’ve already run it)
pip install poetry- Install dependencies
cdinto the part-7 directory thenpoetry install - Run the DB migrations via poetry
poetry run ./prestart.sh(only required once) - Run the FastAPI server via poetry
poetry run ./run.sh - Open
http://localhost:8001/docs
Go ahead and create a new recipe using the interactive docs try me button, you’ll
need to set the submitter_id to 1 to match the initial user we created via prestart.sh:
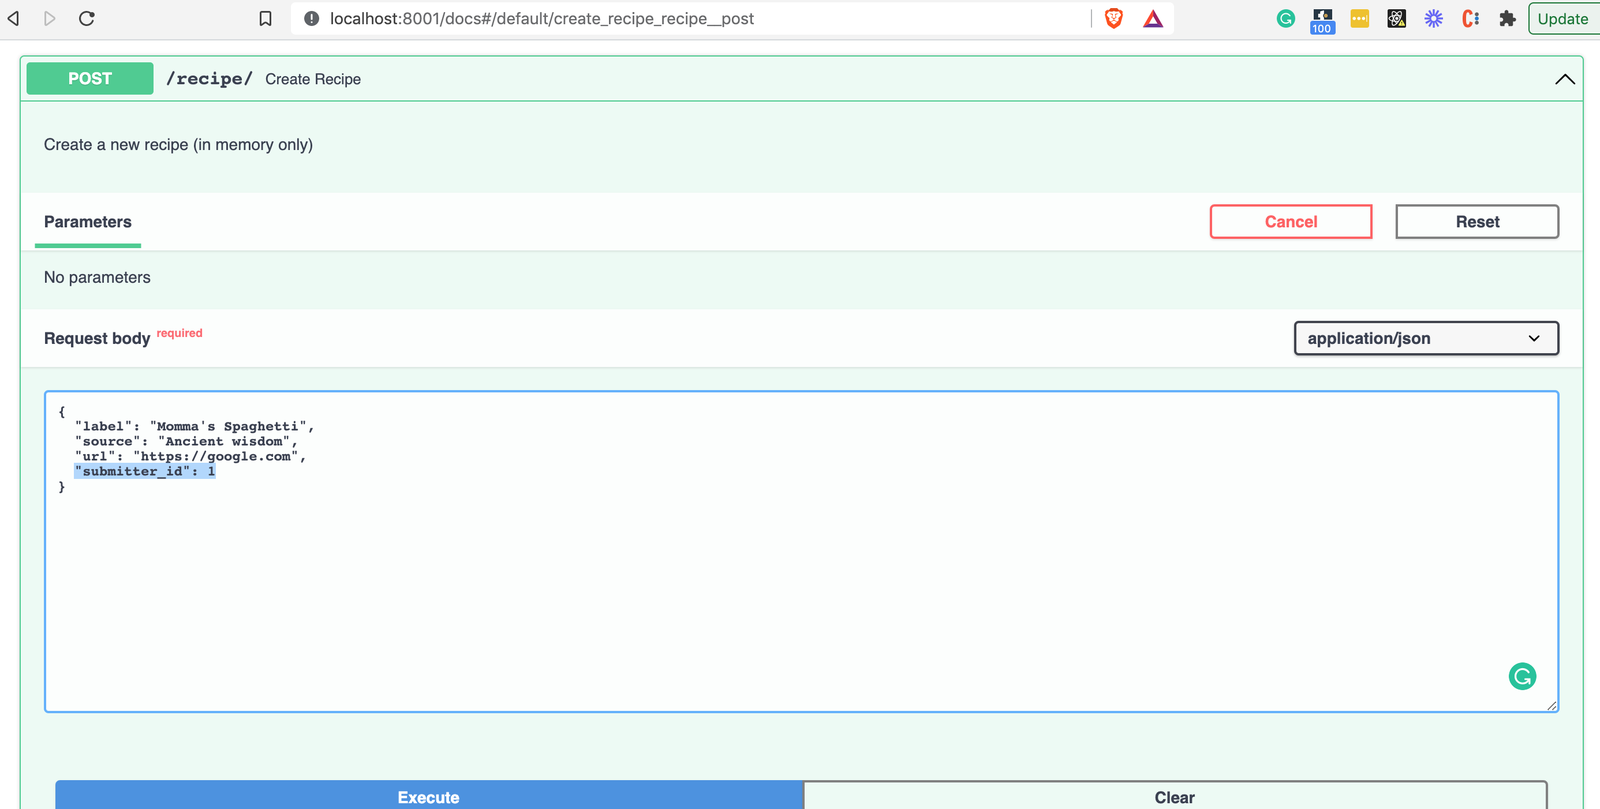
gotcha: the url field must be a valid URL with an http/https
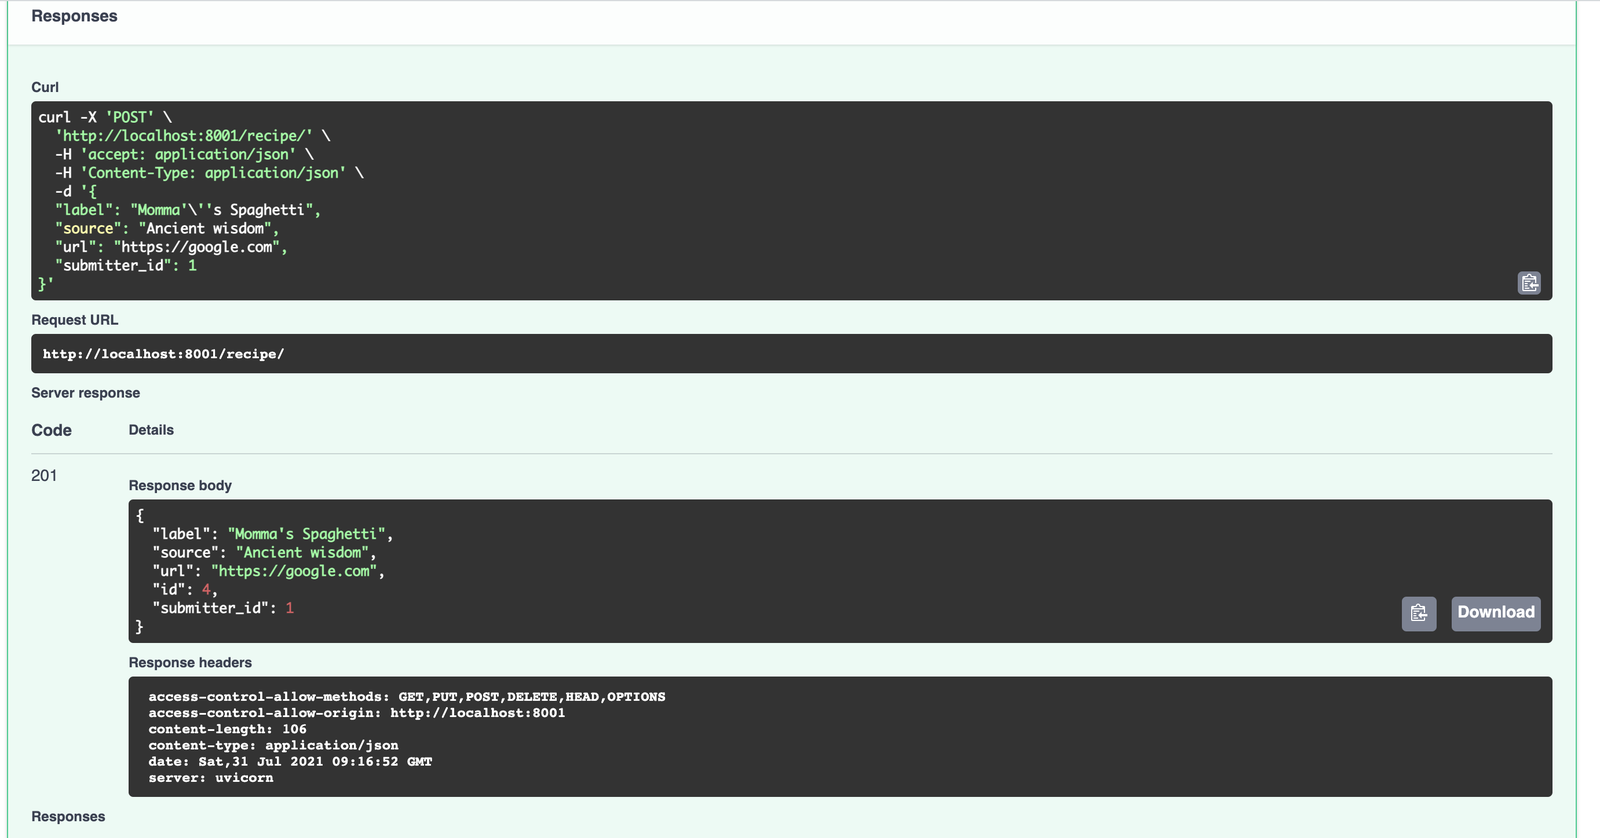
Scroll down the responses and you should see the HTTP 201 status code JSON response body:
And now for the moment of truth. Stop the server (CTRL-C). Then restart it with poetry run ./run.sh
Navigate to the home page: http://localhost:8001
You should see the recipe you just created persisted in the list of recipes:
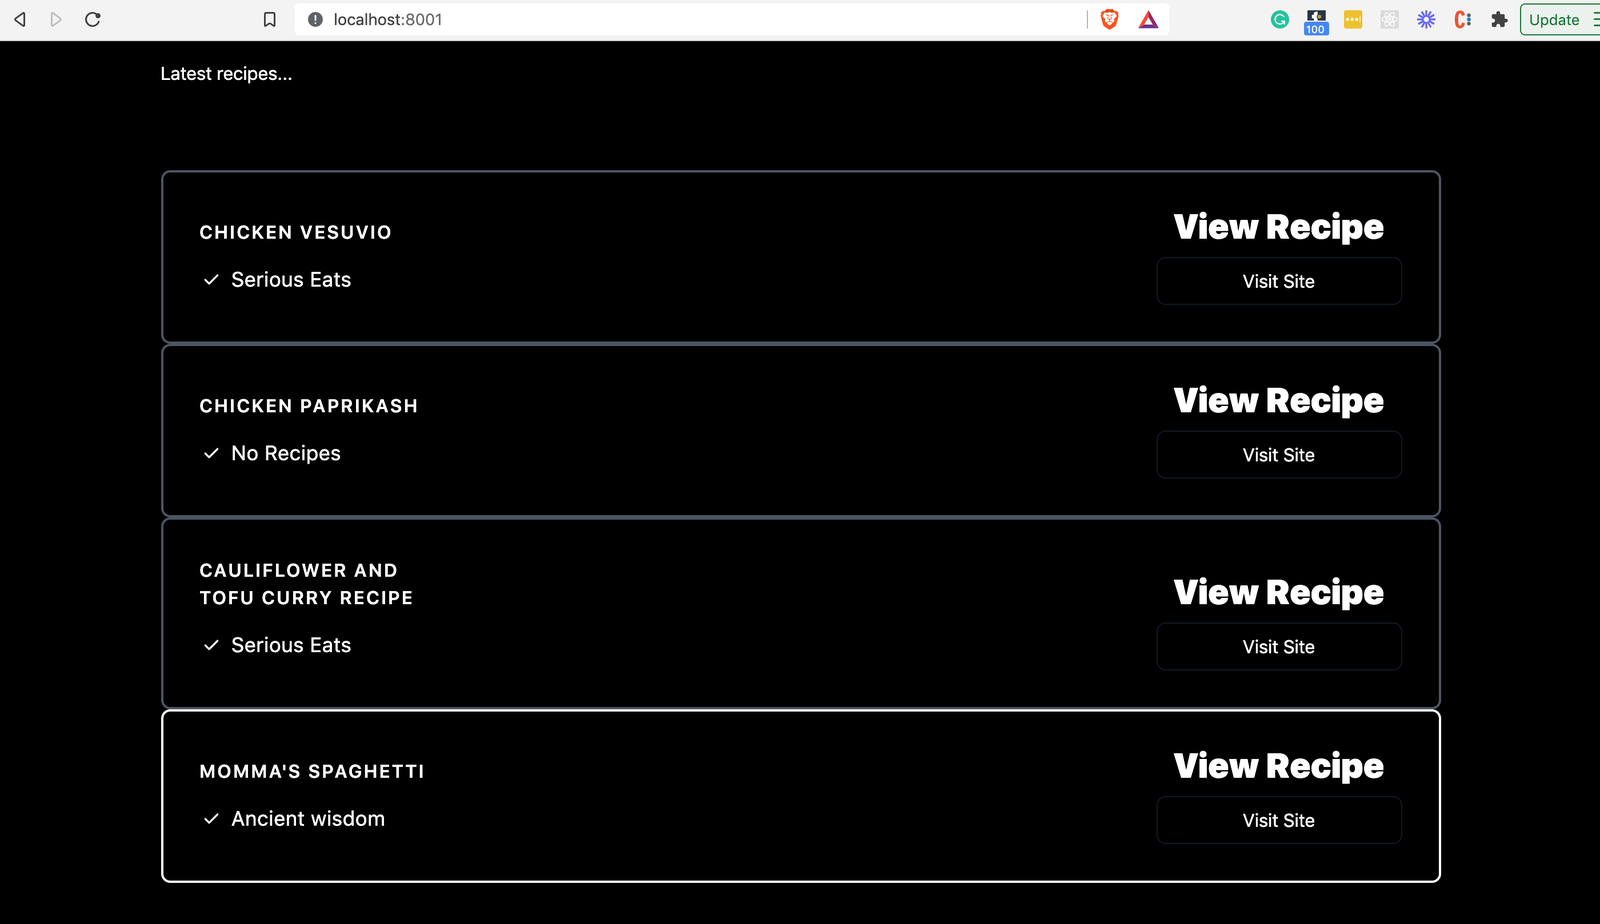
The database is now hooked up to our API!
Continue Learning FastAPI
Phew! That was a long one. In the next part of the tutorial, we’ll take stock and update our app structure to be really production-ready as well as adding proper config and API versioning. We’re well on our way now.