The Ultimate FastAPI Tutorial Part 10 - Auth via JSON Web Token (JWT)
In part 10 of the FastAPI tutorial, we'll look at setting up JWT auth endpoints
Introduction
Welcome to the Ultimate FastAPI tutorial series. This post is part 10. The series is a project-based tutorial where we will build a cooking recipe API. Each post gradually adds more complex functionality, showcasing the capabilities of FastAPI, ending with a realistic, production-ready API. The series is designed to be followed in order, but if you already know FastAPI you can jump to the relevant part.
Code
Project github repo directory for this part of the tutorial
Tutorial Series Contents
Optional Preamble: FastAPI vs. Flask
Beginner Level Difficulty
Part 1: Hello World
Part 2: URL Path Parameters & Type Hints
Part 3: Query Parameters
Part 4: Pydantic Schemas & Data Validation
Part 5: Basic Error Handling
Part 6: Jinja Templates
Part 6b: Basic FastAPI App Deployment on Linode
Intermediate Level Difficulty
Part 7: Setting up a Database with SQLAlchemy and its ORM
Part 8: Production app structure and API versioning
Part 9: Creating High Performance Asynchronous Logic via async def and await
Part 10: Authentication via JWT
Part 11: Dependency Injection and FastAPI Depends
Part 12: Setting Up A React Frontend
Part 13: Using Docker, Uvicorn and Gunicorn to Deploy Our App to Heroku
Part 14: Using Docker and Uvicorn to Deploy Our App to IaaS (Coming soon)
Part 15: Exploring the Open Source Starlette Toolbox - GraphQL (Coming soon)
Part 16: Alternative Backend/Python Framework Comparisons (i.e. Django) (Coming soon)
Post Contents
Theory Section - JWT Auth Overview
Practical Section 1 - Implementing JWT Auth Endpoints - Sign Up Flow
Practical Section 2 - Implementing JWT Auth Endpoints - Login Flow
![]()
Theory Section - JWT Auth Overview
What Do We Mean by Auth: Authentication vs. Authorization
When people talk about “auth” they are talking about:
- Authentication: Determines whether users are who they claim to be
- Authorization: Determines what users can and cannot access
In short, access to a resource is protected by both authentication and authorization. If you can’t prove your identity, you won’t be allowed into a resource. And even if you can prove your identity, if you are not authorized for that resource, you will still be denied access.
Most of what we’re covering in this tutorial is authentication, but it lays the foundation necessary for authorization.
What’s a JWT?
JSON Web Token (JWT, stupidly pronounced “jot”) is an open standard (RFC 7519) that defines a way for transmitting information –like authentication and authorization facts– between two parties: an issuer and an audience. Communication is safe because each token issued is digitally signed, so the consumer can verify if the token is authentic or has been forged. There are quite a few different ways to sign the token which are discussed in more detail here
A JSON Web Token is basically a long encoded text string. This string is consists of three smaller parts, separated by a period. These parts are:
- the header
- a payload or body
- a signature
Therefore, tokens will look like this:
header.payload.signature
JSON web tokens are not “secrets” (unless you choose to encrypt them) like API tokens. However, because they
are signed they cannot be easily tampered with - this is their value.
JWTs are designed to be passed around.
In fact, here is one for our example app which you can copy and paste into jwt.io to play
with: eyJhbGciOiJIUzI1NiIsInR5cCI6IkpXVCJ9.eyJ0eXBlIjoiYWNjZXNzX3Rva2VuIiwiZXhwIjoxNjI5NzMyNzY2LCJpYXQiOjE2MjkwNDE1NjYsInN1YiI6IjUifQ.rJCd2LxtEn5hJz3OASul0bhHf2GlFKfCNNk48q0pb4o
You should see:
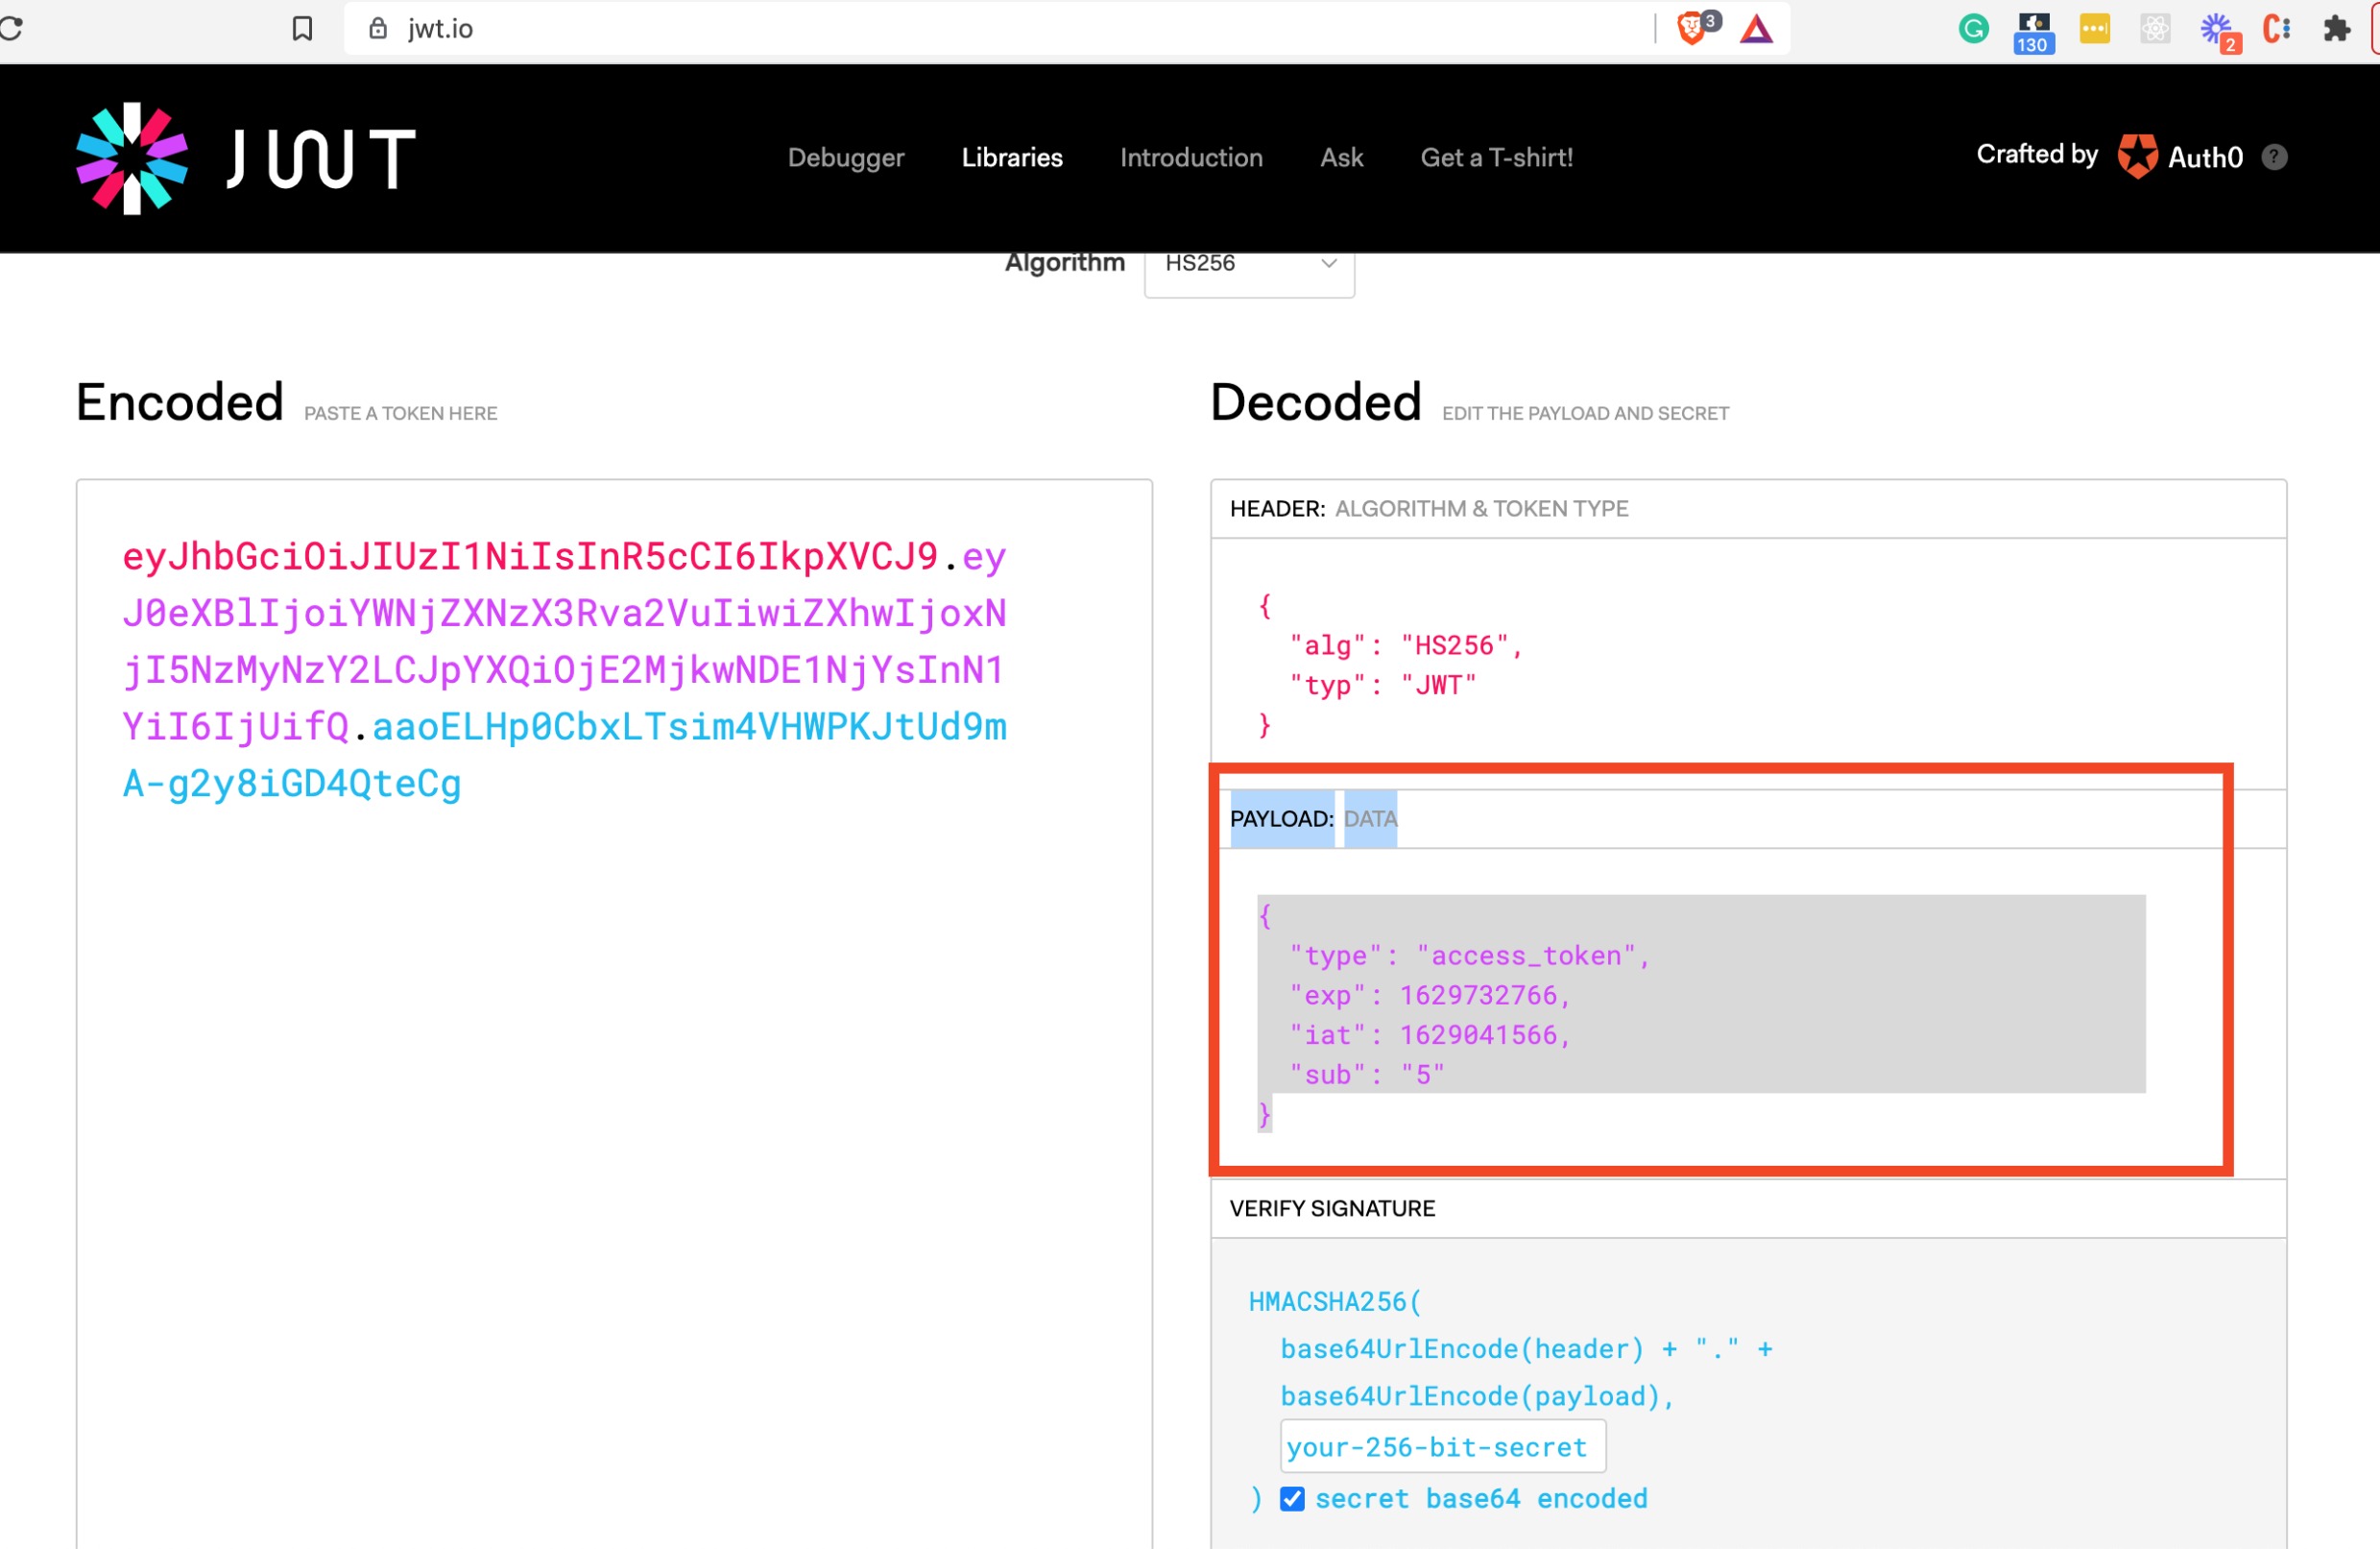
Notice the decoded section on the right consists of three parts.
Why Use JWTs?
It all comes down to state. The HTTP protocol is stateless, so when calling protected API endpoints our options are:
- Send a username/password for every request
- Something smarter than (1)
With JWTs, the client (e.g. a user’s browser) will store a copy of the JWT after logging in and then include it in subsequent request headers. On the server, this token is decoded and verified. This means there is no need for every protected endpoint request to include login credentials.
Typical JWT auth use cases include:
- A non-server-side rendered web frontend, such as one written in a frontend framework like React, Angular or Vue.
- A backend microservice
- An external service
- A mobile app
- A desktop app
This tutorial series’s project, a recipe API, is a realistic scenario where we would want an auth solution.
There are alternatives to JWTs such as:
- Fernet
- Branca
- Platform-Agnostic Security Tokens (PASETO)
The pros and cons of these alternatives are discussed here. I am not a security expert, so do your research. This post assumes that you have decided to go down the JWT route (which is very popular). Let’s get coding!
Practical Section 1 - Implementing JWT Auth Endpoints - Sign Up Flow
Let’s take a look at the new additions to the app directory in part 10:
./app
├── __init__.py
├── api
│  ├── __init__.py
│  ├── api_v1
│  │  ├── __init__.py
│  │  ├── api.py          ----> UPDATED
│  │  └── endpoints
│  │     ├── __init__.py
│  │     ├── auth.py      ----> ADDED
│  │     └── recipe.py
│  └── deps.py            ----> UPDATED
├── backend_pre_start.py  ----> UPDATED
├── core
│  ├── __init__.py
│  ├── auth.py            ----> ADDED
│  ├── config.py          ----> UPDATED
│  └── security.py        ----> ADDED
├── crud
│  ├── __init__.py
│  ├── base.py
│  ├── crud_recipe.py
│  └── crud_user.py       ----> UPDATED
├── db
│  ├── __init__.py
│  ├── base.py
│  ├── base_class.py
│  ├── init_db.py
│  └── session.py
├── initial_data.py
├── main.py
├── models
│  ├── __init__.py
│  ├── recipe.py
│  └── user.py            ----> UPDATED
├── schemas
│  ├── __init__.py
│  ├── recipe.py
│  └── user.py            ----> UPDATED
└── templates
   └── index.html
To follow along:
- Clone the tutorial project repo
cdinto part-10pip install poetry(if you don’t have it already)poetry install- If you’re continuing from part 9, remove your SQLite database
rm example.dbas we’ve made some breaking changes to the DB schema (ignore if you’re starting here) poetry run ./prestart.sh(sets up a new DB in this directory)poetry run ./run.sh- Open http://localhost:8001
To begin, we’ve added three new endpoints to our recipe API. These are in the
api/api_v1/endpoints/auth.py module. We’ll start by considering the new /signup
POST endpoint where we will create new users:
@router.post("/signup", response_model=schemas.User, status_code=201)  # 1
def create_user_signup(
    *,
    db: Session = Depends(deps.get_db),  # 2
    user_in: schemas.user.UserCreate,  # 3
) -> Any:
    """
    Create new user without the need to be logged in.
    """

    user = db.query(User).filter(User.email == user_in.email).first()  # 4
    if user:
        raise HTTPException(  # 5
            status_code=400,
            detail="The user with this email already exists in the system",
        )
    user = crud.user.create(db=db, obj_in=user_in)  # 6

    return user
Let’s break this down:
- As shown in Part 4 of the series
we specify a Pydantic
response_modelwhich shapes the endpoint JSON response. - As shown in Part 7 of the series we specify the database as a dependency of the endpoint via FastAPI’s dependency injection capabilities.
- The POST request body is validated according to the
UserCreatepydantic schema. There are some really powerful tweaks we’ve made in the user schemas we will cover shortly. - As covered in Part 7 of the series
we use the SQLAlchemy ORM to query the database
usertable, applying a filter to check if any users with the requested email already exist. - In order to ensure user emails are unique, if a matching user is found (i.e. an existing user with the same email address) then we return an HTTP 400 (as shown in Part 5: Basic Error Handling)
- Finally, if the user email is unique we proceed to use the
crudutility functions to create the user. We’ll take a look at this now.
If we follow the code logic, we arrive at the call to crud.user.create(db=db, obj_in=user_in). Let’s take a look at this
code in app/crud/crud_user.py:
from typing import Any, Dict, Optional, Union

from sqlalchemy.orm import Session

from app.crud.base import CRUDBase
from app.models.user import User
from app.schemas.user import UserCreate, UserUpdate
from app.core.security import get_password_hash


class CRUDUser(CRUDBase[User, UserCreate, UserUpdate]):
    def get_by_email(self, db: Session, *, email: str) -> Optional[User]:
        return db.query(User).filter(User.email == email).first()

    def create(self, db: Session, *, obj_in: UserCreate) -> User:
        create_data = obj_in.dict()
        create_data.pop("password")
        db_obj = User(**create_data)
        db_obj.hashed_password = get_password_hash(obj_in.password)
        db.add(db_obj)
        db.commit()

        return db_obj

    # skipping...

user = CRUDUser(User)
We need to consider this code alongside the updated UserCreate schema in app/schemas/user.py which now includes the
password field:
# Properties to receive via API on creation
class UserCreate(UserBase):
    email: EmailStr
    password: str
Crucially, you’ll note that in the create method (note that we’re overriding the parent CRUDBase method),
we convert the Pydantic model to a dictionary by calling obj_in.dict()
and then remove the password entry from the dictionary via .pop(). Then to generate the hashed password we call a new
method get_password_hash. Let’s look at this function next.
When a password has been “hashed” it means it has been turned into a scrambled
representation of itself (more detail here).
A user’s password is taken and – using a key known to the
site – the hash value is derived from the combination of both the password and the key,
using a set algorithm. In the recipe API, we’ll use the passlib
library to help us with this functionality. From the docs:
Passlib is a password hashing library for Python 2 & 3, which provides cross-platform implementations of over 30 password hashing algorithms, as well as a framework for managing existing password hashes. It’s designed to be useful for a wide range of tasks, from verifying a hash found in /etc/shadow, to providing full-strength password hashing for multi-user application.
This library can be seen in use in the app/core/security.py module:
from passlib.context import CryptContext


PWD_CONTEXT = CryptContext(schemes=["bcrypt"], deprecated="auto")


def verify_password(plain_password: str, hashed_password: str) -> bool:
    return PWD_CONTEXT.verify(plain_password, hashed_password)


def get_password_hash(password: str) -> str:
    return PWD_CONTEXT.hash(password)

# skipping...
Here the CryptContext class from passlib is used to hash and verify user passwords.
The last step in the user creation flow is updating our database. We’ll have to make one change to the user table:
class User(Base):
    id = Column(Integer, primary_key=True, index=True)
    first_name = Column(String(256), nullable=True)
    surname = Column(String(256), nullable=True)
    email = Column(String, index=True, nullable=False)
    is_superuser = Column(Boolean, default=False)
    recipes = relationship(
        "Recipe",
        cascade="all,delete-orphan",
        back_populates="submitter",
        uselist=True,
    )

    # New addition
    hashed_password = Column(String, nullable=False)
Notice the new column hashed_password.
So this is our flow to create a user. Those following along from previous tutorial posts will note that I’ve tweaked
the alembic migration and the app/db/init_db.py script to accommodate creating users with a password.
Practical Section 2 - Implementing JWT Auth Endpoints - Login Flow
Next, let’s consider the new /login endpoint:
from fastapi.security import OAuth2PasswordRequestForm
# skipping...

@router.post("/login")
def login(
    db: Session = Depends(deps.get_db), form_data: OAuth2PasswordRequestForm = Depends()  # 1
) -> Any:
    """
    Get the JWT for a user with data from OAuth2 request form body.
    """

    user = authenticate(email=form_data.username, password=form_data.password, db=db)  # 2
    if not user:
        raise HTTPException(status_code=400, detail="Incorrect username or password")  # 3

    return {
        "access_token": create_access_token(sub=user.id),  # 4
        "token_type": "bearer",
    }

# skipping...
Notice that we use FastAPI’s OAuth2PasswordRequestForm dependency
in the path operation function.
OAuth2PasswordRequestForm is a class dependency that declares a form body with:
- The username.
- The password.
- An optional grant_type
- An optional scope field as a big string, composed of strings separated by spaces. (not required for our example)
- An optional client_id (not required for our example).
- An optional client_secret (not required for our example).
Let’s break the endpoint logic down:
- We declare the
OAuth2PasswordRequestFormdependency - We check the request body via a new
authenticatefunction (we’ll look at this in a moment) - If authentication fails, no user is returned, this triggers an HTTP 400 response
- Finally, the JSON web token is created and returned to the client via the
create_access_tokenfunction (we’ll look at this in a moment).
Both of the new functions in the above list (authenticate and create_access_token) are from the new
app/core/auth.py module. Let’s consider this module in its entirety now. You’ll note that at this point
in the tutorial series we’ve introduced another external dependency, python-jose
which provides us with a variety of cryptographic backends for encrypting and signing tokens.
from typing import Optional, MutableMapping, List, Union
from datetime import datetime, timedelta

from fastapi.security import OAuth2PasswordBearer
from sqlalchemy.orm.session import Session
from jose import jwt

from app.models.user import User
from app.core.config import settings
from app.core.security import verify_password


JWTPayloadMapping = MutableMapping[
    str, Union[datetime, bool, str, List[str], List[int]]
]

oauth2_scheme = OAuth2PasswordBearer(tokenUrl=f"{settings.API_V1_STR}/auth/login")


def authenticate(
    *,
    email: str,
    password: str,
    db: Session,
) -> Optional[User]:
    user = db.query(User).filter(User.email == email).first()
    if not user:
        return None
    if not verify_password(password, user.hashed_password):  # 1
        return None
    return user


def create_access_token(*, sub: str) -> str:  # 2
    return _create_token(
        token_type="access_token",
        lifetime=timedelta(minutes=settings.ACCESS_TOKEN_EXPIRE_MINUTES),  # 3
        sub=sub,
    )


def _create_token(
    token_type: str,
    lifetime: timedelta,
    sub: str,
) -> str:
    payload = {}
    expire = datetime.utcnow() + lifetime
    payload["type"] = token_type
    payload["exp"] = expire  # 4
    payload["iat"] = datetime.utcnow()  # 5
    payload["sub"] = str(sub)  # 6

    return jwt.encode(payload, settings.JWT_SECRET, algorithm=settings.ALGORITHM)  # 8
Quite a lot is happening here, let’s break it down:
- We use the
verify_passwordfunction we looked at earlier inapp/core/security.pywhich leverages the passlib library - The
subkeyword argument to thecreate_access_tokenfunction will correspond to the user ID - The
app/core/config.pyis updated to include some auth-related settings, such the JWT validity timeframe before expiry - We construct the JWT. There are a number of required/optional fields (known as “claims”) detailed in RFC 7519. The “exp” (expiration time) claim identifies the expiration time on or after which the JWT MUST NOT be accepted for processing.
- The “iat” (issued at) claim identifies the time at which the JWT was issued.
- The “sub” (subject) claim identifies the principal that is the subject of the JWT. This will be the user ID in our case.
If the user passes the authentication check, the /login endpoint returns the JWT to the client. This JWT can then be
used to access restricted functionality. A basic example of this is found in the third new endpoint:
@router.get("/me", response_model=schemas.User)
def read_users_me(current_user: User = Depends(deps.get_current_user)):
    """
    Fetch the current logged in user.
    """

    user = current_user
    return user
Up until now, the only dependency injection we’ve used has been for accessing the database, but we can also use it for other things, like fetching the logged-in user. We’ll explore this in more detail in the next post of the series on dependency injection.
The key code to note from the updated app/deps.py module is here:
def get_current_user(
    db: Session = Depends(get_db), token: str = Depends(oauth2_scheme)
) -> User:
    # skipping for simplicity...
    try:
        payload = jwt.decode(
            token,
            settings.JWT_SECRET,
            algorithms=[settings.ALGORITHM],
            options={"verify_aud": False},
        )
        username: str = payload.get("sub")
        token_data = TokenData(username=username)
    except JWTError:
        raise credentials_exception
    user = db.query(User).filter(User.id == token_data.username).first()
    if user is None:
        raise credentials_exception
    return user
    # skipping for simplicity...
Here the incoming JWT token is decoded (again using python-jose), with the combination of a JWT_SECRET value
set in the API app/core/config.py as well as the encoding algorithm configured there (HS256). If this decoding
is successful we “trust” the token, and are happy to fetch the user from the database.
For now, let’s try out the whole auth flow locally:
- Clone the tutorial project repo
cdinto part-10pip install poetry(if you don’t have it already)poetry install- If you’re continuing from part 9, remove your SQLite database
rm example.dbas we’ve made some breaking changes to the DB schema (ignore if you’re starting here) poetry run ./prestart.sh(sets up a new DB in this directory)poetry run ./run.sh- Open http://localhost:8001/docs
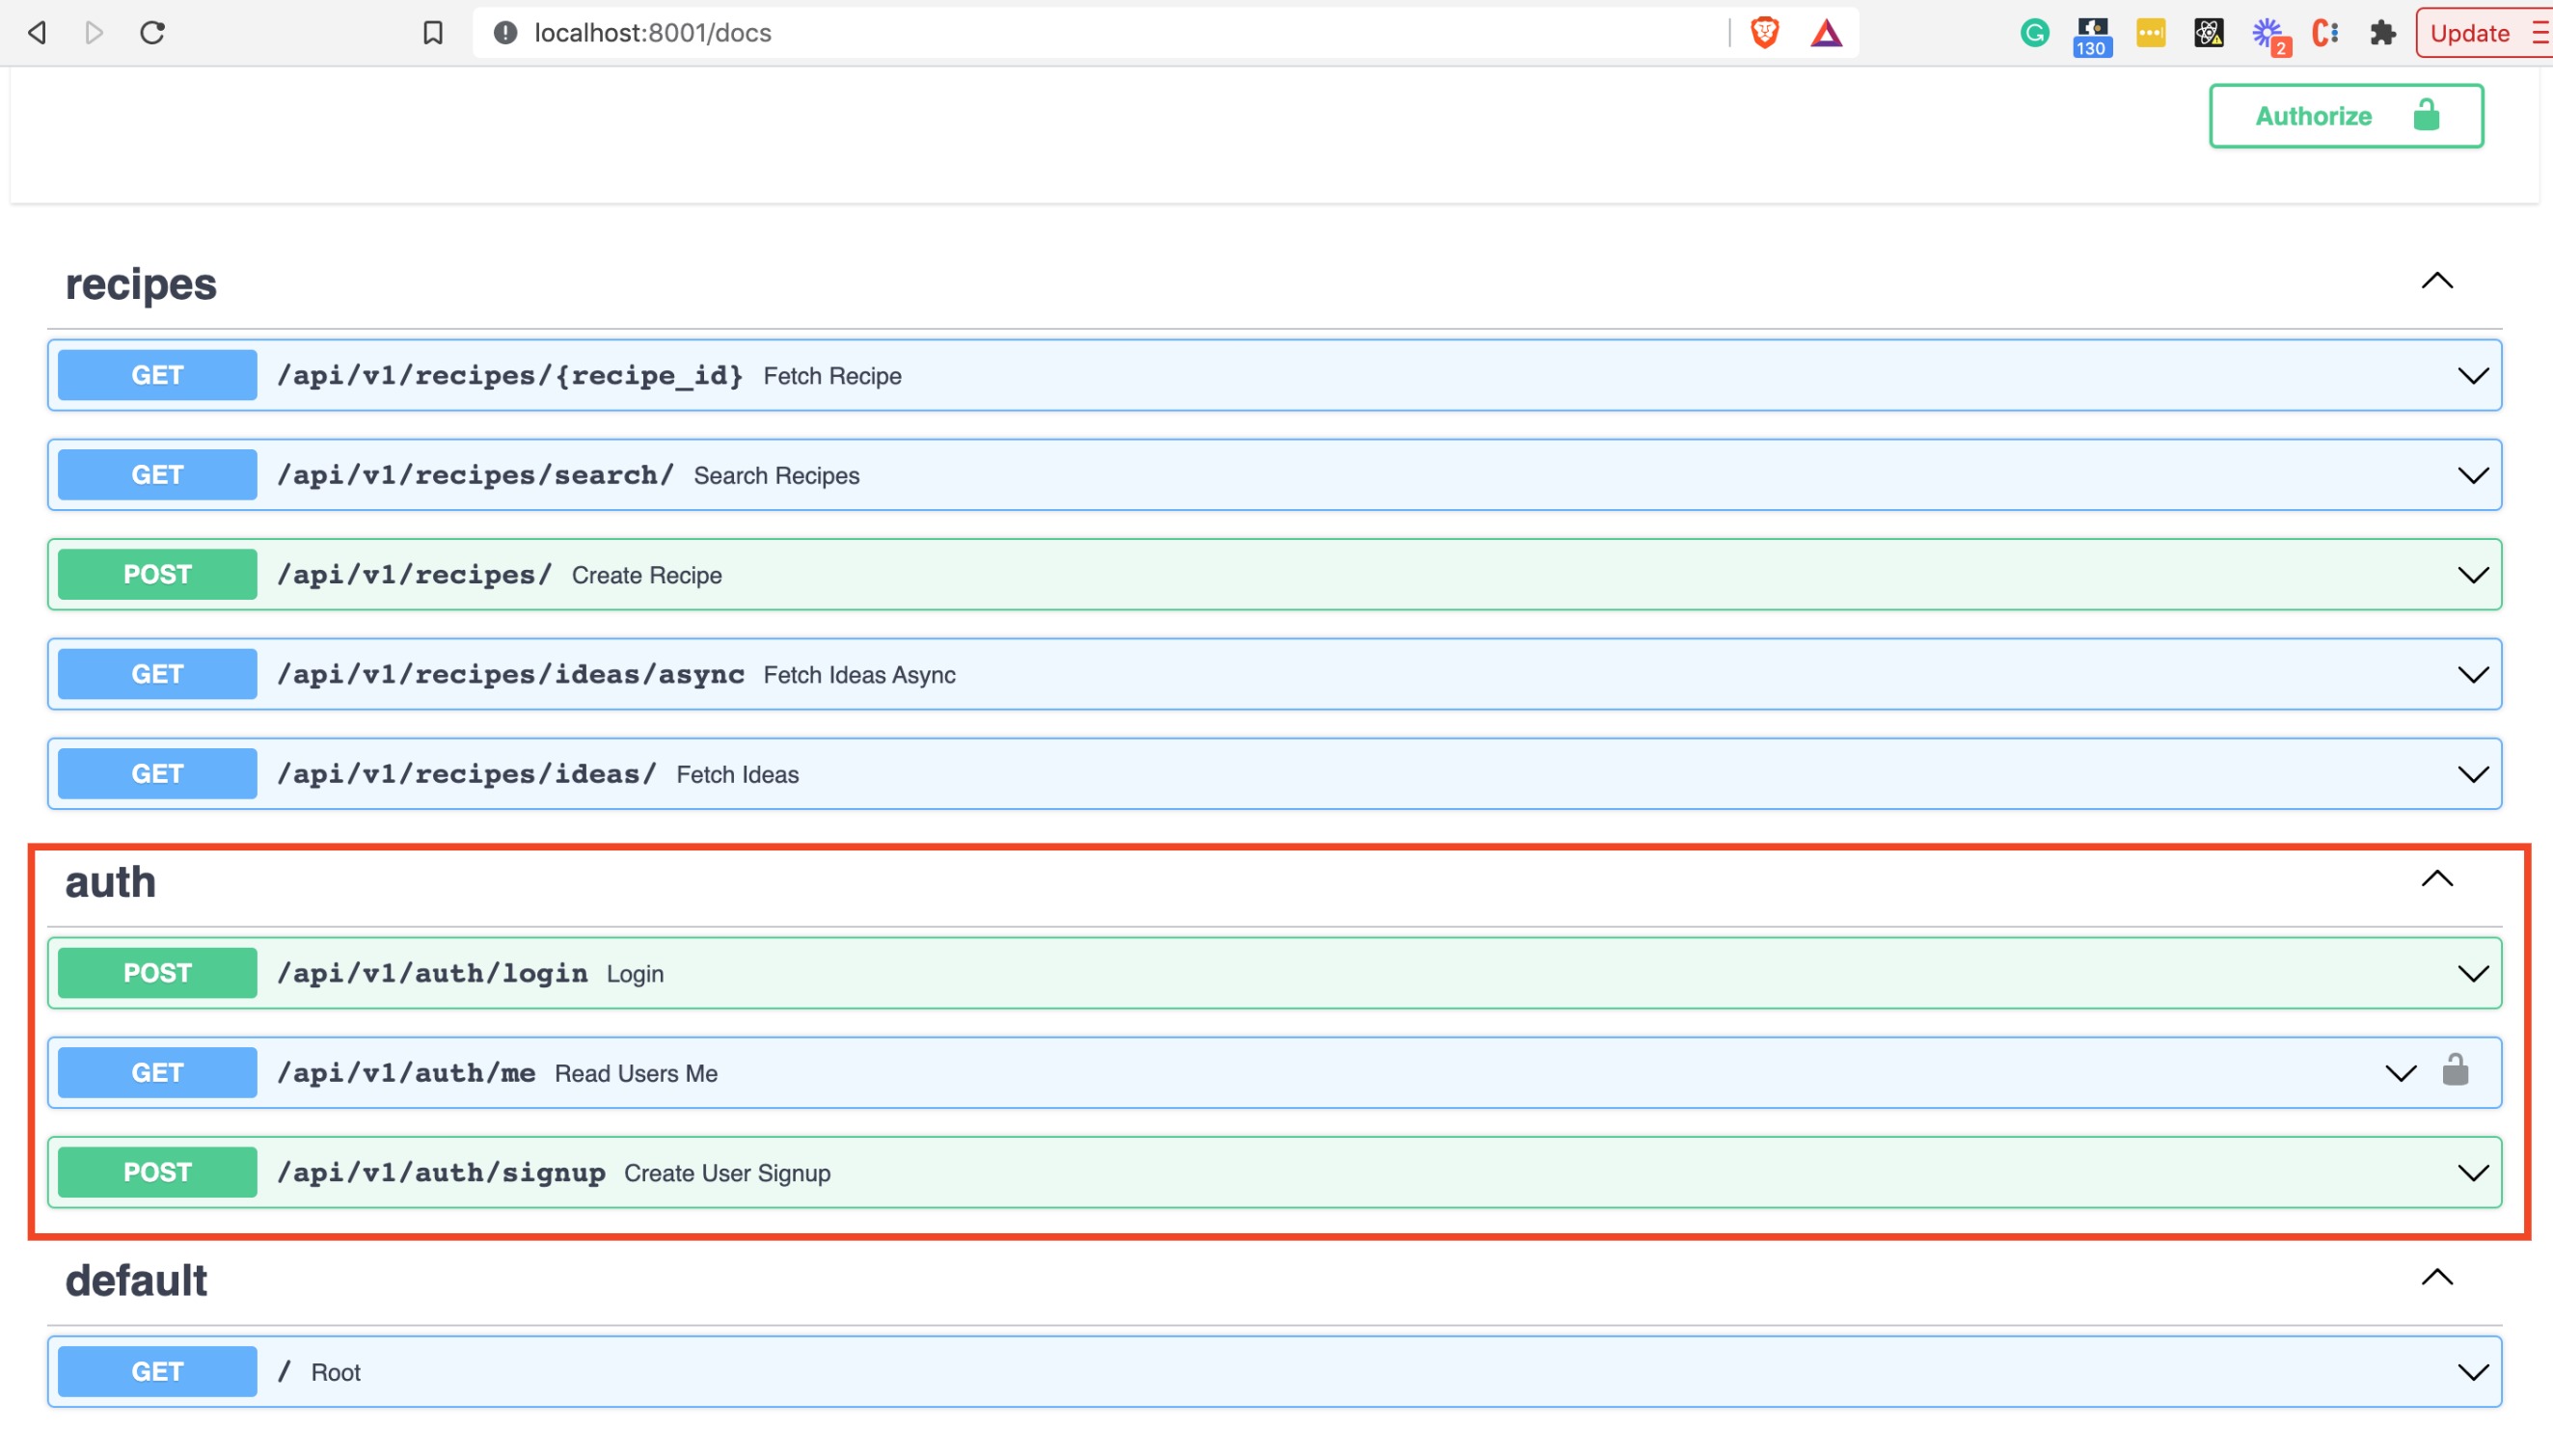
You should see the new endpoints:
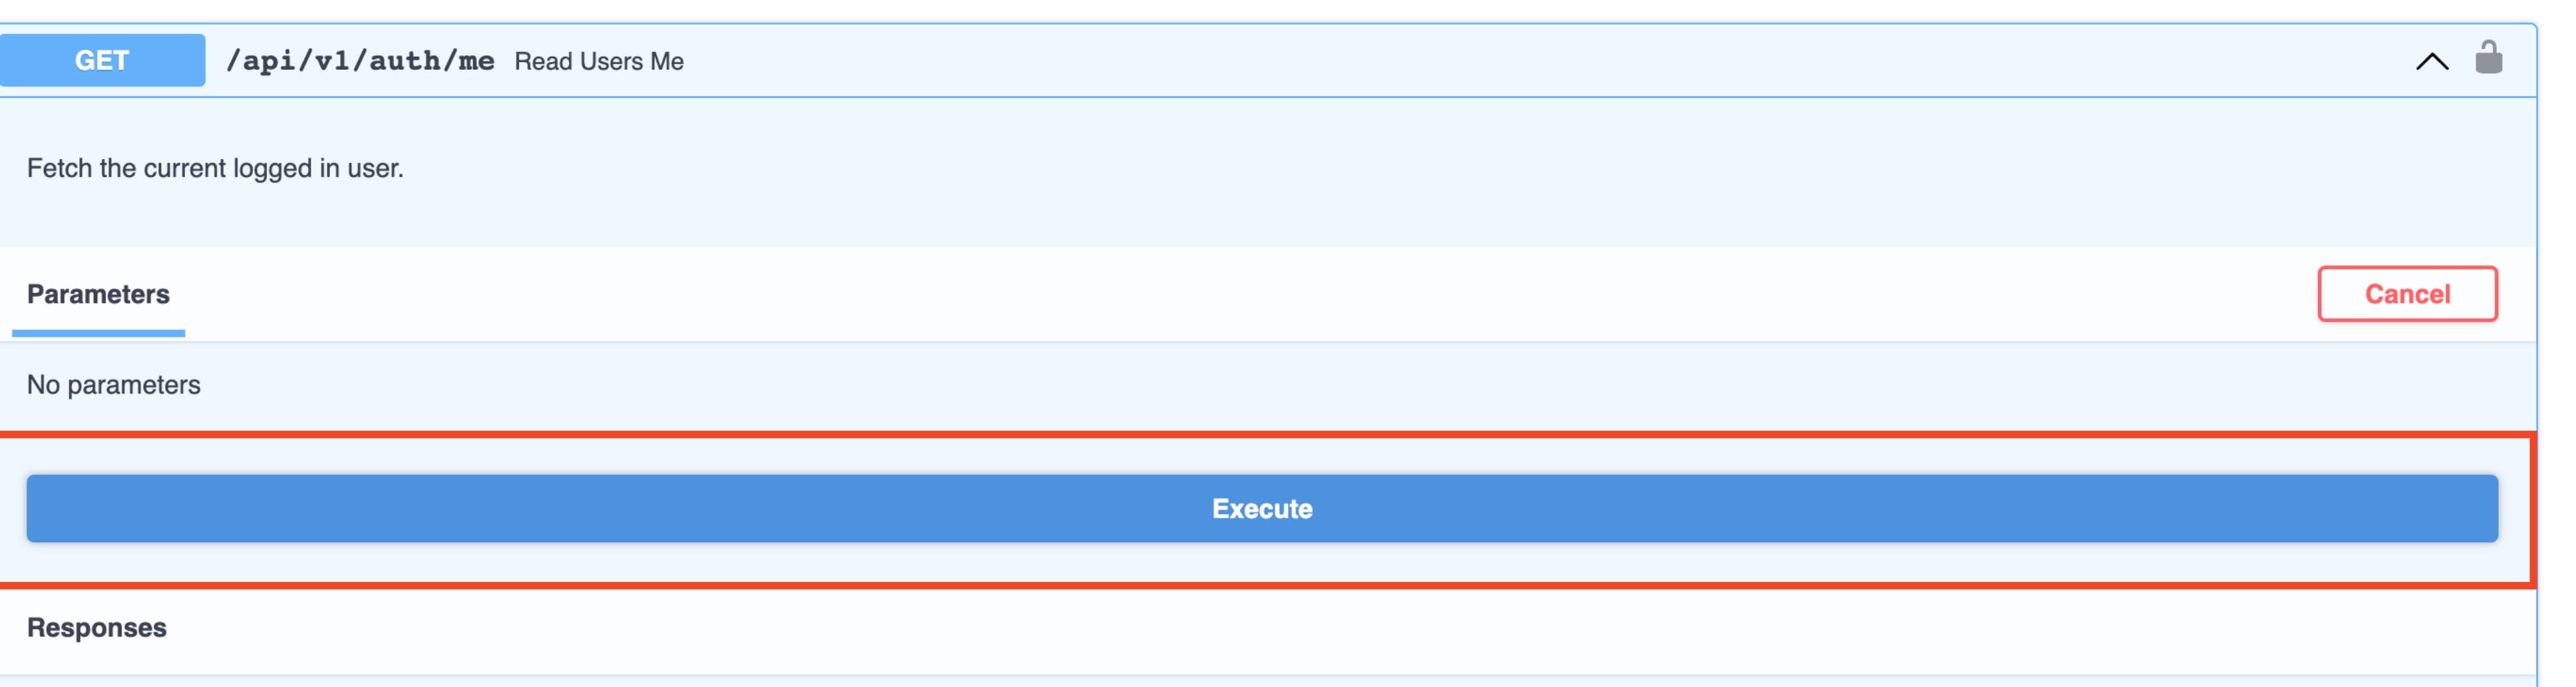
Let’s curl /api/v1/auth/me endpoint via the Try Me button:
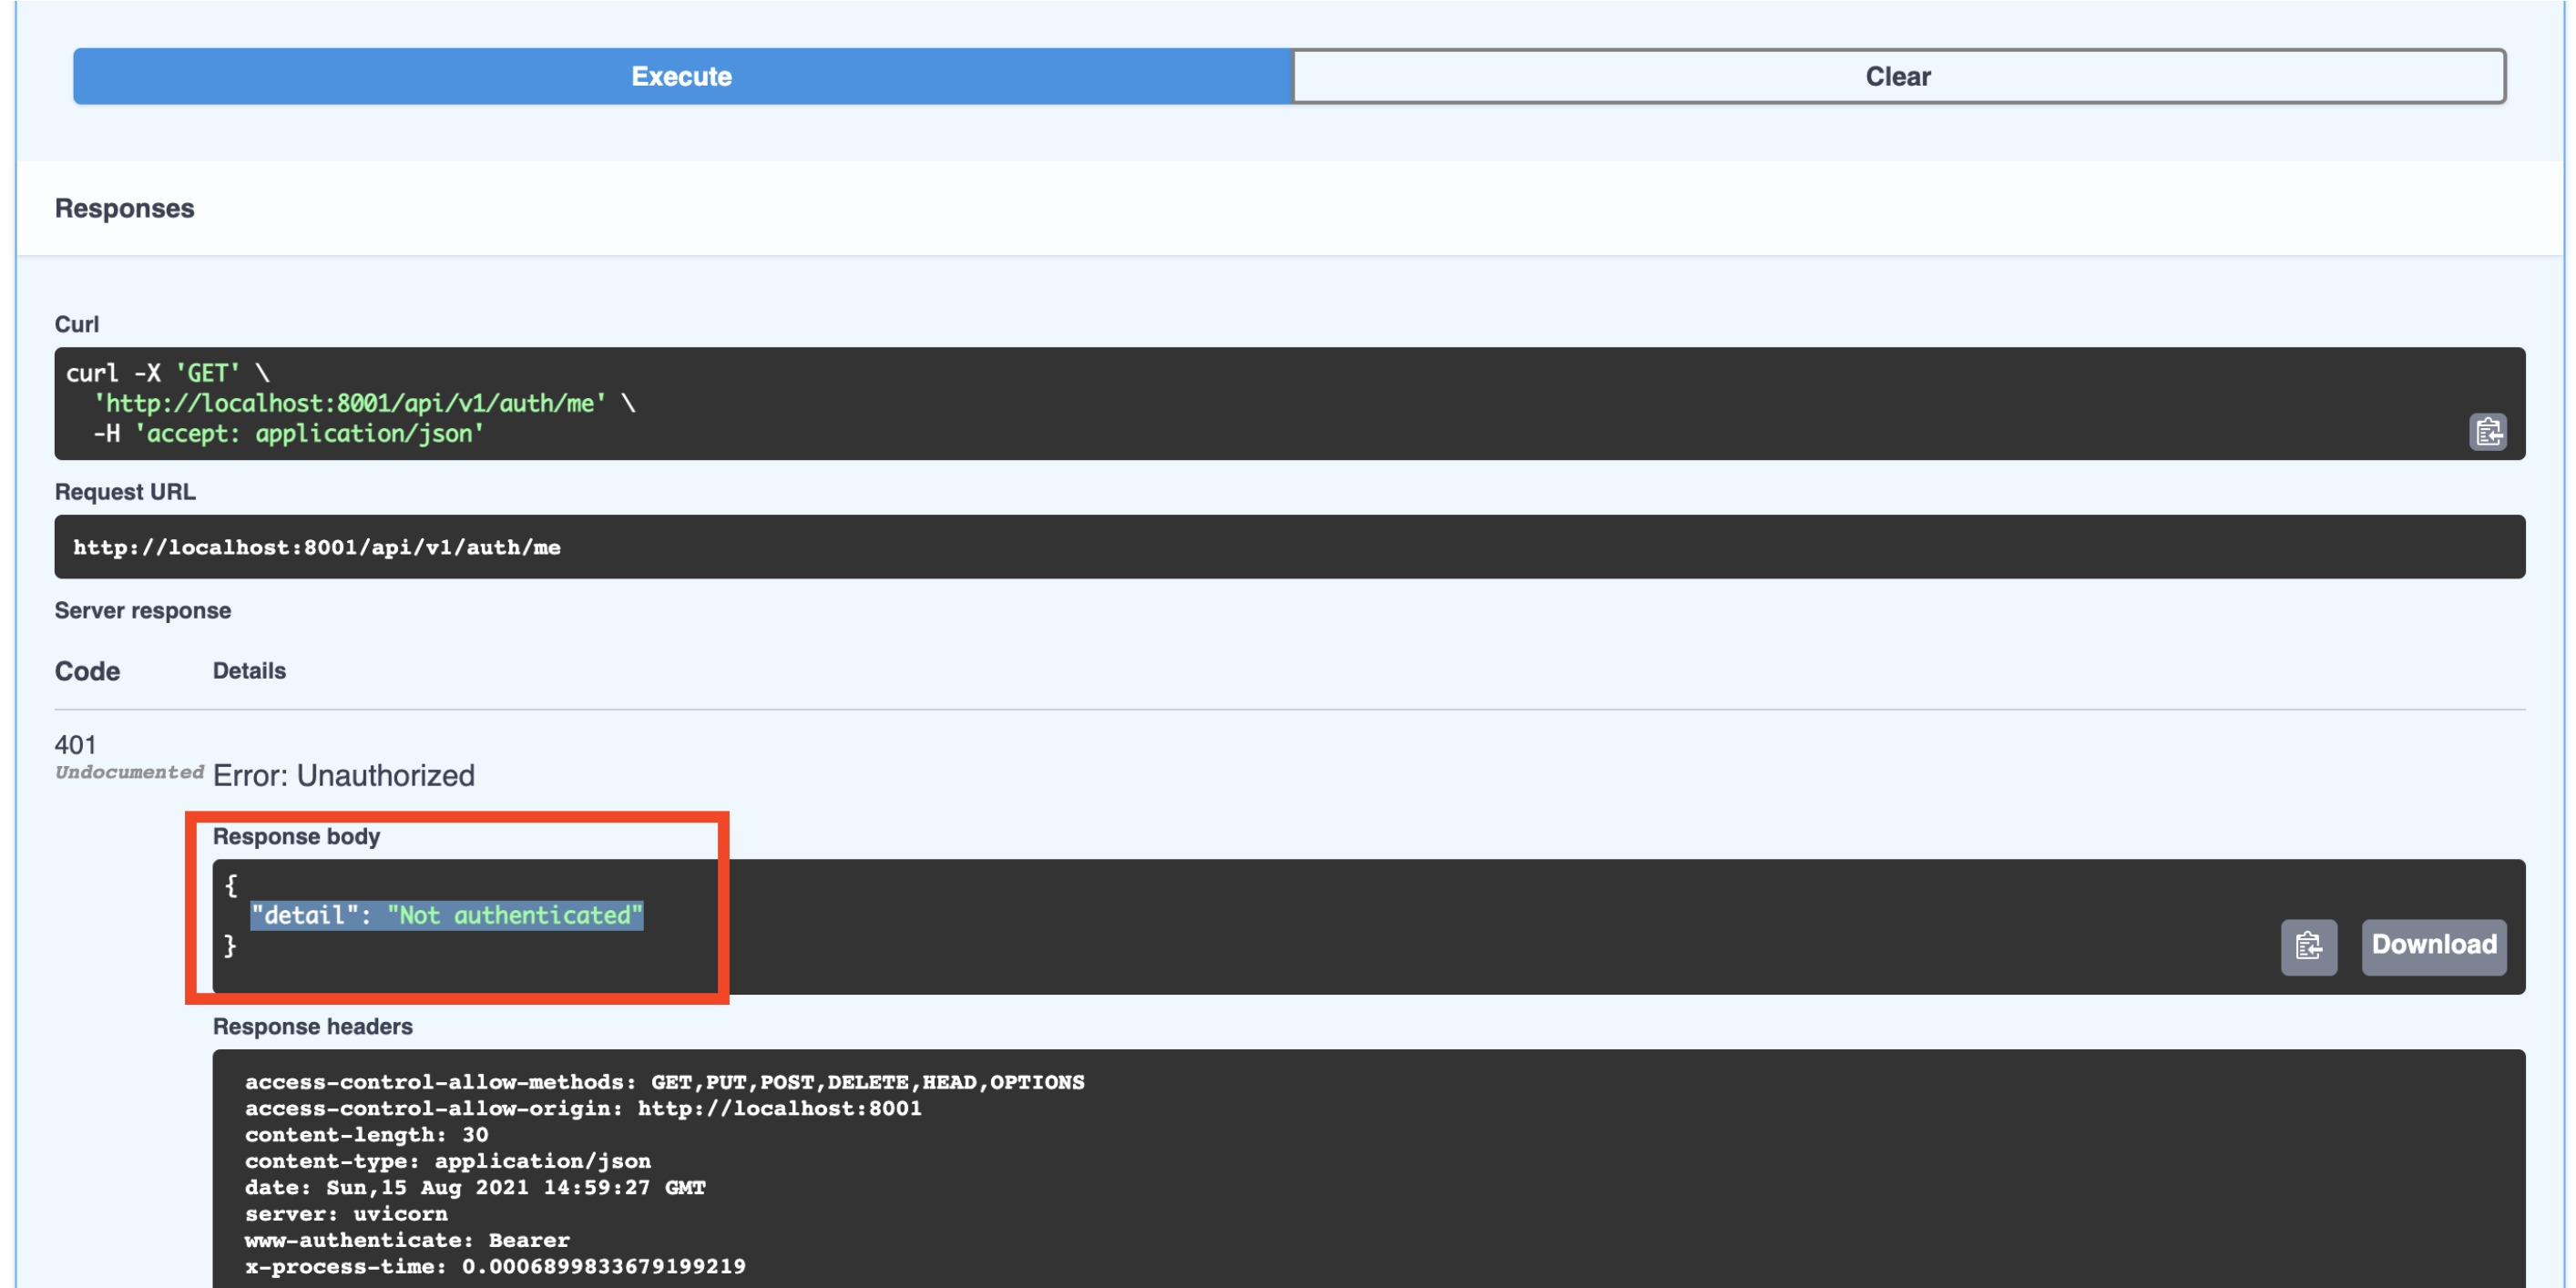
When you hit this endpoint, you should see the response is a 401 Unauthorized:
To fix this, we will first create a user via the /api/v1/auth/signup endpoint. Once again use the Try me
functionality and populate the request body fields (first_name, surname, email, password) then click
“execute”:
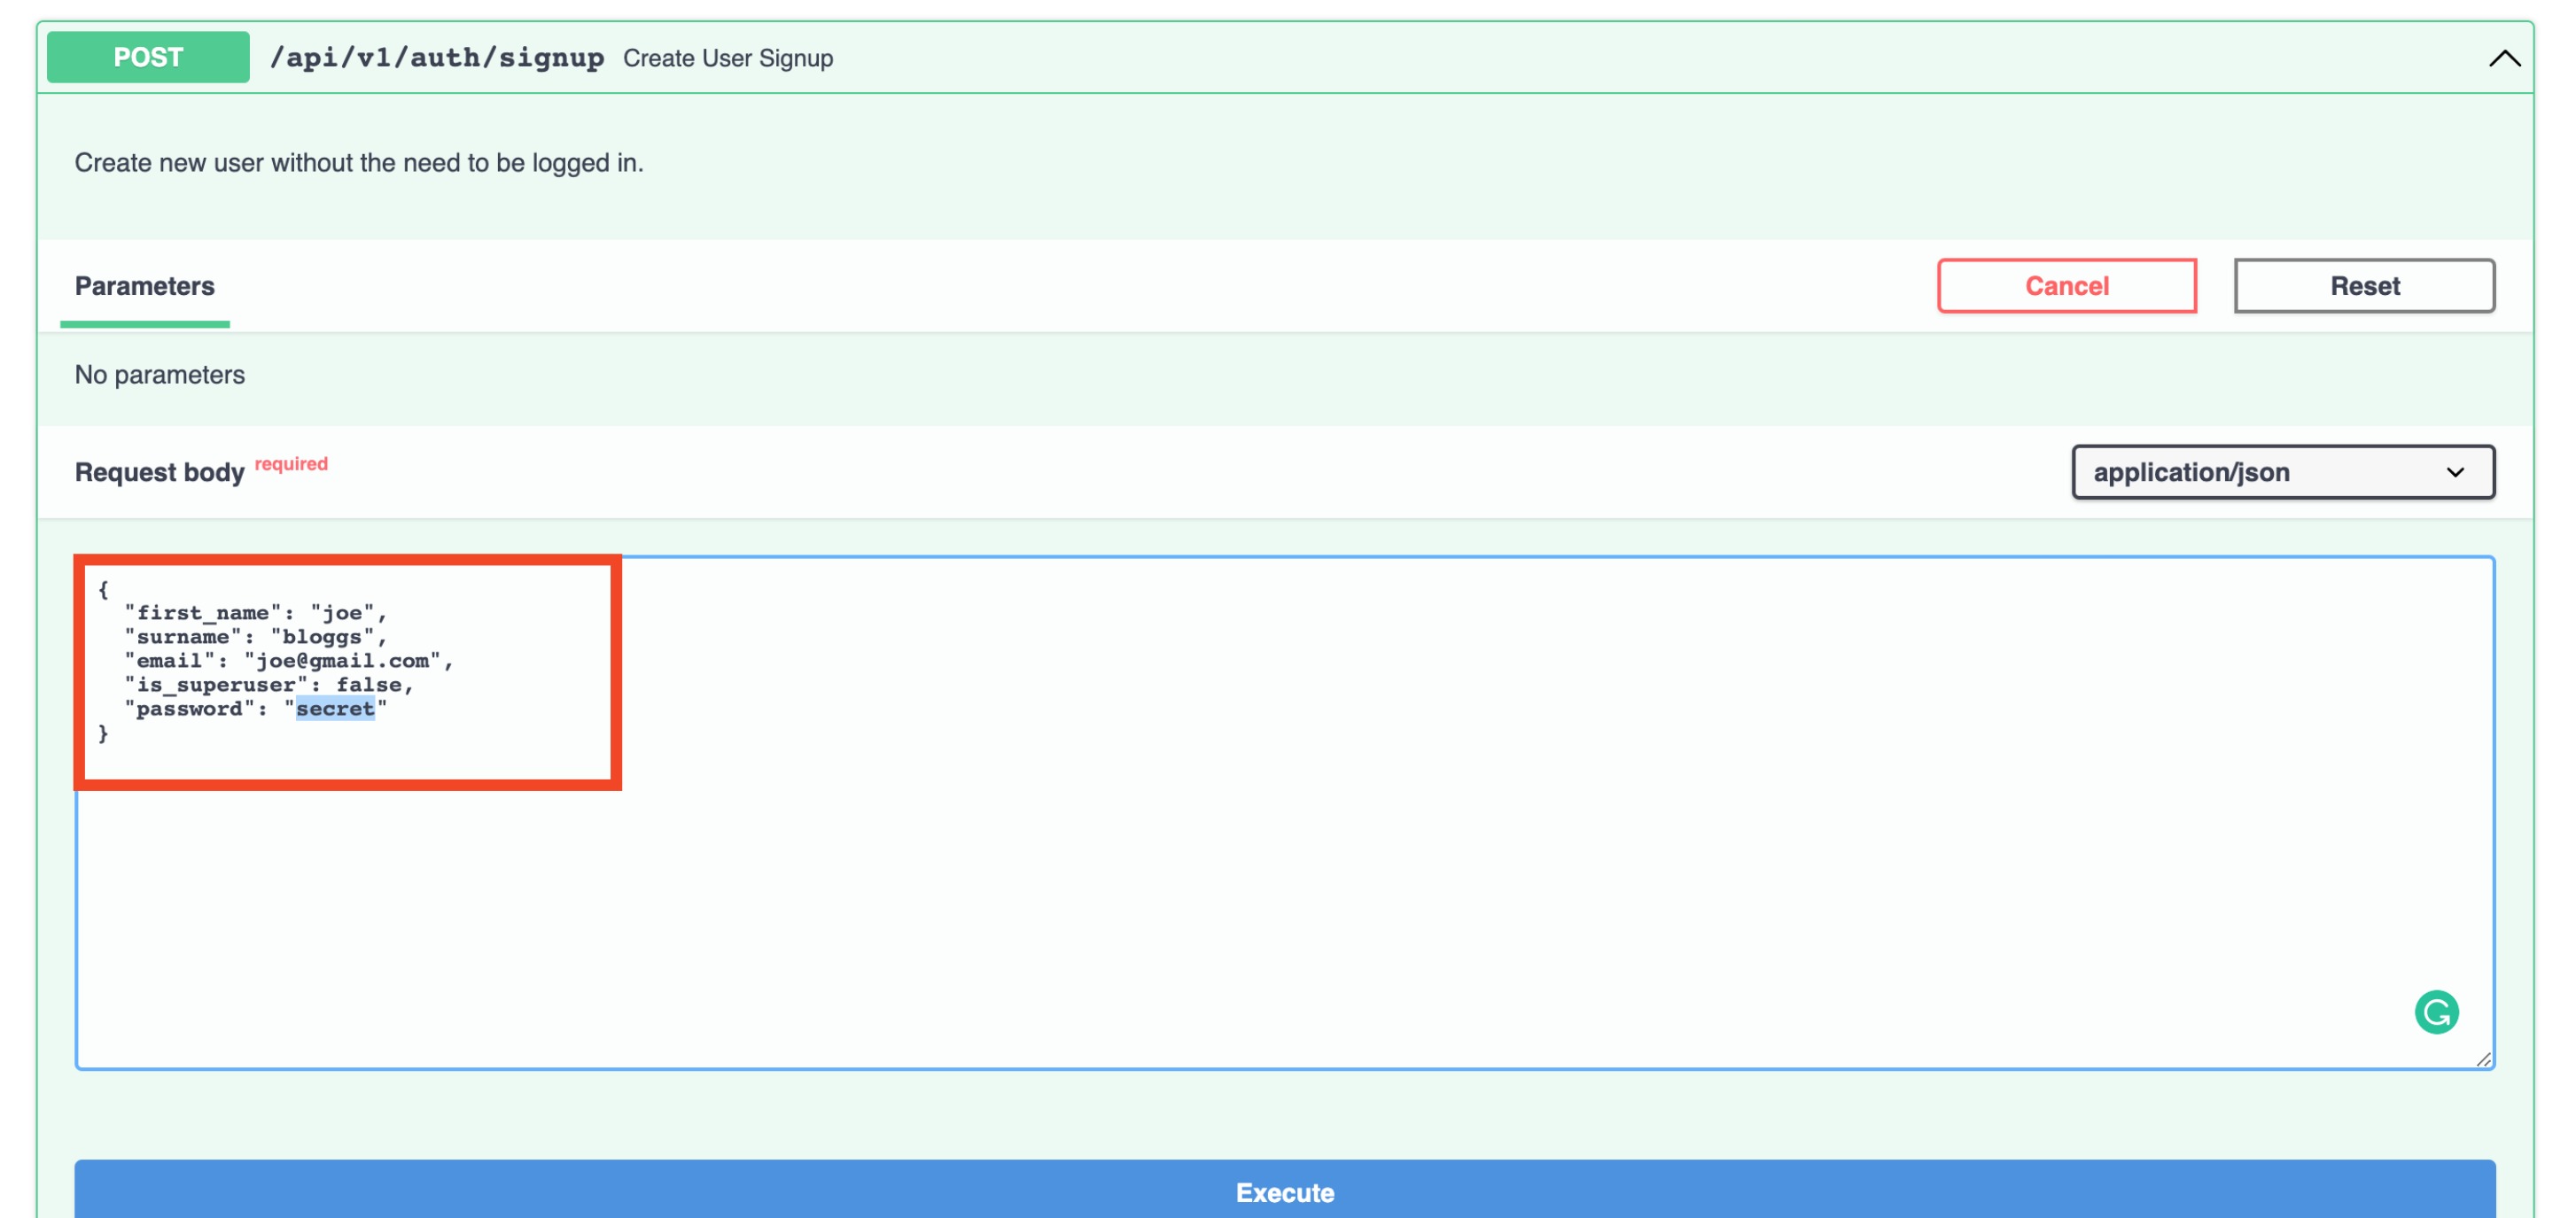
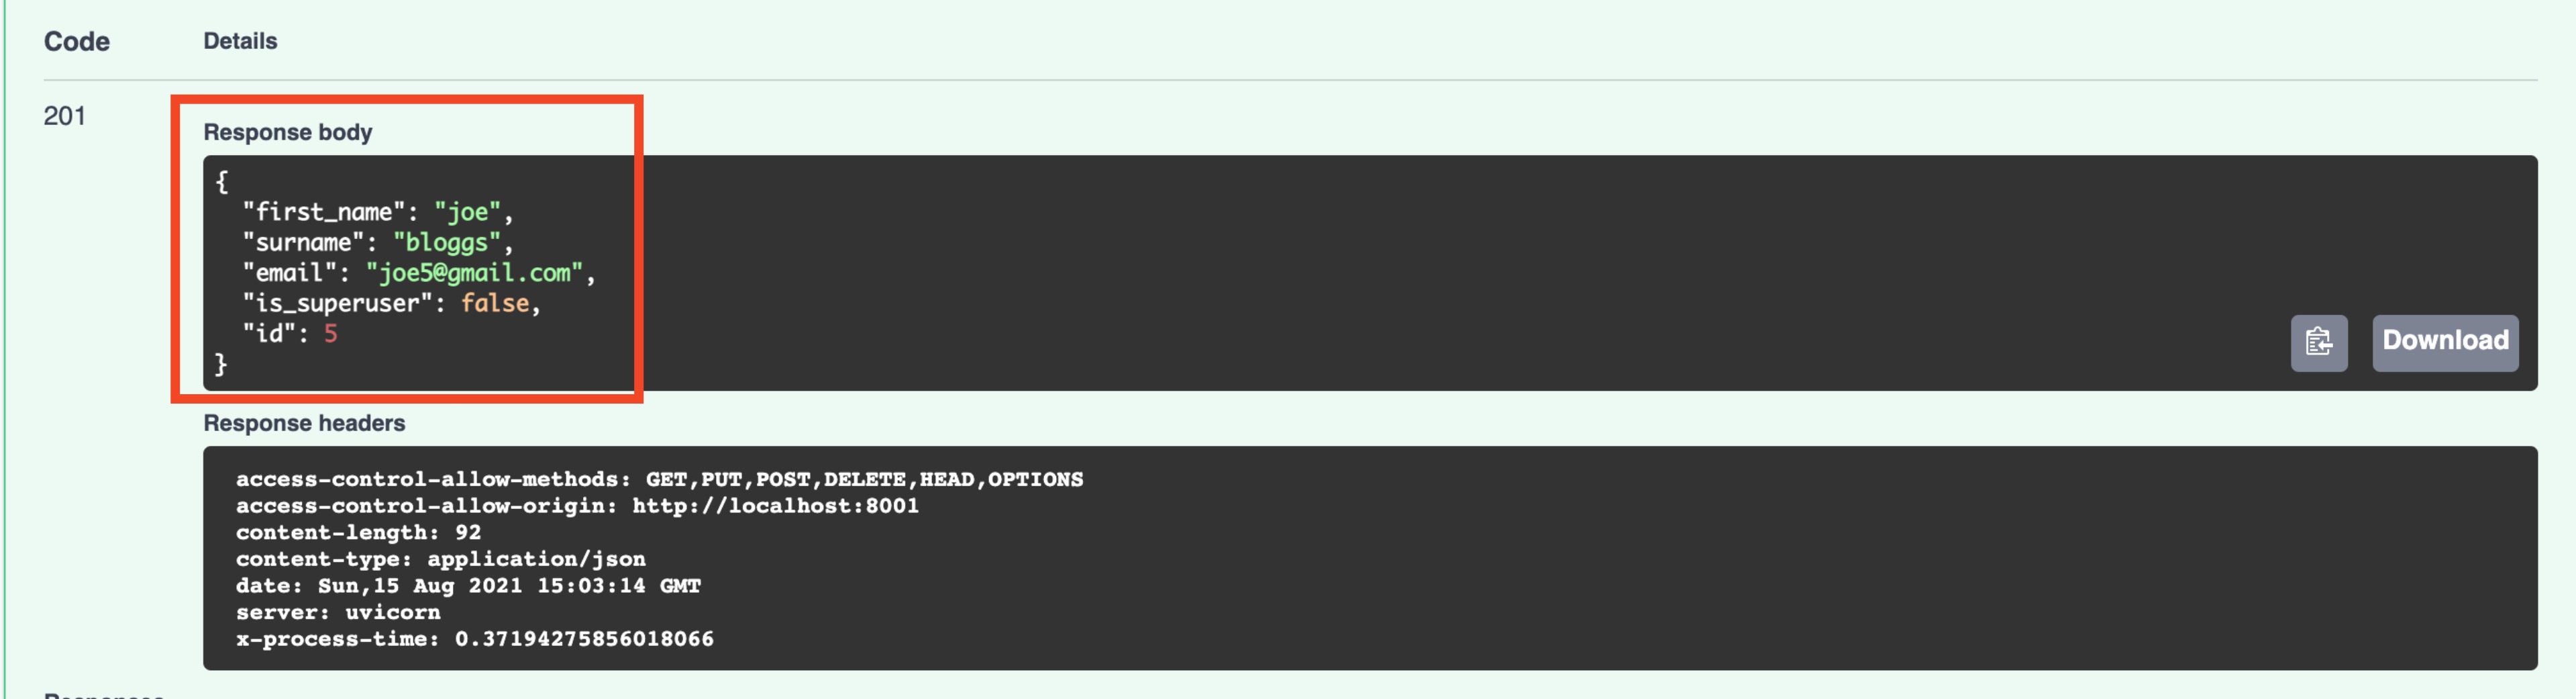
If you scroll down, you should see in the response that your user has been created:
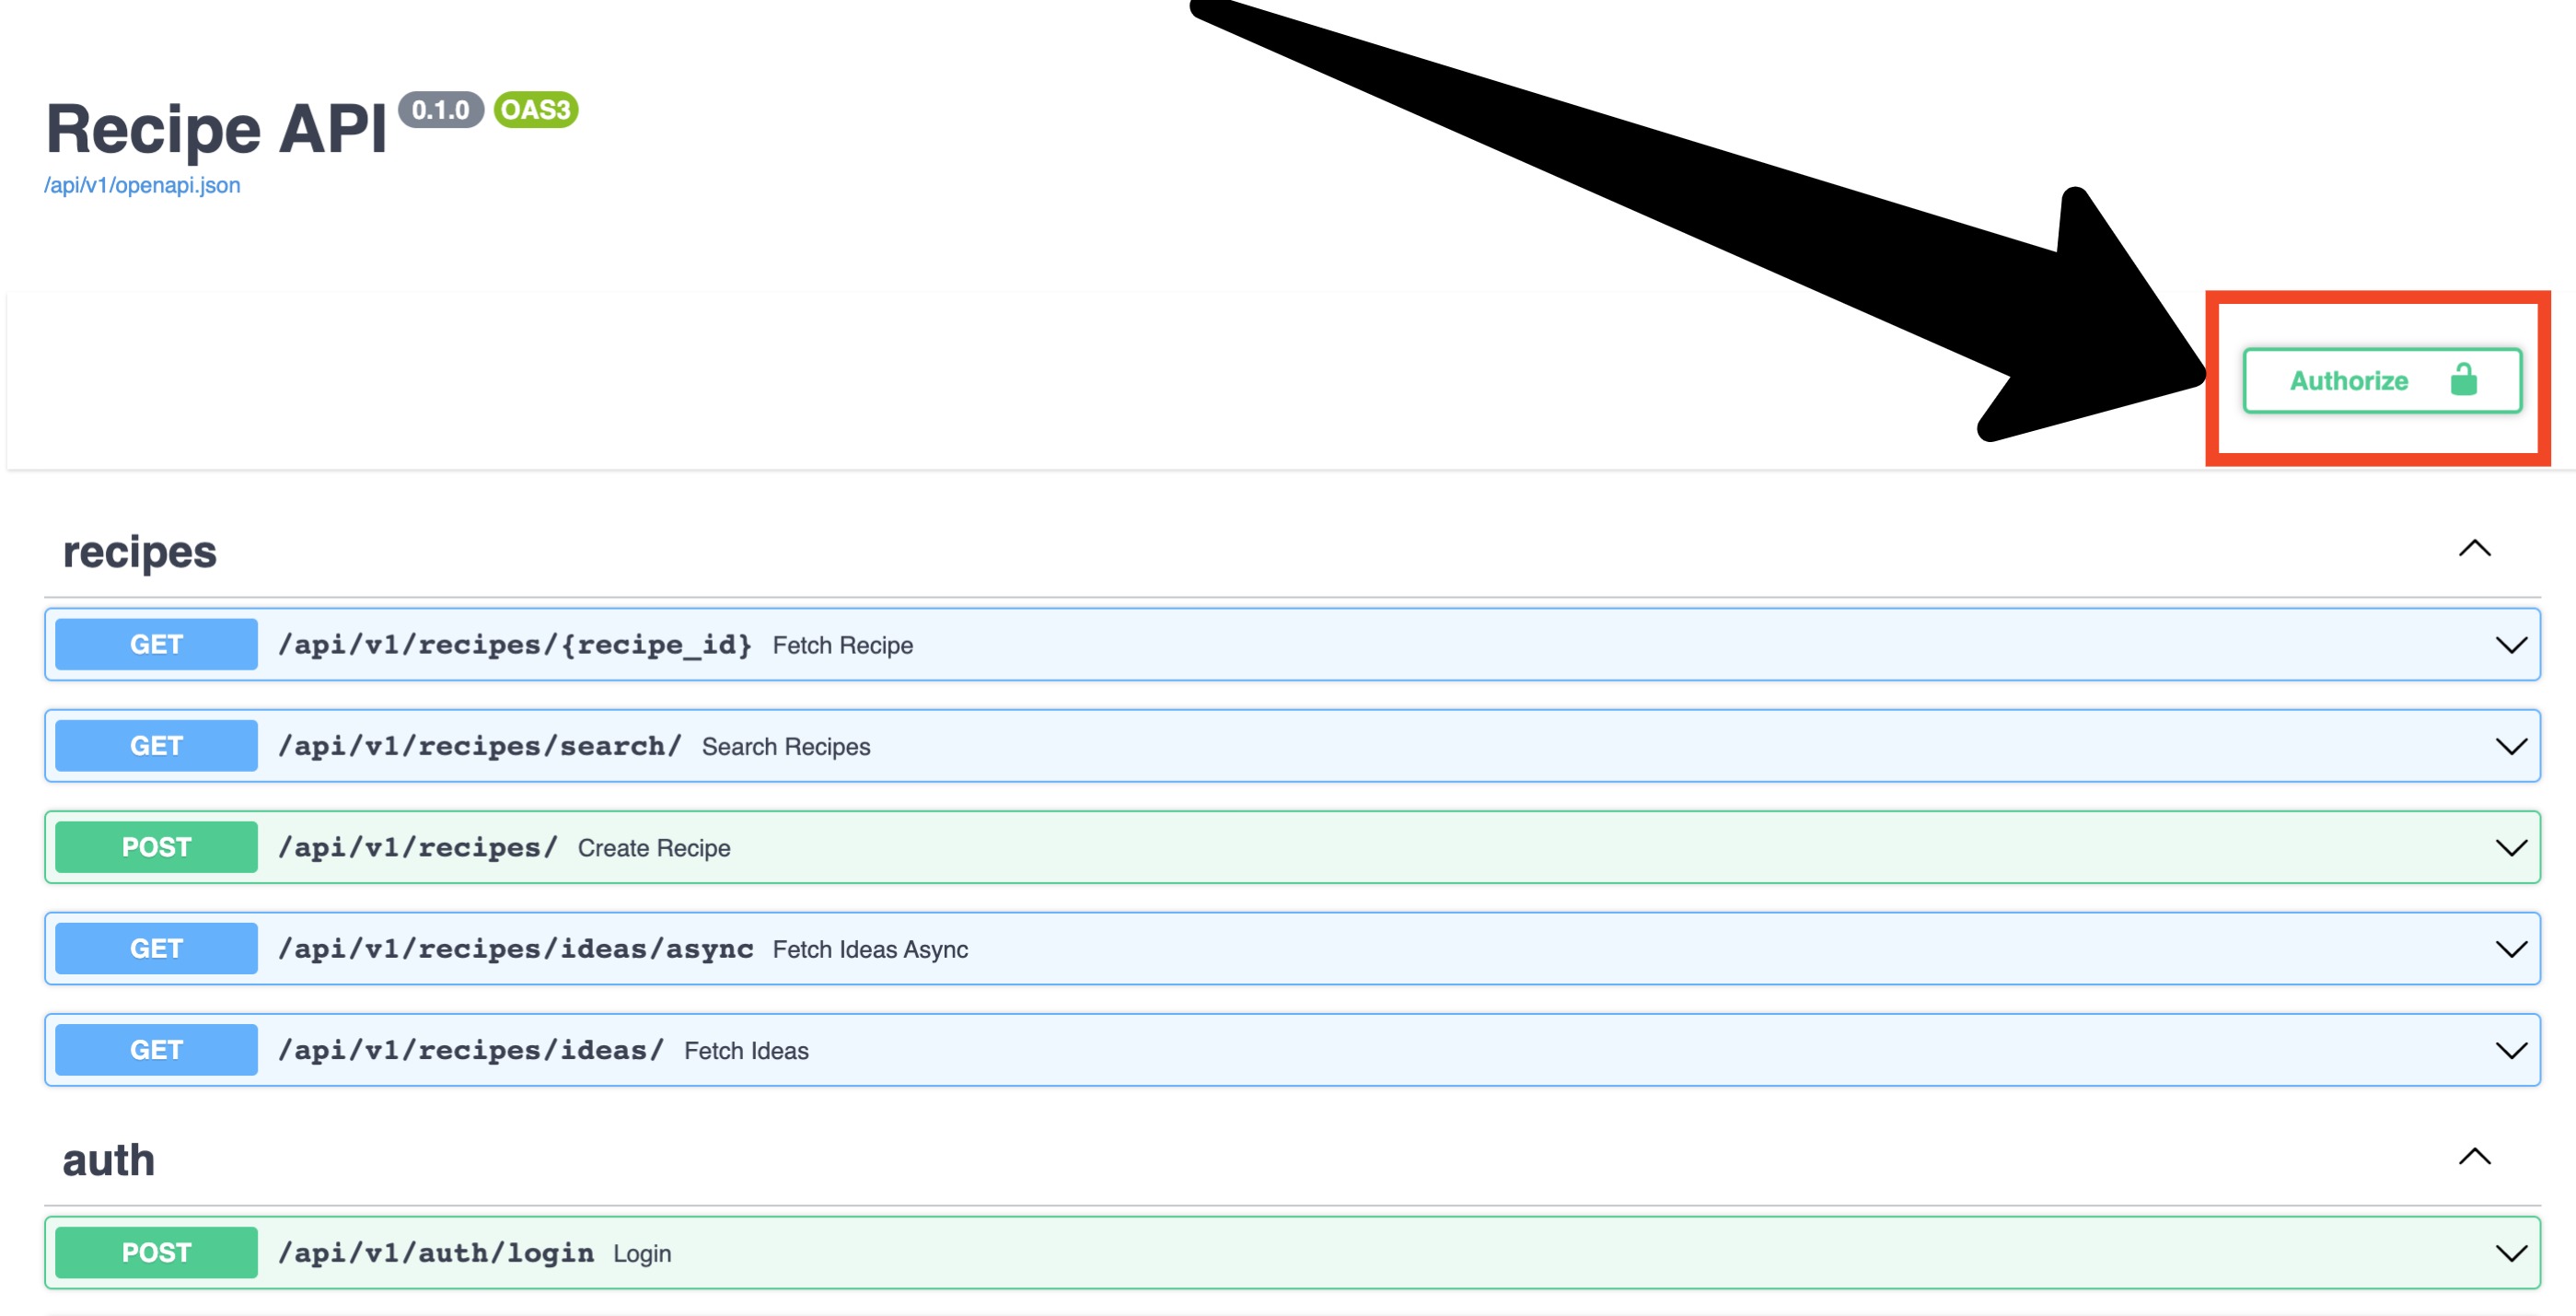
Next, we’ll make use of a useful swagger interactive UI feature to Authorize a user. Click on the Authorize
button in the top right:
Enter the credentials (note you should enter the email address in the username field) then click “Authorize”:
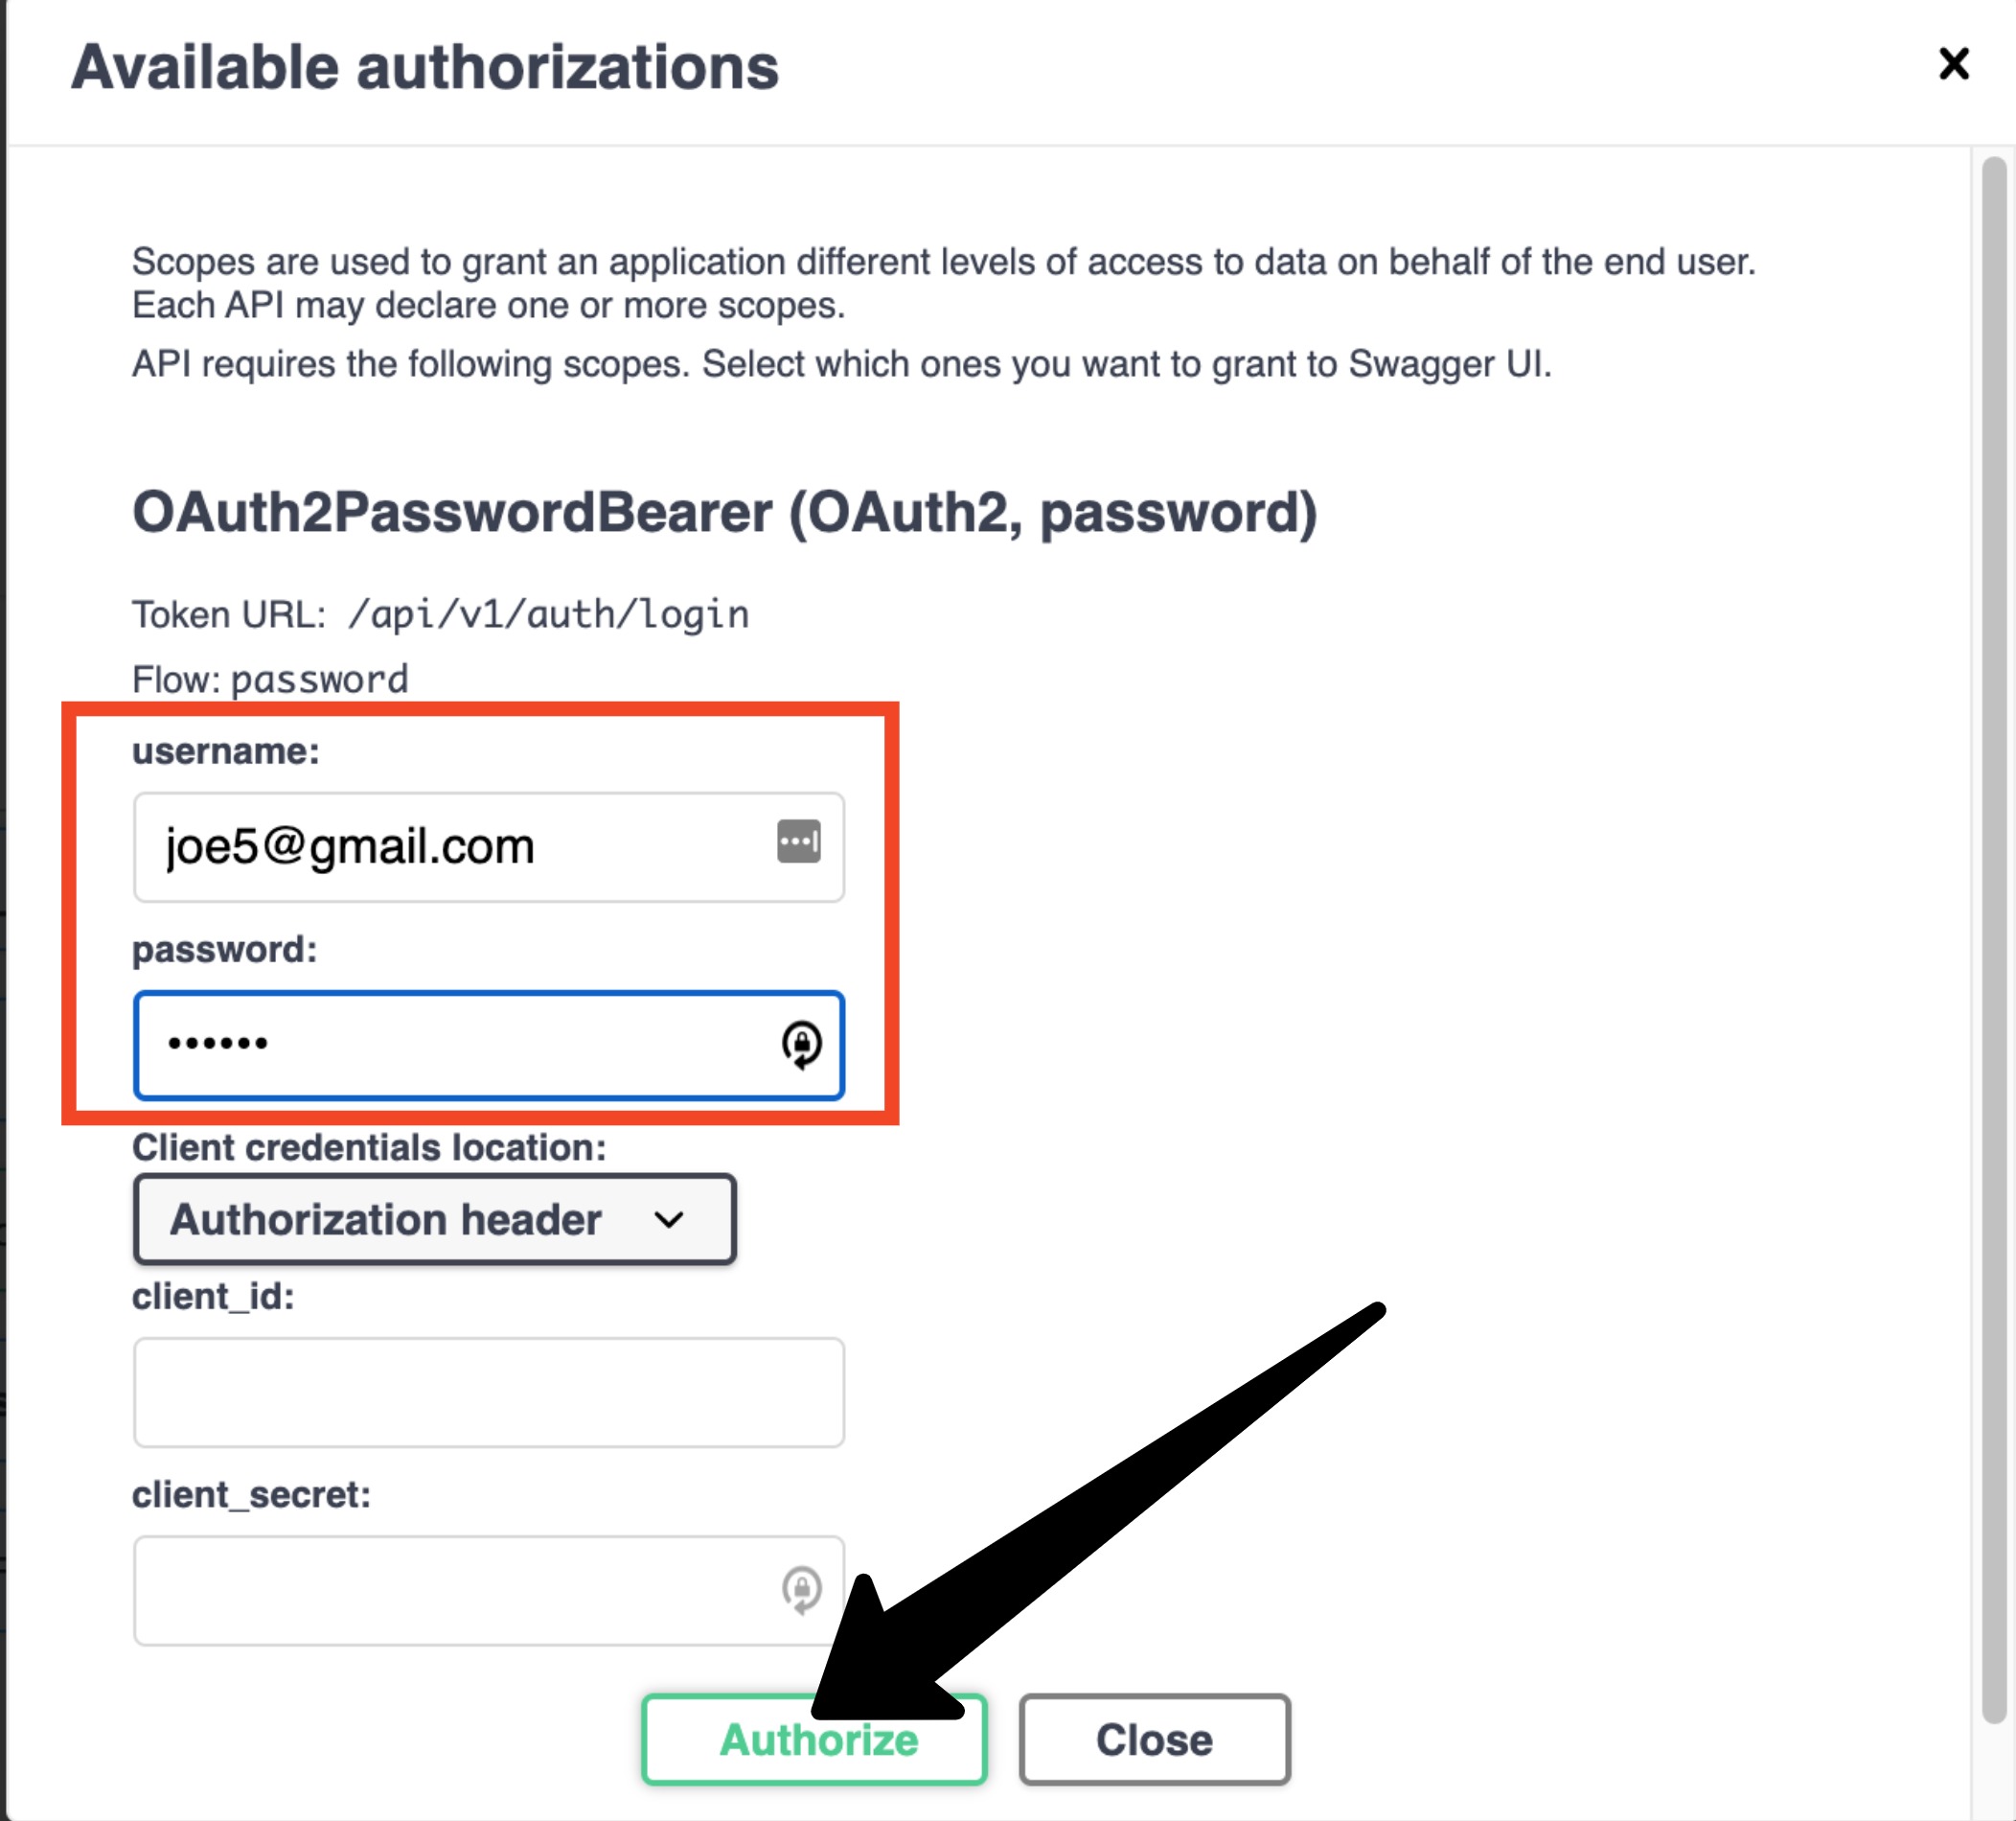
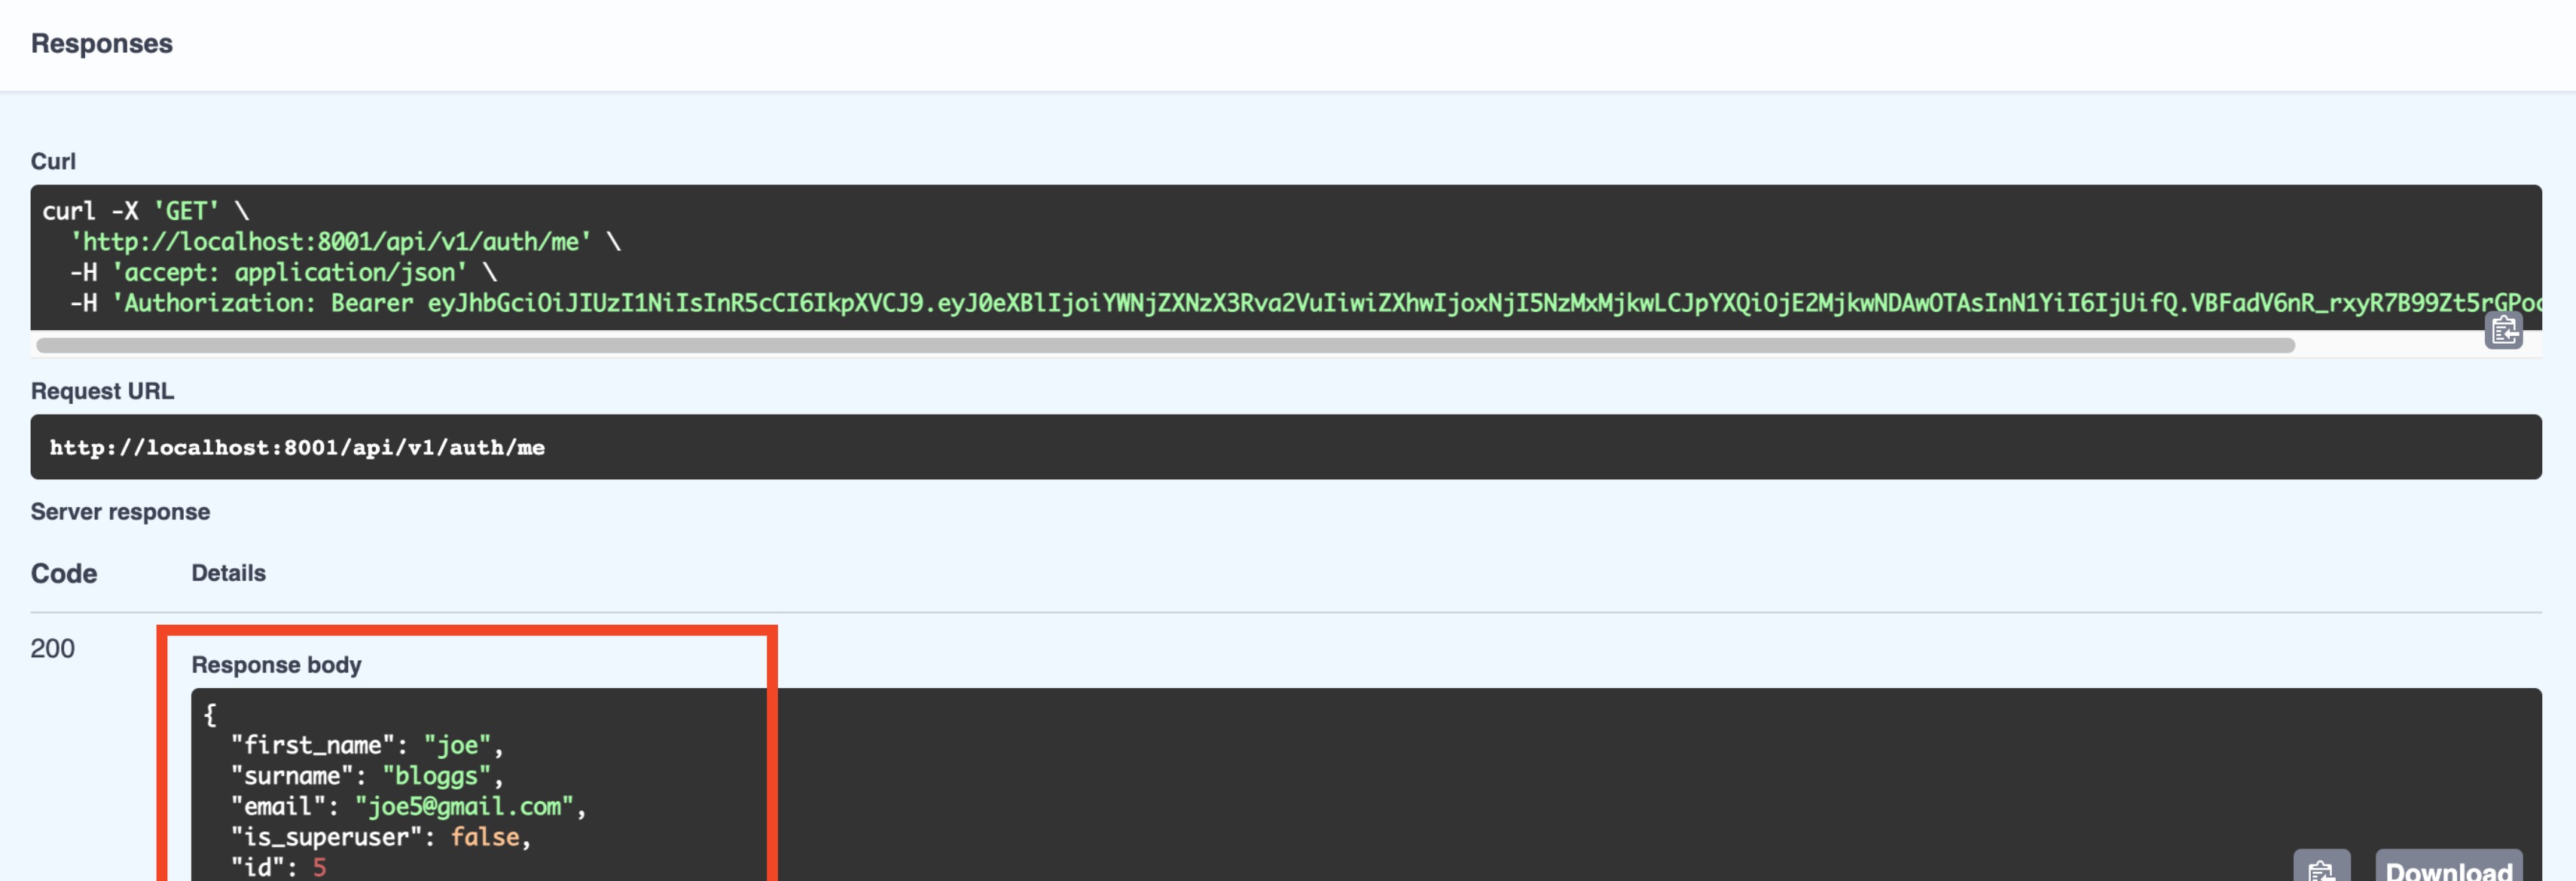
You should see that you are logged in. Now if you try the api/v1/auth/me endpoint again, you should get a 200
response with the user details in the response body:
Congrats! You now have basic auth working in your FastAPI application!
There are many more complicated features we could add like:
- Using scopes for authorization
- Refresh tokens
- Password resets
- Single Sign On (SSO)
- Adding custom data to the JWT payload
- JSON Web Encryption
We’ll be looking at all of this later in the tutorial series in the advanced part.
Continue Learning FastAPI
Next we’re going to consolidate what we’ve learned in a post on dependency injection: Part 11: Dependency Injection and FastAPI Depends